Machine generation of PDF files the easy way – part III

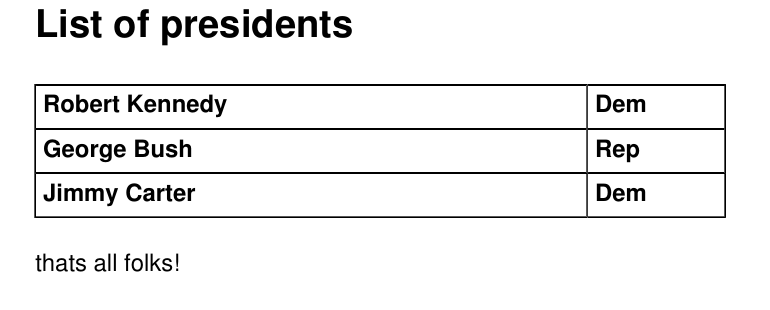
This third example will extend upon my XSL-FO script to convert the list into more of a table. The result will generate a form and will look like this.

data3 What I find to be really well done in XSL-FO and pretty useful is that it is possible to actually create tables that are formed from cells. What happens is that you create a table out of cells and decide which of these cells should have borders.

The change for this example is to turn the list output into a small table with borders. The additional xslt “code” for a table is pretty low. The following example is all you need to create a tiny table with one row of two cells.

<fo:table table-layout="fixed" width="60%">
  <fo:table-column column-width="proportional-column-width(80)" />
  <fo:table-column column-width="proportional-column-width(20)" />
    <fo:table-body>

    <fo:table-row >
      <fo:table-cell >
        <fo:block> value of cell 1, row 1 </fo:block>
      </fo:table-cell >
      <fo:table-cell  >
        <fo:block> value of cell 2, row 1 </fo:block>
      </fo:table-cell >
    </fo:table-row >
    </fo:table-body>
</fo:table>

When taken on its own this is really easy to take in. Simply define a table and the number of columns are necessary. Once that is done then it is just a matter of adding the actual rows full of data.

The table tag describes just how big (wide) our table will be . The attribute width on the table tag is using a relative width. This is defining the width to be equal to 60% if the width of our region body. This is a really flexible method if it is possible that the layout is likely to change during development.

The table-column tags essentially describes how wide each cell will be. The proportional-column-width attribute is also relative. This is proportioning our table with simple ratios. This may not be good enough when absolute dimensions are mandatory but for most forms this is a convenient trade off.

This example, although simple, would become quite tedious if you had to write the code for each row. The trick is to split up this table and row code into each of our templates so when the form is processed this is done for us automatically.

This is especially easy to do for the data file that we are using. Simply define the table layout somewhere before the person template is called and finish the table layout after all of the “people” are processed. In my case, the table definition is in the region body and the rows is for each person.

Region body

        <fo:flow flow-name="xsl-region-body">

          <fo:block font-size="16pt" font-weight="bold" space-after="5mm">List of <xsl:value-of select="/xmlroottag/listtype"/>
          </fo:block>

          <fo:block font-size="10pt">

              <fo:table table-layout="fixed" width="60%">
                  <fo:table-column column-width="proportional-column-width(80)" />
                  <fo:table-column column-width="proportional-column-width(20)" />
                  <fo:table-body>

                     <xsl:apply-templates />

                  </fo:table-body>
              </fo:table>


          <fo:block space-before="5mm">
                thats all folks!
          </fo:block>

          </fo:block>
        </fo:flow>

Person template

<xsl:template match="person">
    <fo:table-row >
       <fo:table-cell font-weight="bold" border-collapse="collapse" border-style="solid" border-width=".1mm" text-align="left" padding="1mm" >
           <fo:block>
           <xsl:value-of select="first"/>
           <xsl:value-of select="last"/>
           </fo:block>
       </fo:table-cell >
       <fo:table-cell font-weight="bold" border-collapse="collapse" border-style="solid" border-width=".1mm" text-align="left" padding="1mm" >
           <fo:block>
           <xsl:value-of select="party"/>
           </fo:block>
       </fo:table-cell >
    </fo:table-row >
</xsl:template>

This example works well because the of how homogeneous our data is. The data and xslt document was created with this structure in mind. It will perfectly process a list of data and prior to the list it will display a description about the list.

This is basically all the information that is necessary in order to create a simple form. The form itself would not be all that sophisticated as this is really only adding a few lines. The next set of changes provides the changes to create labels with small captions over them.


Download source and pdf for this example

The next set of changes for this can be found in part IV.

Posted in programming | Tagged , , , | Comments Off on Machine generation of PDF files the easy way – part III

Machine generation of PDF files the easy way – part II

In my previous article, I went through the basics of what tools would be necessary to use Apache FOP to create PDF files.

In this second example will extend upon my XSL-FO script to add a header and footer to the output. The final result will generate this header and footer on all pages of the report and will look like this.

data2

The original example has been pretty much the simplest possible case. Every page is just one big rectangle and each time that a person record shows up it will be output. It is actually magically simple. If there were hundreds of names, then they will be displayed and as they approach the defined margin it would automatically break to the next page.

In the previous article, I mentioned that the report definition only contained the report body. I didn’t actually mention other things that it could have included. The two new things that are included in this example contain is both the region-before and the region-after sections. These are used for adding a header and footer to the report.

       +---------------------------------------+
       |              region-before            |
       +---------------------------------------+
       |   |                               |   |
       | r |                               |   |
       | e |                               | r |
       | g |                               | e |
       | i |                               | g |
       | o |                               | i |
       | n |          region-body          | o |
       | - |                               | n |
       | s |                               | - |
       | t |                               | e |
       | a |                               | n |
       | r |                               | d |
       | t |                               |   |
       |   |                               |   |
       +---------------------------------------+
       |              region-after             |
       +---------------------------------------+

It is important to remember that this mock up (above) is excluding the page margins. The 2cm page margins defined by the page would be within the region-body.  It is also possible any or all of these four other regions also have a margin.

Adding the header/footer is as simple as adding these two “regions” to the definition at the same location as the definition of the region-body.

          <fo:region-body margin-top="1cm" margin-bottom="1cm"/>
          <fo:region-before region-name="myHeader" extent="2.0cm"/>
          <fo:region-after region-name="myFooter" extent="1.5cm"/>

The actual definition of what we would expect to see in in our header and footer regions is defined in the page-sequence along with the region body.

        <fo:static-content flow-name="myFooter">
          <fo:block font-family="Helvetica" text-align="left" font-size="7pt" color="black">
          __________________________________________________________________________________________________________________________________
          </fo:block>
          <fo:block font-family="Helvetica" text-align="left" font-size="7pt" color="gray">
		We deliver the most interesting data which can be considered almost factual.
          </fo:block>
        </fo:static-content>

This example shows what the footer should look like and it will be used in the region after portion of the page as was described in with the rest of the simple-page-master.

This could actually be simpler, it is not necessary to define every attribute on every block. It would have been sufficient to define the font-family on the block for the entire footer and within that have one or more blocks with varying attributes for the lines that are displayed.

One additional change to the xslt form in general was how the listtype value was retrieved from the data. This time rather than specifying the entire hard coded path, I simply pluck the value when I am processing that particular field.

This only works because when designing the xslt I knew that the listtype field would exist once in my input and it would be located just prior to my list data. If this field happened to be in my datafile after my person data my list header would incorrectly show up after my list.

Download source and pdf for this example

The next set of changes for this can be found in part III.

Posted in programming | Tagged , , , | Comments Off on Machine generation of PDF files the easy way – part II

Machine generation of PDF files the easy way – part I

The tools

In order to reproduce this work you will need to download Apache FOP and have a recent version of Java on your computer.

https://xmlgraphics.apache.org/fop/download.html

Page layout

There are a number of books that spend hundreds of pages to describe how to create the XSL-FO formatting files. I can only give a brief overview and try to describe a few examples to help bend XSL-FO to your will.

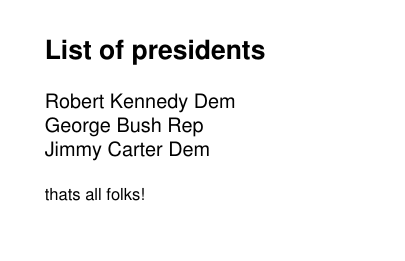
The first example will be taking a few names and creating a PDF file that is a list of these names. This is a snapshot from the actual output from step #1.data1There is no point in display the entire page here as it is only partially filled. It can be downloaded at the bottom of this post for the truly curious.

The actual layout for generating a single page PDF file using A4 as the page size and 2cm margins. In addition to the physical page definition, there are a lot of tags that appear to deal with formatting.

ie.

<fo:block font_size="16pt" font-weight="bold">
(other stuff here)

</fo:block>

The formatting

The formatting in the xslt file in a lot of cases is pretty obvious. Virtually every tag contains one more attributes. One of the nice things about the xslt is that the names chosen by the W3C are actually quite meaningful as are most of the attributes.

<fo:block
font-size=”16pt”
font-weight=”bold”
space-after=”5mm”>
List of
<xsl:value-of select=”/xmlroottag/listtype”/>
</fo:block>

It may or may not seem obvious but not every attribute can be used on every tag.  An obvious example of this is margins. Page layout is anything that relates to the physical size. It is the definition of how part of the document will look on with respect to the output page (body, heading or footer) The block could be considered a scope or style that lets you define the basic format for everything within that paragraph or block.

As not every tag has the same sets of attributes so it can be difficult to know which tags have which attributes. I suggest that you find either a good reference book. A book is nicer as you can slide printouts of specific code in between the pages to clarify any points or show examples of special functionality.

I was surprised that really none of the xslt books that cover XSL-FO received good reviews. I think this is because this is a really dense material and it is difficult to easily convey. I happened to purchase a book from O’Reilly which I used to help supplement other examples and information received from the internet.

Making XML Look Good in Print

The actual xslt layout that creates my PDF is listed below.

<?xml version="1.0" encoding="UTF-8"?>
<xsl:stylesheet version="1.1" xmlns:xsl="http://www.w3.org/1999/XSL/Transform" xmlns:fo="http://www.w3.org/1999/XSL/Format" exclude-result-prefixes="fo">
<xsl:template match="xmlroottag">
    <fo:root xmlns:fo="http://www.w3.org/1999/XSL/Format">
      <fo:layout-master-set>
        <fo:simple-page-master master-name="simpleA4" page-height="29.7cm" page-width="21cm" margin-top="2cm" margin-bottom="2cm" margin-left="2cm" margin-right="2cm">
          <fo:region-body/>
        </fo:simple-page-master>
      </fo:layout-master-set>

      <fo:page-sequence master-reference="simpleA4">
        <fo:flow flow-name="xsl-region-body">

          <fo:block font-size="16pt" font-weight="bold" space-after="5mm">
              List of <xsl:value-of select="/xmlroottag/listtype"/>
          </fo:block>

          <fo:block font-size="10pt">

              <xsl:apply-templates />

          <fo:block space-before="5mm">
                thats all folks!
          </fo:block>

          </fo:block>
        </fo:flow>
      </fo:page-sequence>
     </fo:root>
</xsl:template>

<xsl:template match="person">
     <fo:block font-size="12pt" >
         <xsl:value-of select="first"/>
         <xsl:value-of select="last"/>
         <xsl:value-of select="party"/>
     </fo:block>
</xsl:template>

<xsl:template match="listtype">
</xsl:template>

</xsl:stylesheet>

The data file is listed here so you can see the structure of the xml.

<xmlroottag>                                                                                                            
   <listtype>presidents </listtype>                                                                                     
   <person>                                                                                                             
      <first> Robert </first>                                                                                           
      <last> Kennedy </last>                                                                                            
      <party> Dem </party>                                                                                              
   </person>                                                                                                            
   <person>                                                                                                             
      <first> George </first>                                                                                           
      <last> Bush </last>                                                                                               
      <party> Rep </party>                                                                                              
   </person>                                                                                                            
   <person>                                                                                                             
      <first> Jimmy </first>                                                                                            
      <last> Carter </last>                                                                                             
      <party> Dem </party>                                                                                              
   </person>                                                                                                            
</xmlroottag>                               

The xslt document does contain a single stylesheet which is essentially a collection of templates that you need or want to generate specific output. The person template (lines 33-40) when executed will extract the first, last and party fields from the xml data, yet I am getting a bit ahead of myself.

The form matches up with the starting at the template for the xmlroottag which starts matching with the data at element xmlroottag of our xml data file. This xsl template (lines 3-31) defines how the pages will be formatted (lines 5 – 9). All pages will just be a collection of simple A4 sized pages with border of 2cm on each side.

It is on line 7 that the defines the body of the document. This body is actually described in lines 11 – 26. The region body is where the xslt starts to actually process the data file and as the data is matched it is then output into the body of our document.

The first thing that is done in our document body is to retrieve the “listtype” tag. I am pulling in the value form the listtype field from the data file into the document. You can see that it is possible to pull in a value from the data by giving the exact location of the data. This obviously only works due to the nature of this field existing in that particular location. If the structure of the file changes or the root tag name changes, then this data won’t be found nor will the form actually create any meaningful output. The way that this is done is neither elegant nor flexible and it will be corrected in the future examples.

One of the most innocuous lines is the apply-templates at line 21 . This is essentially asking FOP to simply perform any of the templates that are defined if they happen to match that same structure in the data file. Fop will encounter the tag listtype and execute that template, which in this case doesn’t do anything. The next tags in the data file are the three different person blocks.

This person template will be executed three times, once for each of the tag in the data file. When it is executed it will extract that data and output it into our document body.

After the last person tag is processed there is no more of the data file left, and thus control resumes in the region body on line 22. This just changes the formatting and outputs a bit of constant text.

Most of the xslt file is taken up with some of the more boilerplate parts of the code (ie page layout) with only a few lines being used to process the xml data. In the rest of my examples I will be using this single page layout using the simple-page-master. However, it is possible to create different layouts for even pages, odd pages, blank pages, first page, or last page. If you want to do anything really creative using XSL-FO you will have to investigate specifically for that point.

Making the PDF

It is possible to include the merging of the xml data and xslt inside of a Java program but for right now, I will simply run the command line program “fop” with its parameters to generate the form. This will allow us to produce the output that we desire.

fop -xml data1.xml -xsl data1.xsl -pdf data1.pdf

This command simply creates the data1.pdf file from the data1.xml and data1.xsl source files.

Note: This assumes that fop exists in your path, otherwise you will need to give the fully qualified name to the fop executable.

The next set of changes for this can be found in part II.

Download source and pdf for this example


Posted in programming | Tagged , , , | Comments Off on Machine generation of PDF files the easy way – part I

Machine generation of PDF files the easy way

In the beginning, personal computers were not quite so friendly and not all users really enjoyed working with them in that pre-windowed state. In that sense, windows from Microsoft was really an advancement as it provided a easy to use interface to utilize the power of the computer.

The power of the computer allowed more than just text. It also allowed for the formatting and beautifying of documents. With word processing, you could see almost exactly what the final result would look like. The fonts and other markup was immediately visible and that gave a real advantage to the average user. No longer did you need a professional who could do desktop publishing to create a nice looking lost pet flyer.

Yet, pretty early on everyone noticed that what you see is what you get is only guaranteed if you happen to look at the document on the exact same computer, when you looked at the same document using the same program on an almost identical second computer sometimes the layouts were not quite the same as the source machine.

Adobe cracked this nut with their portable document format, PDF, and rather than trying to keep it a proprietary standard they released it as an open standard in 1993. To help with the acceptance, they also offer for free their own PDF file viewer.

This format provided the ability to generate a file on one machine or platform and have it accurately reproduced everywhere it was opened. For casual uses, it is perfect. It is possible to create documents that anyone can look at and nobody can modify. The document can be printed on any other machines with perfect reproduction.

This is pretty neat, but after a few decades this is old hat. It is possible to download dozens of tools for free that can create or modify PDF’s.

There are toolkits that can be used to generate PDF files but one of the neatest in my opinion is the one provided by Apache.

Apache Formatting objects processor (FOP)

This is just one implementation of the world wide web consortium’s Extensible Stylesheet Language Formatting Objects or XSL-FO. Apache FOP is simply a print formatter driven by XSL-FO and an independent output formatter.

I use this technology in a lot of cases where either I need to produce PDF files or want to provide nice to look at output. The supported output formats for Apache FOP are PDF, Postscript, PCL, and AFP.

The XSL-FO solution is a well thought out decomposition where the format is stored in an XSLT file while the actual data to be formatted is stored in an XML file. The two are processed together to generate the final output.

I will be producing a number of different posts showing how to take a very small data file and how to create a PDF file showing off that list of data. I will then expand the solution to show how XSL-FO can be expanded to create really professional looking documents.

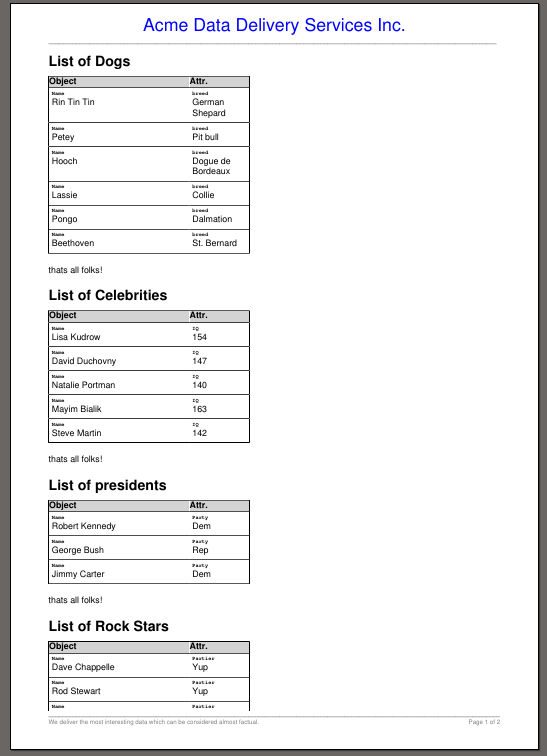
The final PDF report file will look like this.

data7

It all begins with the page layout.

Posted in programming | Tagged , , , | Comments Off on Machine generation of PDF files the easy way

safe(r) and private browsing using more cpu cycles

“You are never going to amount to a thing”

Whoever said that was apparently under-estimating just how valuable that companies in general and the internet in particular find you.

The web companies want to know what you have been up to, I am NOT paranoid while the bricks and mortar companies want to get a picture of your for their files in Big brother is watching (you buy underwear).

It is pretty much impossible to not have a footprint that can be bought, sold or tracked by anyone who is really interested in you.  The closest you could come to that would be to live in a tent or a shack in the backwoods while not owning any device with a microprocessor and only purchase things with cash.

That would be hard and frankly rather a dull life.  Yet, it is possible to make it harder for search engines and web sites to know consistently what things are interesting to you.

It is possible to change your browser settings to remove all cookies after each close, or to do all of your browsing in a private or incognito window.   The cookies provide plenty of information so deleting them is actually not a bad start but there are a few other methods that can be done as well.

Deleting cookies and installing privacy tools is good, but what would be more secure than knowing that any virus or malware that you may have encountered since your last browsing session is removed.

This service could be performed by any number of solutions, not limited to

  • re-installing your operating system each day
  • booting from a live boot dvd
  • browsing from a virtual machine

The first option is obviously ridiculous even if it were possible by the majority of people who surf on the internet.  The second option is actually not a bad solution the only problem is that not only cookies and malware are gone on each boot but also every little configuration option starting with screen resolution and ending with your special  tools or browsers.

Browsing from a virtual machine

This is a pretty good option as new personal computers sold today have a lot of disk space and may also have a big processor with a oodles of ram as well.

With a virtual machine it is possible to install your favorite Windows operating system or Linux distribution.  Furthermore once the operating system has been installed it can be configured to have any and all unique programs or setup.

Yet a virtual machine is not a magic.  It would still be vulnerable to malware or viruses that would be there on the next boot and any cookies or other tracking agents would still be there as well.

The magic comes in because it is possible to have a “reference” or “template” virtual machine that you setup to be perfectly aligned with your desires, but then you make a copy of it and use the copy each time you wish to browse the internet.

This provides both a machine that is perfectly setup but because it is a temporary copy, it will be deleted (optimally for the) next start up.

VMWare Workstation

I hope to write up a similar guide for VirtualBox and perhaps VMPlayer in the near future but as I happen to have an older version of VMWare workstation my first discussion on this topic will be using VMWare.

VMWare workstation is a pretty nice program for virtualizing those old operating systems that cannot be retired because you cannot afford the new version of the software.  It might be a useful solution if the printer drivers (as an example) are not available for the new OS.

One day I might do a nice in depth review of what VMWare offers but today it is only important to know that VMWare can allow another operating system simultaneously on your PC.

Up until now, I never really bothered with a virtualized machine for browsing because VMWare Workstation has all of its machines in a single tabbed pane. This makes it a bit inconvenient to switch between multiple virtual machines and your host operating system. (more later about how to get around that limitation)

Creating a machine

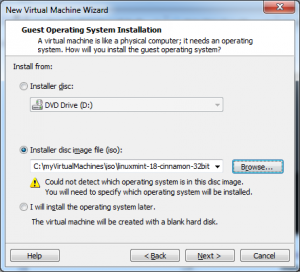
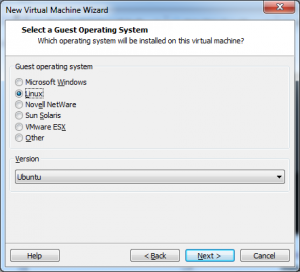
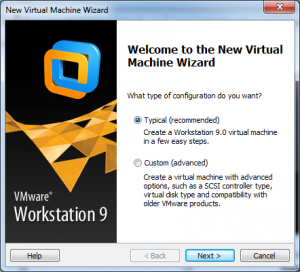
I am not going to discuss each option for setting up a machine as my version of this software is a bit out of date (version 9 versus the current 12.5).  If you have installed an operating system on a PC you will find VMWare to be reasonably similar.  Simply boot up the new machine with your operating system (or ISO file) attached.
create-vm-step1 create-vm-step2

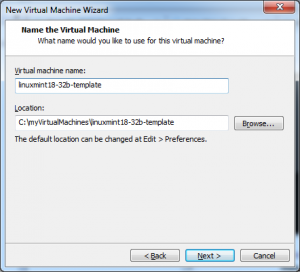
create-vm-step3 create-vm-step4

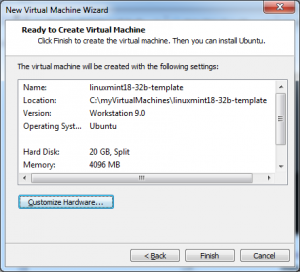
create-vm-step5 create-vm-step6

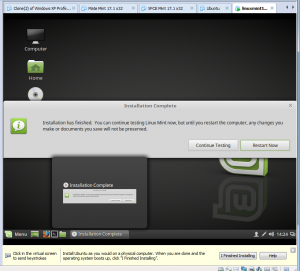
I have called my new virtual machine linux18-32b-template, and have installed Linux Mint 18 32bit version.  I personally like Linux but this same technique will work for windows installations as well.

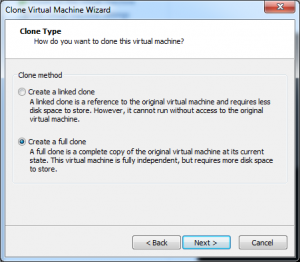
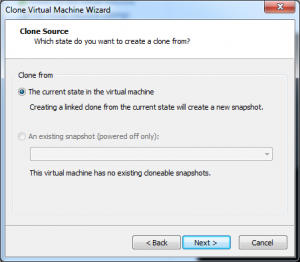
The only other manual step that needs to be performed is to select clone from the VMWare application to create our first copy or clone of our template machine.  (VM -> Manage -> Clone)
clone-vm-step1 clone-vm-step2

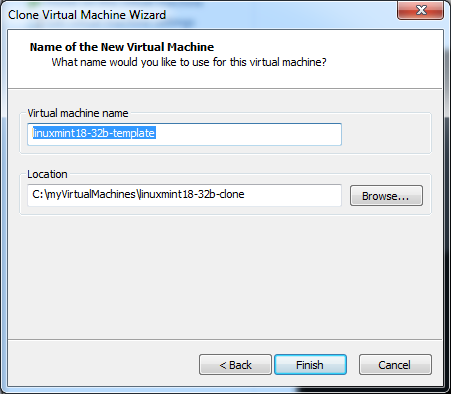
The first two steps are just verifying that we want a full copy of the current state of our virtual machine.  Step three actually doesn’t do more than give our new clone a name as well as to decide where it will be located

Note: It is important that you use a different directory for the clone.
clone-vm-step3
I could have, and perhaps, should have used a new name or better name for my virtual machine in case I ever choose to run it from the VMWare application.

By using the clone function, VMWare will do all of the hard work to make sure that the virtual machine is consistently named and all of those tiny little parameters or directory settings are properly changed.

vmware-machine-file-listing

The last step is actually the easiest.  Simply create a small batch file to copy the disk drive images from the template machine to the clone machine.

@echo off
cd /d c:\myVirtualMachines
set DST=linuxmint18-32b-clone
set SRC=linuxmint18-32b-template

echo copying files

copy %SRC%\linuxmint18-32b-template-s001.vmdk %DST%\linuxmint18-32b-template-cl1-s001.vmdk
copy %SRC%\linuxmint18-32b-template-s002.vmdk %DST%\linuxmint18-32b-template-cl1-s002.vmdk
copy %SRC%\linuxmint18-32b-template-s003.vmdk %DST%\linuxmint18-32b-template-cl1-s003.vmdk
copy %SRC%\linuxmint18-32b-template-s004.vmdk %DST%\linuxmint18-32b-template-cl1-s004.vmdk
copy %SRC%\linuxmint18-32b-template-s005.vmdk %DST%\linuxmint18-32b-template-cl1-s005.vmdk
copy %SRC%\linuxmint18-32b-template-s006.vmdk %DST%\linuxmint18-32b-template-cl1-s006.vmdk
copy %SRC%\linuxmint18-32b-template-s007.vmdk %DST%\linuxmint18-32b-template-cl1-s007.vmdk
copy %SRC%\linuxmint18-32b-template-s008.vmdk %DST%\linuxmint18-32b-template-cl1-s008.vmdk
copy %SRC%\linuxmint18-32b-template-s009.vmdk %DST%\linuxmint18-32b-template-cl1-s009.vmdk
copy %SRC%\linuxmint18-32b-template-s010.vmdk %DST%\linuxmint18-32b-template-cl1-s010.vmdk
copy %SRC%\linuxmint18-32b-template-s011.vmdk %DST%\linuxmint18-32b-template-cl1-s011.vmdk

"\Program Files (x86)\VMware\VMware Workstation\vmware.exe" -x -n -q %DST%\linuxmint18-32b-template.vmx

The number of disk image files and the names of the images may vary.  You may actually only have a single large file if you choose to create your disk image at a single file when creating your virtual machine.

Also, with some very careful machine creation it might have been able to have the same names for my disk images in both my template and my cloned virtual machines.

** warning **

Not every file that contains a vmdk extension seems to be part of the disk images. In my case there was one additional file that appeared to be part of the disk drives.

linuxmint18-32b-template.vmdk

This file actually is a configuration file for the disk images describing their size as well as well as the disk names.  If you accidentally copy this file as well, then you will be telling VMWare the names of the original disk files (ie linuxmint18-32b-template-s001.vmdk ) but in the location of the cloned machine (ie linuxmint18-32b-template-cl1-s001.vmdk).

So this makes it impossible to simply copy all files with the extension of vmdk from the reference directory to the cloned directory.

The last line of my batch file simply tells VMWare Workstation to start up and to run the machine pointed to by the configuration file.

"\Program Files (x86)\VMware\VMware Workstation\vmware.exe" -x -n -q %DST%\linuxmint18-32b-template.vmx

The three parameters that VMWare will accept are so interesting that they should receive their own special description.

Parameter value Description
-x Run the machine named
-n Open up machine in new window
-q Quit application when machine is shutdown
-X Run the machine named but full screen.

Now that this batch file has been created, it is possible to put a shortcut for this file on the desktop.  This way it will really convenient to start our browsing virtual machine.  Simply double click on this batch file to start up a separate window running the virtual machine.  Obviously you should try and run this batch file if already have this machine running.

The downside

The downside is not too terribly great but should be mentioned for full disclosure.  It is important that periodically you run the template VM image and install any security updates.  This might be operating system, application patches or even virus software updates.

Periodically, you might want to set up some more defaults for your browsing convenience. This might be some standard web pages that you visit often or even new browser plugins.  This is not difficult but somewhat inconvenient to have to setup permanent configuration in a separate virtual machine.

These two situations are not difficult but may prove one reason for anyone not paranoid about his/her security to decide against implementing this more secure browsing solution.
Posted in Soapbox | Tagged , , | Comments Off on safe(r) and private browsing using more cpu cycles

bridging the gap to excel – unoconv tool

Some time back a customer asked that I provide my estimated hours every week.  I kept track of all my hours in a simple text file which is ok for reminding yourself of what happened but not so professional when dealing with customers.

I guess as a software developer everything is a programming problem.  I entered my hours in a reglar format so I could extract them for later processing.  The data is a small table with several columns with one for each task and one row for each day.

Initially was worried that I might have to read up on what the format of a Microsoft Excel file is but during my search I discovered that there is an open source tool unoconv.

This tool is used for converting between different document formats ranging from doc and bmp to html and tiff.

unoconv --show
The following list of document formats are currently available:

  bib      - BibTeX [.bib]
  doc      - Microsoft Word 97/2000/XP [.doc]
  doc6     - Microsoft Word 6.0 [.doc]                                                                                               
  doc95    - Microsoft Word 95 [.doc]                                                                                                
  docbook  - DocBook [.xml]                                                                                                          
  docx     - Microsoft Office Open XML [.docx]                                                                                       
  docx7    - Microsoft Office Open XML [.docx]                                                                                       
  fodt     - OpenDocument Text (Flat XML) [.fodt]                                                                                    
  html     - HTML Document (OpenOffice.org Writer) [.html]
  latex    - LaTeX 2e [.ltx]
  mediawiki - MediaWiki [.txt]
  odt      - ODF Text Document [.odt]
  ooxml    - Microsoft Office Open XML [.xml]
  ott      - Open Document Text [.ott]
  pdb      - AportisDoc (Palm) [.pdb]
  pdf      - Portable Document Format [.pdf]
  psw      - Pocket Word [.psw]
  rtf      - Rich Text Format [.rtf]
  sdw      - StarWriter 5.0 [.sdw]
  sdw4     - StarWriter 4.0 [.sdw]
  sdw3     - StarWriter 3.0 [.sdw]
  stw      - Open Office.org 1.0 Text Document Template [.stw]
  sxw      - Open Office.org 1.0 Text Document [.sxw]
  text     - Text Encoded [.txt]
  txt      - Text [.txt]
  uot      - Unified Office Format text [.uot]
  vor      - StarWriter 5.0 Template [.vor]
  vor4     - StarWriter 4.0 Template [.vor]
  vor3     - StarWriter 3.0 Template [.vor]
  wps      - Microsoft Works [.wps]
  xhtml    - XHTML Document [.html]

The following list of graphics formats are currently available:

  bmp      - Windows Bitmap [.bmp]
  emf      - Enhanced Metafile [.emf]
  eps      - Encapsulated PostScript [.eps]
  fodg     - OpenDocument Drawing (Flat XML) [.fodg]
  gif      - Graphics Interchange Format [.gif]
  html     - HTML Document (OpenOffice.org Draw) [.html]
  jpg      - Joint Photographic Experts Group [.jpg]
  met      - OS/2 Metafile [.met]
  odd      - OpenDocument Drawing [.odd]
  otg      - OpenDocument Drawing Template [.otg]
  pbm      - Portable Bitmap [.pbm]
  pct      - Mac Pict [.pct]
  pdf      - Portable Document Format [.pdf]
  pgm      - Portable Graymap [.pgm]
  png      - Portable Network Graphic [.png]
  ppm      - Portable Pixelmap [.ppm]
  ras      - Sun Raster Image [.ras]
  std      - OpenOffice.org 1.0 Drawing Template [.std]
  svg      - Scalable Vector Graphics [.svg]
  svm      - StarView Metafile [.svm]
  swf      - Macromedia Flash (SWF) [.swf]
  sxd      - OpenOffice.org 1.0 Drawing [.sxd]
  sxd3     - StarDraw 3.0 [.sxd]
  sxd5     - StarDraw 5.0 [.sxd]
  sxw      - StarOffice XML (Draw) [.sxw]
  tiff     - Tagged Image File Format [.tiff]
  vor      - StarDraw 5.0 Template [.vor]
  vor3     - StarDraw 3.0 Template [.vor]
  wmf      - Windows Metafile [.wmf]
  xhtml    - XHTML [.xhtml]
  xpm      - X PixMap [.xpm]

The following list of presentation formats are currently available:

  bmp      - Windows Bitmap [.bmp]
  emf      - Enhanced Metafile [.emf]
  eps      - Encapsulated PostScript [.eps]
  fodp     - OpenDocument Presentation (Flat XML) [.fodp]
  gif      - Graphics Interchange Format [.gif]
  html     - HTML Document (OpenOffice.org Impress) [.html]
  jpg      - Joint Photographic Experts Group [.jpg]
  met      - OS/2 Metafile [.met]
  odg      - ODF Drawing (Impress) [.odg]
  odp      - ODF Presentation [.odp]
  otp      - ODF Presentation Template [.otp]
  pbm      - Portable Bitmap [.pbm]
  pct      - Mac Pict [.pct]
  pdf      - Portable Document Format [.pdf]
  pgm      - Portable Graymap [.pgm]
  png      - Portable Network Graphic [.png]
  potm     - Microsoft PowerPoint 2007/2010 XML Template [.potm]
  pot      - Microsoft PowerPoint 97/2000/XP Template [.pot]
  ppm      - Portable Pixelmap [.ppm]
  pptx     - Microsoft PowerPoint 2007/2010 XML [.pptx]
  pps      - Microsoft PowerPoint 97/2000/XP (Autoplay) [.pps]
  ppt      - Microsoft PowerPoint 97/2000/XP [.ppt]
  pwp      - PlaceWare [.pwp]
  ras      - Sun Raster Image [.ras]
  sda      - StarDraw 5.0 (OpenOffice.org Impress) [.sda]
  sdd      - StarImpress 5.0 [.sdd]
  sdd3     - StarDraw 3.0 (OpenOffice.org Impress) [.sdd]
  sdd4     - StarImpress 4.0 [.sdd]
  sxd      - OpenOffice.org 1.0 Drawing (OpenOffice.org Impress) [.sxd]
  sti      - OpenOffice.org 1.0 Presentation Template [.sti]
  svg      - Scalable Vector Graphics [.svg]
  svm      - StarView Metafile [.svm]
  swf      - Macromedia Flash (SWF) [.swf]
  sxi      - OpenOffice.org 1.0 Presentation [.sxi]
  tiff     - Tagged Image File Format [.tiff]
  uop      - Unified Office Format presentation [.uop]
  vor      - StarImpress 5.0 Template [.vor]
  vor3     - StarDraw 3.0 Template (OpenOffice.org Impress) [.vor]
  vor4     - StarImpress 4.0 Template [.vor]
  vor5     - StarDraw 5.0 Template (OpenOffice.org Impress) [.vor]
  wmf      - Windows Metafile [.wmf]
  xhtml    - XHTML [.xml]
  xpm      - X PixMap [.xpm]

The following list of spreadsheet formats are currently available:

  csv      - Text CSV [.csv]
  dbf      - dBASE [.dbf]
  dif      - Data Interchange Format [.dif]
  fods     - OpenDocument Spreadsheet (Flat XML) [.fods]
  html     - HTML Document (OpenOffice.org Calc) [.html]
  ods      - ODF Spreadsheet [.ods]
  ooxml    - Microsoft Excel 2003 XML [.xml]
  ots      - ODF Spreadsheet Template [.ots]
  pdf      - Portable Document Format [.pdf]
  pxl      - Pocket Excel [.pxl]
  sdc      - StarCalc 5.0 [.sdc]
  sdc4     - StarCalc 4.0 [.sdc]
  sdc3     - StarCalc 3.0 [.sdc]
  slk      - SYLK [.slk]
  stc      - OpenOffice.org 1.0 Spreadsheet Template [.stc]
  sxc      - OpenOffice.org 1.0 Spreadsheet [.sxc]
  uos      - Unified Office Format spreadsheet [.uos]
  vor3     - StarCalc 3.0 Template [.vor]
  vor4     - StarCalc 4.0 Template [.vor]
  vor      - StarCalc 5.0 Template [.vor]
  xhtml    - XHTML [.xhtml]
  xls      - Microsoft Excel 97/2000/XP [.xls]
  xls5     - Microsoft Excel 5.0 [.xls]
  xls95    - Microsoft Excel 95 [.xls]
  xlt      - Microsoft Excel 97/2000/XP Template [.xlt]
  xlt5     - Microsoft Excel 5.0 Template [.xlt]
  xlt95    - Microsoft Excel 95 Template [.xlt]
  xlsx     - Microsoft Excel 2007/2010 XML [.xlsx]

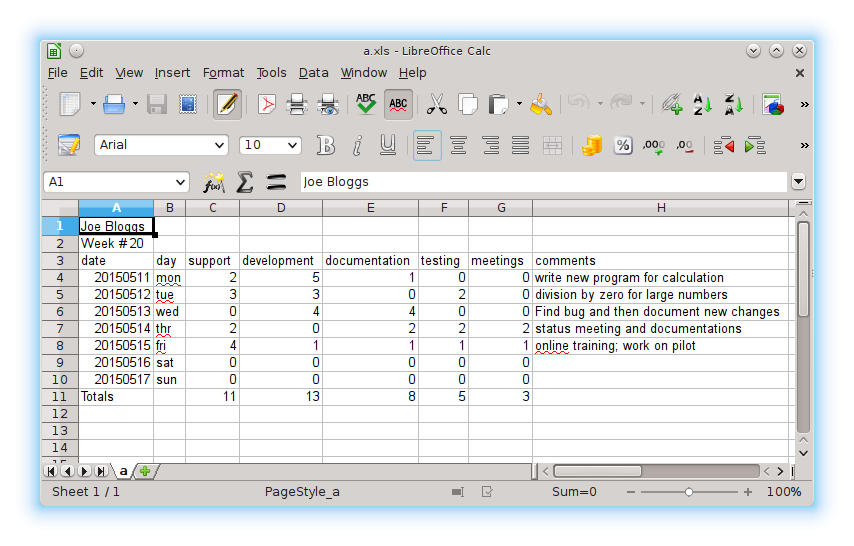
My extracted data is pretty much what you would expect for csv data – in the USA.

Joe Bloggs
Week # 20
date,day,support,development,documentation,testing,meetings,comments
20150511,mon,2,5,1,0,0,write new program for calculation
20150512,tue,3,3,0,2,0,division by zero for large numbers
20150513,wed,0,4,4,0,0,Find bug and then document new changes
20150514,thr,2,0,2,2,2,status meeting and documentations
20150515,fri,4,1,1,1,1,online training; work on pilot
20150516,sat,0,0,0,0,0,
20150517,sun,0,0,0,0,0,
Totals, ,11,13,8,5,3,


In the USA csv files are comma separate files, but this isn’t the case in other lands where the comma is used as the decimal separator. I could not find out how to convert semicolon delimited files.  This wasn’t a problem for me, especially since this was just a temporary internal file on the way to the xls file.

So my particular task of converting a csv file into an excel spreadsheet is obviously not challenging this program at all but the it is really neat that I can create a ubiquitous xls format without any real effort at all.

Unfortunately this utility is a command line utility so it may be less friendly for those less comfortable with the command line.

unoconv -f <output format> <input file>

unoconv  -f  xls  week17.csv

unoconv-samplexls

However there is one little thing that you do need to keep in mind, it is not possible to run this tool at the same time that open office / libre office is running.  If you do then you will see the following message.

Error: Unable to connect or start own listener. Aborting.

The unoconv utility is common in many linux repositories but it is also available for windows.

https://github.com/dagwieers/unoconv/releases


Posted in Command line | Comments Off on bridging the gap to excel – unoconv tool

fun with XML – JAXB and arrays

In part I of my JAXB example I briefly described some of the annotations required to turn normal Java objects into XML files with JAXB.

To expand on the xml examples from my previous post, I will be taking a number of small java objects and load them into an array. What makes this interesting is that the number of XML objects is not known nor all that important when loading or saving.

<?xml version="1.0" encoding="UTF-8" standalone="yes"?>
<Library>
    <Publication>
        <Author>Robert Heinlein</Author>
        <Title>Have spacesuit will travel</Title>
        <Price>15.99</Price>
        <Isbn>095524347</Isbn>
    </Publication>
    
     ...

    <Publication>
        <Author>Robert Heinlein</Author>
        <Title>Stranger in a strange land</Title>
        <Price>15.99</Price>
        <Isbn>0123123123</Isbn>
    </Publication>
</Library>

Actually, there isn’t really all that much more that needs to be explained.  The marshal and unmarshal methods converts between xml and plain old java objects.  There is one slight difference.

The top level class is annotated with the @XmlRootElement annotation, then its value is represented as XML element in an XML document.  The actual subobjects or subelements cannot have this tag.

The bookcollection is the top class which is just an array of books which in this case is essentially the primitive.

In my example, the bookcollection is perhaps not a clean separation between the actual xml object and the methods that use it.  All of the methods that are part of this class are not necessary.  The only important part of the class is the following lines.

package de.companyname.complex;

import javax.xml.bind.annotation.*;
import org.apache.log4j.Logger;

@XmlRootElement(name="Library")
@XmlAccessorType(XmlAccessType.FIELD)

public class bookcollection {

	@XmlElement(name="Publication")
	private book[] cardcatalog;

	...

The example is pretty straight forward to understand.  It loads the xml data and dumps it to the console.

Posted in programming | Tagged , | Comments Off on fun with XML – JAXB and arrays

fun with XML – a JAXB example

Full disclosure, I am not J2EE expert so my descriptions may be a bit off.  However, using JAXB is just to powerful to ignore.  The first part of this topic is pretty basic, while the second part is a bit more interesting.

When xml started to become an interesting format  for data files and configuration files I didn’t really see the interest.  It is a very verbose format that is a pain in the neck to parse through with your own code.

Of course when my colleague recommended to get with the program and use SAX to parse through these files I gave it a shot.  For simple files it was ok for the complex formats it was indeed a pain.

	<?xml version="1.0" encoding="UTF-8" standalone="yes"?>
	<Magazine>
		<Year>2016</Year>
		<Month>6</Month>
		<Title>Economist</Title>
		<Price>9.99</Price>
	</Magazine>

Sax is the simple API for XML which lets you evaluate various elements while parsing through the through XML documents.  If you need to parse through the XML picking up information as you go it may be right for you.  The SAX parser is just retrieving the data notifying you when interesting events occur.

SAX isn’t bad but it does have its limitations it isn’t just a case of programmer laziness.  Not only that the limitations of SAX are not trivial.

  • No random access to the structure
  • The entire xml structure is not loaded
  • You need to write your own code for storing the data

One of the other solutions that was developed to help with dealing with XML files is JAXB. JAXB stands for Java architecture for XML binding.  This API is used to convert XML data to java objects and java objects to XML data.

The converting between XML and Java objects is done by marshaling and unmarshaling.

Name Description
Marshal The process of transforming the representation of an object in one format to another object format suitable for storage or processing.
UnMarshal The reverse process of converting the object format back into its original data format.

However the marshaling/unmarshaling cannot be done without some providing some hints in our code. These hints are in the form of the following annotations.

Annotation Description
@XmlRootElement(name=”name here”) This defines the name of the root element of the XML file.
@XmlElement (name=”name here”) This defines the connection between the variable in the java class and the element name in the XML structure.
@XmlAccessorType (XmlAccessType.FIELD) When this annotation is used in this manner we don’t need to annotate the getter and setter methods for each field.
@XmlElementWrapper (name= “name here”) It generates a wrapper element around XML representation

Simple Example

The first example is basically how to load a simple xml file into a java object.

The XML file looks like this.

	<?xml version="1.0" encoding="UTF-8" standalone="yes"?>
 	<Magazine>
		<Year>2016</Year>
		<Month>6</Month>
		<Title>Economist</Title>
		<Price>9.99</Price>
	</Magazine>

This is a rather silly example, what might be much more meaningful would be a xml configuration file that contains a lot of settings for some sort of interface or system.

The actual code below is actually more complex that you might see for loading the “magazine” object.  The methods dump, load and save would probably be methods in your actual program and would not necessarily be in this class.

The annotation  @XmlRootElement is what creates the “Magazine” opening and closing tags for the file while the @XmlElement annotations marks each field for our XML structure.

The only real work that does happen is indeed in the save and load methods.  We create either a marshaller or unmarshaller depending on whether we are trying to get the values from an xml file (unmarshaller) or write out our java object into an xml file (marshaller)

There is really not a lot of code to review, we create a JAXB context and then create the necessary marshaller.

Computers don’t need all of that fancy formatting in order to parse through their data or source code for that matter.  The formatting is done for the humans involved as it is easier to see a nicely formatted xml structure than the following.

<?xml version=”1.0″ encoding=”UTF-8″ standalone=”yes”?><Magazine><Year>2016</Year><Month>6</Month><Title>Economist</Title><Price>9.99</Price></Magazine>

JAXB provides for this case as well.  If we simply tell our marshaller we want formatted output, the output will be formatted into the xml magazine structure with all of the indenting.

This is done by simply setting the JAXB_FORMATTED_OUTPUT property and is commented in the code.

The only method that isn’t so clearly defined is the dump method.  To be honest, it is exactly like the save method but rather than writing the data to a file it is just sent to standard out / console.

package de.companyname.simple;

/*
 * 
 * example for writing a simple xml file
 * 
 */

import java.io.File;

@XmlRootElement(name="Magazine")
@XmlAccessorType(XmlAccessType.FIELD)
public class magazine {

	// Microsoft Exchange values 
	@XmlElement(name="Year")
	private  int year; 

	@XmlElement(name="Month")
	private  int month; 

	@XmlElement(name="Title")
	private   String title; 

	@XmlElement(name="Price")
	private   double price;

	public magazine()
	{
	}
	public magazine(int year, int month, String title, double price)
	{
		this.year = year;
		this.month = month;
		this.title = title;
		this.price = price;
	}

    public int getYear()
    {
    	return year;
    }
    public void setYear(int value)
    {
    	this.year= value;
    }
    
    public int getMonth()
    {
    	return month;
    }
    public void setMonth(int value)
    {
    	this.month= value;
    }
    
    public String getTitle()
    {
    	return title;
    }
    public void setTitle(String value)
    {
    	this.title = value;
    }
    
    public double getPrice()
    {
    	return price;
    }
    public void setPrice(double value)
    {
    	this.price = value;
    }
    
    public void dump()
    {    	
    	JAXBContext jc = null;
    	try {
        	jc = JAXBContext.newInstance(magazine.class);
	    }
    	catch (JAXBException ex)
    	{
		// TODO Auto-generated catch block
		ex.printStackTrace();
    	}
        
        Marshaller marshaller;
	try {
		marshaller = jc.createMarshaller();

                // tell marshaller to format the data for humans
		marshaller.setProperty(Marshaller.JAXB_FORMATTED_OUTPUT, true);
		marshaller.marshal(this, System.out);
	} 
	catch (JAXBException ex) 
	{
		// TODO Auto-generated catch block
		ex.printStackTrace();
	}
    }
    
    public magazine load(String filename)
    {
    	magazine loaded = new magazine();
    	
    	JAXBContext jc = null;
    	try {
        	jc = JAXBContext.newInstance(magazine.class);
	        Unmarshaller unmarshaller = jc.createUnmarshaller();
	        File xml = new File(filename);
	        loaded = (magazine) unmarshaller.unmarshal(xml);
	}
    	catch (JAXBException ex)
    	{
		// TODO Auto-generated catch block
		ex.printStackTrace();
    	}
    	
    	return loaded;
    }
    
    public void save(String filename)
    {
    	
       	JAXBContext jc = null;
    	try {
        	jc = JAXBContext.newInstance(magazine.class);
	    }
    	catch (JAXBException ex)
    	{
		// TODO Auto-generated catch block
		ex.printStackTrace();
    	}

        Marshaller marshaller;
	try {
		marshaller = jc.createMarshaller();

                // tell the marshaller to format the data for humans
		marshaller.setProperty(Marshaller.JAXB_FORMATTED_OUTPUT, true);
	        
		OutputStream os = new FileOutputStream( filename );
	        marshaller.marshal( this, os );
	        os.close();
	} 
	catch (JAXBException ex) 
	{
		// TODO Auto-generated catch block
		ex.printStackTrace();
	}
	catch (FileNotFoundException ex)
	{
		// TODO Auto-generated catch block
		ex.printStackTrace();
	} catch (IOException e) {
		// TODO Auto-generated catch block
		e.printStackTrace();
	}
    }
    
    public static void main(String[] args) throws Exception 
    {
    	magazine single = new magazine ();

    	single.setTitle("Economist");
    	single.setPrice(9.99);
    	single.setYear(2016);
    	single.setMonth(6);
    	single.dump();
    	
    	single.save("first.xml");
    	
    	magazine second = single.load("first.xml");
    	second.dump();
    }
}

This example is a very convenient way to have a simple xml file and load it into a java object.  I actually do use this when creating small status files or configuration files but it really wasn’t what I was initially interested in.

What I was really interested in was the ability to load and save an indeterminate number of objects into an array.  This allows me the flexibility to add one more of my object to the list and then write it out.

In Part II of JAXB, my example will be for this exact situation.

Note: The example was compiled with java 1.7.

Posted in programming | Tagged , | Comments Off on fun with XML – a JAXB example

paranoid about smart phones

I recently went to a small speech that was being held about IoT.  I guess I think less of IoT in the marketing speech and more in the implementation.

What someone might call a smart device or IoT is what I might consider as just adding a computer to an ordinary device (running shoes, clothing, garage opener, etc) – but I am getting off topic.

It was a very interesting speech that summed up a lot of the technologies that I have heard about as well as some of the protocols that I have not.  Yet, what was more interesting was the anecdotal stories about what smart devices really can do.

A friend of mine had a smart phone that was not running one of the big two operating systems.  He was from Hungry and he downloaded a keyboard app, which presumably made the phone that much more comfortable to use.  One day he saw that this app had an upgrade – this upgrade needed access to quite a few new permissions.  These permissions were a bit non-sequitur and because it didn’t make any sense that his keyboard app has access to his contacts he simply did not install the upgrade.

Intuitively, I should have thought that the new app wanted to mine through his data and sell either it directly or amalgamate it with the other data which is sold.

From what I heard in my IoT meeting, this is the other somewhat less transparent way that these app providers are using to fund their efforts.  (Just when I thought that popup advertising was bad)

A couple of examples were given in the IoT speech.  The smart phone is a really powerful device and it includes accelerators, GPS and the ability to report back.  One company was using this additionally captured information in San Francisco as a method of tracking parking spaces.  The device can tell from a general profile when cars are parking and where they are.  This provided infrastructure for a parking assistance service.  This information isn’t really so secret but when it is obtained in the background it could be considered a bit creepy.

The second example was somewhat less clear but it about tracking the devices in a given area. This particular area was a large bank building, and by tracking the number of devices in that particular area they could estimate the number of the people who (probably) worked at the particular bank.  This is quite interesting to other investors, banks or hedge funds to determine how productive the bank is.

The cool thing for the app makes is that their terms of service or explicit listing of which functions will be available to them makes it perfectly legal.  After all, who reads all of the terms of service for every app or program?  Who can be overly distressed by knowing that your app uses the network.  Of course it does, how else can it get fresh weather data?

Perhaps it is this lack of transparency from devices or app which helps to show just how transparent we the consumer are in the internet age.  It isn’t all that encouraging to know that our devices are blabbing about our behavior and what is worse is that we are enabling them to do it.

Posted in Soapbox | Tagged | 1 Comment

making more than jar files with Ant

In a previous post, making jar files with Ant,  I briefly covered the creation of a Ant script that would compile the Java source files and then create jar file from them.

It was a really neat example of how with less than 100 lines of script ant can compile the source, create a zip file from the source, create a jar and even include the source files in the jar file (optionally).

This is possible due to the powerful list of (over 150) tasks that are available to your scripts.  This list ranges from the more common tasks like

  • copy files or directories
  • delete a file or directory
  • make directory
  • zip / unzip
  • tar / untar
  • fix operating system line endings
  • auto incrementing build number
  • secure copy
  • clearcase access tool
  • cvs access tool

This is just a small list of what is available.  If the list of tasks doesn’t contain what you need you can either execute any system command.  It is also possible to extend Ant with new tasks but I won’t be getting into that right now.

Creating a package

It is beyond the scope of this blog entry to cover the creation of something really interesting like creating a Debian or Red Hat Package but Ant could probably do it.

One of the IT groups that I have worked with in the past had their own custom package installation system.  It was really just a zip file with one of the files containing the inventory of files in the package as well as which types of operations should be done as part of the install.

The package installer then read the inventory file and proceeded to copy, delete and in general install files to their machine.  The actual format of their package is irrelevant for this example, however, below is a similar style of how we used Ant to build our packages for that client.

	<target name="package" depends="jarfile,srcfile" description="prepare for release">
		<echo>"preparing ..."</echo>
 
step 1		<!-- create a temp directory with name of our package -->
		<mkdir dir="${packagename}"/>
 
		<!-- fill it with all sorts of program goodness -->

step2		<!-- contents of our "static" files-->
		<copy todir="${packagename}/${packagename}" verbose="No" preservelastmodified="Yes">
			<fileset dir="${package.dir}" includes="**" />
		</copy>
 
step 3		<!-- contents of other libraries -->
		<copy todir="${packagename}/${packagename}/lib" verbose="No" preservelastmodified="Yes">
			<fileset dir="${lib.dir}" includes="**" />
		</copy>
 
step 4		<!-- copy our program -->
		<copy file="${build.dir}/${jarname}.jar" todir="${packagename}/${packagename}/lib" verbose="No" preservelastmodified="Yes"/>

step 5		<!-- turn it into a zip file -->
		<zip zipfile="${build.dir}/${packagename}.zip" basedir="${packagename}" 
			includes="**">
		</zip>
 
step 6		<!-- turn it into a tar file -->
		<tar compression="gzip" destfile="${build.dir}/${zipfile}-${version.num}.tar.gz">
			<tarfileset dir="${packagename}" >
				<include name="**" /> 
			</tarfileset>
		</tar>
 
step 7		<!-- clean up after ourselves -->
		<delete dir="${packagename}"/>
	</target>

The actual ant tasks and their comment should actually be enough, but just in case I have summarized each step in the following table.


Step Description
1. Create a temporary directory using the name of the package.
2. Copy all files from my directory that contained some of the more static package files into the temporary directory.  This directory contains any other configuration or data files.
3. Copy all libraries from the lib directory into the temporary directory.
4. Copy our newly created java library into the temporary directory.
Note: we could have created the java library in that directory directly but that would have not been so obvious compared to the build file we have.
5. Create a zip file using the temporary directory as our source.  This will create the zip file with the same name as our package which is quite convenient.
Note: the permissions get lost on the runInterface.sh file
6. Create a gzipped tar file using the temporary directory as our source. This will create the tar file with the same name as our package which is quite convenient.
Note: the permissions get lost on the runInterface.sh file
You could get around this by running an operating system command (tar).
7. Remove the temporary directory as no longer necessary.

Below is the complete source code for a log4j2 based Hello world application.  It isn’t the program that is so interesting but how the build script, using the package generation seen above can create our zip with our program.

If you look closely at the build script you will see it includes the two log4j2 jar files in the classpath allowing us to have a runnable jar not just a normal jar.

Simply unzip the package into a directory and the scripts can be run immediately.


Note: The example was compiled with java 1.8 and uses log4j-api-2.6.2.jar and log4j-core-2.6.2.jar.

Posted in programming, Setup From Scratch | Tagged , , | Comments Off on making more than jar files with Ant