
Flashback
I wanted to buy home automation electronics, nothing really fancy just a WiFi controller for a led strip. When shopping for things like this Pay attention. I saw something that spoke about WiFi and was really quite cheap so I just bought it.
Unfortunately a number of personal issues came up and that particular project ended up on the windowsill for weeks. When I actually did get around to look at it, I would say that this particular manufacturer meant that wireless really meant radio frequency with a remote control.
Eventually I did make the determination that this device although pretty wasn’t going to work as I wanted. I only wanted to be able to control the lights in the children’s room from my computer, perhaps dim them once everyone is asleep and turn them off before I go to bed.
One of my friends loves technical bits and bobs and suggested that I simply purchase another devices that would do what I wanted. This was actually good advice but didn’t want to end up with another white elephant.
A number of the devices were deceptively cheap but I couldn’t really guarantee they would do the job. I did see a few devices but they were essentially a two part device, a hub to control the devices and the actual device connected to the led strip.
Now
Rather than follow my friends sage advice I took a route less traveled. The new plan was build a small control board that I could add to my existing “light fixture” so it would be possible to turn on and off the led strips via WiFi.
The parts I purchased to create my control board is as follows.
| Item | Name |
|---|---|
| WiFi capable microcontroller |
Elegiant Nodemcu Lua ESP8266 ESP 12E WiFi Development Board |
| Controllable relay (ie switch) |
2 Kanal 5V Relay Relais Module for Arduino |
| Small bread board | |
| Tiny bread board | |
| Temperature sensor | |
| Development environment | The open-source Arduino Software (IDE) |
The WiFi device that I choose was not exactly an Arduino, but it was indeed a microprocessor that also had a 8266 WiFi board attached. This board can also be programmed using the Arduino IDE. Well, not without doing a small bit of configuration first.
Preparing the Arduino IDE
Unpacking the software
This actually depends on the platform that you are using and how you like to do things. I will leave this as a an exercise to the user. I happened to choose windows for this particular task as it was convenient.
I simply unpacked the IDE and added that directory to my path.
Configure the software
Once the software is unpacked or installed it is just a matter of running the IDE. All of the configuration will be done there.
In a nutshell this involves adding a new setup file into the preferences window and then using the Board Manager to install the new configuration. This was briefly described at the following site
https://github.com/esp8266/arduino#installing-with-boards-manager
The first step is to add the configuration file in our preferences (file -> preferences).
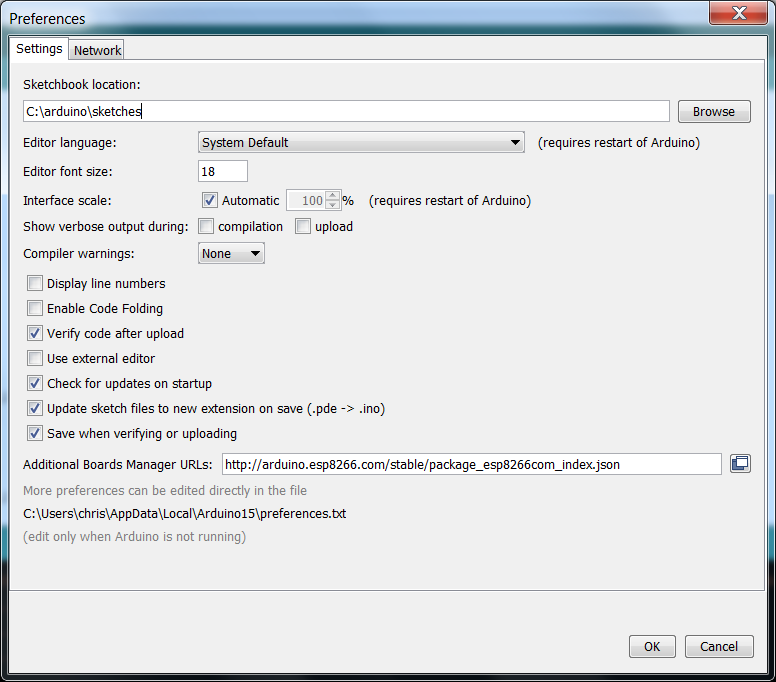
The Arduino IDE is a really nice bit of work. You simply provide a JSON configuration file which really describes where a zip file with all of the code is and which additional board entries it supports.
Simply type this same JSON link into your web browser to see this setup. This is an excellent example of how to have a relatively generic IDE and yet have it fully configurable for supporting multiple setups.
http://arduino.esp8266.com/stable/package_esp8266com_index.json
The second step, once the JSON configuration is added to the preferences, is to go into the board manager and to select the configuration you want to install ( board “tools -> arduino/genuino uno -> boards manager …” )
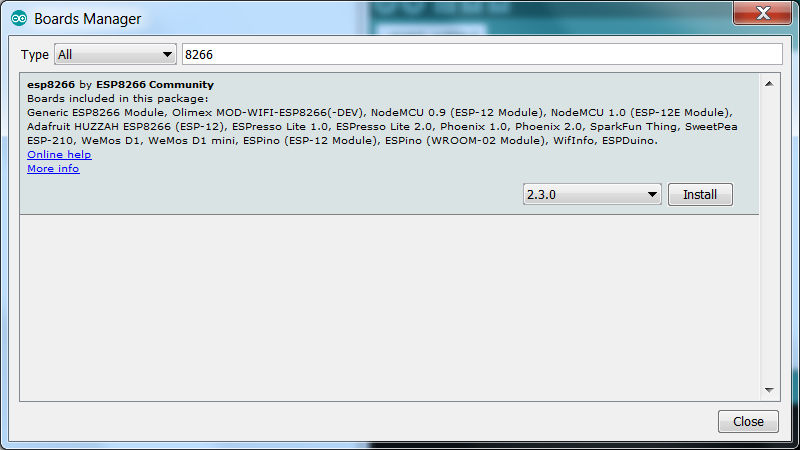
The install doesn’t actually do anything to the device itself but rather uses the JSON file to download the new configuration and libraries into the IDE.
For most people it isn’t so important where exactly the code is installed but for the curious it is not installed into the same directory as the rest of the IDE installation. The new configuration is installed underneath the AppData directory for my user.
c:\Users\ralf\AppData\Local\Arduino15\packages
I would expect there is a similar mechanism on Linux, probably a directory in the users home directory.
Baby Steps
Being unfamiliar with the ESP8266, well the Arduino as well, I thought that I should learn to walk before I run so I did the hello world of the Arduino world. This is typically some code to blink a led. The good news was that my device actually had two leds on the board, it was just a matter of finding out how to access them.
I did have some initial difficulties, this was because I didn’t have any previous experience with the Arduino, the Arduino IDE, or the ESP8266. If you look long enough on the internet you will find the answers to almost anything. I did manage to find a number of different sites with information but perhaps the best starting place is on github. They have a picture of the device, the descriptions of the pins as well as the circuit diagram.
The ESP8266 is open sourced so it is actually possible to create your own if you have the interest.
https://github.com/nodemcu/nodemcu-devkit
Although the Arduino community has a really good eco-system, I still had a few problems. I will not elaborate on most of my problems but one of them was my device was not explicitly listed in the list of board devices.
It turns out that isn’t really a big problem. I ended up using the “Adafruit huzza” which proved to be compatible with my device although it is possible that some of the other devices in the boards manager would have also worked.
Once all of the rest of the configuration has been done, simply create a new project, enter the code and compile.
Blink code
#define ESP8266_LED1 16
#define ESP8266_LED2 2

void setup()
{
  Serial.begin(74880);
  Serial.println("begin");
  pinMode(ESP8266_LED1, OUTPUT);
  pinMode(ESP8266_LED2, OUTPUT);
}

void loop()
{
  Serial.println("in loop");
  digitalWrite(ESP8266_LED1, HIGH);
  digitalWrite(ESP8266_LED2, LOW);
  delay(500);
  digitalWrite(ESP8266_LED1, LOW);
  digitalWrite(ESP8266_LED2, HIGH);
  delay(500);
}
Uploading the code to the device is just as simple as pressing a button, but it is likely that you first need to go in and set the port the Arduino should use. In my case the port had to be explicitly set. The first time that I attached the device to the laptop with a USB cord a new communication port was created, in my case com6.
The upload process doesn’t take overly long and when it finishes, it will immediately start flashing the on-board leds.
The code should be fairly obvious to an Arduino developer, however, I will clarify a few points for the uninitiated.
| code | description |
|---|---|
| Serial.begin | This configures the device to connect to the com port in order for the developer to see any output in the terminal window. The number given is the baud speed that will be used to communicate.
Note: This speed must match the speed set in your terminal window. |
| Serial.println | This will print a message to the serial port.
Note: There is a Serial.print as well that works identically but does not do a carriage return line feed. |
| pinMode | This sets the processor pin to either input or output. In my examples it will be as output but it is possible to use the pin as part of a switch setup to get input from the user.
Note: OUTPUT is defined for you in the standard include files. |
| digitalWrite | This changes the output value of the pin to either off or on.
Note: HIGH and LOW are defined for you in the standard include files. |
| delay | This is a sleep method that will cause the device to sleep for the given number of milliseconds. |
One thing that might not be intuitively obvious to the casual observer is why the baud speed of 74880 was chosen instead of the faster 115200. This stems from my earlier difficulties using these tools.
The ESP8266 E12 board actually sets the port speed to 74880 upon restart. If the terminal is set to 115200 instead, you will see some gibberish on the top of your terminal windows before the setup method of the program is called. If you use the same speed as the default of the board then you see the startup message from the device along with any of your custom messages.
This entire article thus far is not very different from the run of the mill Arduino blink project. Unfortunately the setup description took longer than I anticipated and thus the connection to the network via WiFi and controlling the device will be described in the final part, Evolution LED Lighting – software solution.
