Artificially Intelligent or Creepy

I guess it happened a few years ago when I became a bit more cognizant that those helpful computers were a bit smarter than they first seemed. Perhaps smarter isn’t the right term, perhaps intrusive. The exact incident was when I was sending an email off and had forgotten the attachment. The email service that I was using had analyzed the text and pointed out that I had forgotten the attachment that I had mentioned. Indeed it was nice to get this oversight corrected but it was a bit disconcerting, what other keywords or phrases would my email provider be looking for. Would a question about insurance bring on an avalanche of insurance spam ? What about other topics of a more personal nature? Will I start to get mails about midwives and baby supplies? Perhaps mails about switching gynecologist.

I was actually relieved so far not as not to see anything like that, well based on my emails, I don’t think that this is the case based on my browsing history. It is difficult to have no browsing history but I have tried to no longer be logged into accounts and keep as few cookies as possible. Well, imagine my surprise when I logged into a seldom used email account to see this mail.

Not really remembering what a google map timeline was I took a look and it was stroll down memory lane. This thing has been on for some time and although it doesn’t have all of my movements I can see in a lot of instances which countries, cities, addresses or businesses I have visited. If you zoom in on a specific day you can see what time you started your journey and from which location. The addresses are amazingly specific and correct, which how long you spent at or near a location and how long it took to get to the next location. If this information would be available to a criminal it would be amazing.

You can probably guess that your “victim” worked at a certain location as they seem to be spending about 8 hours a day between 8 and 6 pm during the week at that location. You can see if that work location is close or far away. If you have somehow gotten this information you might already know that this victim is someone worth robbing but this information might also clarify that. Do they eat out a lot? Do they visit expensive stores or shops? What is the best time of the day or day of the month to “visit” their home. If you were a divorce lawyer this might also look pretty interesting. Your client’s husband claims to simply work late or be out of town on business when he is actually been tracked to a specific address across town during that same frame.

https://www.openstreetmap.org/

This information might also be quite interesting as a form of corporate espionage, where did the head of global acquisitions go? We know that she deals primarily with automotive industry.

https://www.openstreetmap.org/

You might be thinking that if I am dumb enough to leave my GPS on as well as enable this feature from Google I deserve all the tracking. This would be true, especially about the enable the feature from Google but it turns out that rarely have my GPS enabled, all of this information appears to have been gathered using either wifi or tracking via the various cell towers of the mobile network.

These markedup map examples are a markup using openstreetmap.org, the actual google maps are much scarier. The google map has wonderful detail listing ATM’s, coffee shops, barbershops, and even links to the various establishments. It is possible to get address, telephone number, opening hours and more.

I really like the openstreetmaps.org site and the information that it does provide but it does pale in comparison to Google Maps.

If this is the type of tracking that can be done with just some passive cooperation I now understand now how during large government investigations are able to have a detailed list of the “criminal” and all of his or her associates as well as detailed movement prior to the crime.

Getting clear of tracking

Well, there is probably no way to be truly clear of being tracked by your cell provider, the phone OS provider or the apps themselves but it is possible to turn off a few of the most direct tracking settings.

  1. Turn off location collection on your email account.
  2. Stop collection gps and wifi information
  3. Remove old history data

1. Gmail

Log into your email account and go to the settings.

Change the location (Standortverlauf) from On to Off.

This should stop that particular email account from wanting to track you.

2. turn off tracking on your phone
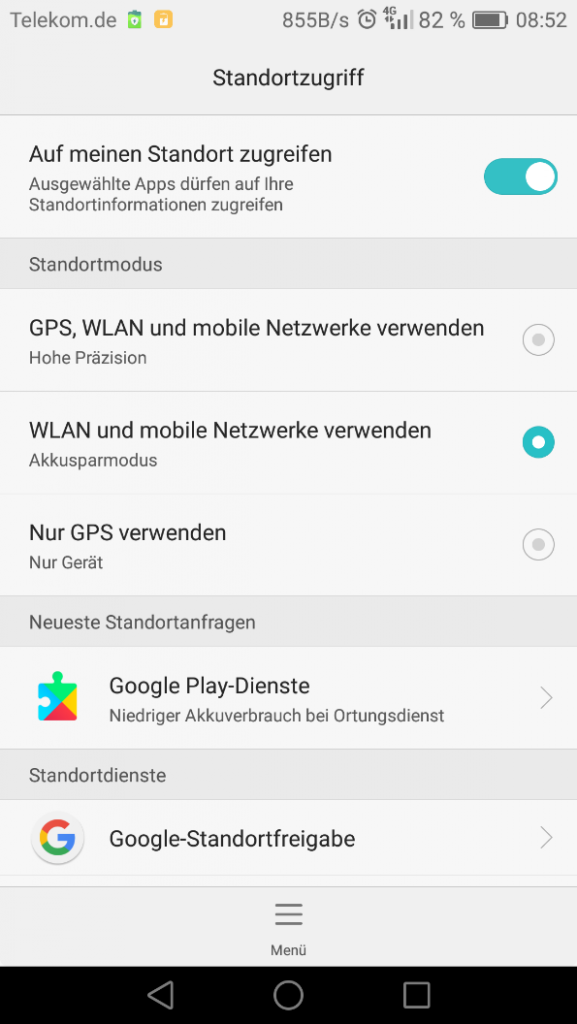
Turn off the collection of data on your smart phone (Auf meinen Standort zugreifen). This has the advantage of not tracking you and may also extend the life of your battery charge.

3. delete the history

I was quite surprised at this one. I was looking at my email account in an attempt to delete this information only to find out that does not seem to be possible. You can delete the history but to do that you need to do it on your cell phone. However, once you delete the history there your timeline as visible from your web browser no longer has any information on your previous travels.

Note: Openstreetmap.org simply provides the maps, they don’t track you and the example above was showing something similar to a Google map. Why not a google map? Well, there are other restrictions of displaying a Google map and I also do not wish to share my location data.

Posted in programming | Comments Off on Artificially Intelligent or Creepy

The great firewall of china

China apparently has a cyber wall since 1997. Who knew? Its role in internet censorship in China is to block access to selected foreign websites and to slow down cross-border internet traffic. The effect includes: limiting access to foreign information sources, blocking foreign internet tools (e.g.google search, facebook, twitter, Wikipedia and others) and mobile apps, and requiring foreign companies to adapt to domestic regulations. It also nurtures domestic companies. The great firewall was formerly operated by the SIIO since 2013 it was officially operated by the Cyberspace administration of china. Its job is to translate the Communist party of chinas will into technical specifications. The SARs* are not affected. The SARs are Hong Kong and Macau because they have their own governmental and legal systems. The word was firstly used by Geremie Barmé an Australien writer who officially wasn’t famous but many people think of him as famous.

Tell me in comments below what you think of the great firewall

Sources:https://en.wikipedia.org/wiki/Great_Firewall

*Special administrative regions

Posted in Soapbox | Tagged | Comments Off on The great firewall of china

Gatling and file variables

At the same time you might wish to replace some of the hard coded values (ie usernames and passwords) with variables as well. It is possible to create lists of values which will be used by Gatling.

These feeder lists will be iterated through with each cycle of your test and the values from that line will be used everywhere that variable name is located.

Partial Soap message

    <soapenv:Body>
       <v1:getAccountData>
          <v1:contributor>
             <v1:contributorId>k.marx</v1:contributorId>             
          </v1:contributor>
          <v1:account>
             <v1:id>${ csvAcctId }</v1:id>
             <v1:idType>acctId</v1:idType>
          </v1:account>
          <v1:keyList>
            <v1:key>keu7</v1:key>
          </v1:keyList>
       </v1:getAccountData>
    </soapenv:Body>


In this case the “${csvAcctId}” variable is filled from the data file. What makes this really powerful is that this variable can be evaluated by Gatling as part of another variable (string)

Code sample

 val zipgetscenario = scenario("zip test get ")
 .repeat(iterations) {
 feed(csv(AcctFilename).circular)
 .exec( 
 AreaObj.getAccountData
 )
 } 

This one feature is so powerful that it alone could easily be the most important and flexible feature. With a single string body and a csv file you can pass in a lot of varied messages.

In one sense, Gatling, is a similar to LoadRunner for creating load and performance tests. It is similar as you need to write a test program which is run and the analysis of the run is graphed. One difference between LoadRunner and Gatling is that Gatling uses Scala as the scripting language.

There will be people who are either pro or anti Scala but from the standpoint of creating scripts in Gatling it is the language that you use – get over it.

The it doesn’t really matter which programming language or script you use. It may take a while to become familiar with the syntax but all programming languages are to a certain degree arbitrary.

Just like any other language it is possible to create a collection of routines that can be used again and again. Unsurprisingly this is true in Gatling as well.

In my next article I will discuss how this can be done so you can create some reusable building blocks to making the testing process easier.

Posted in programming | Tagged | Comments Off on Gatling and file variables

Gatling and Scala

Gatling and the Scala that it uses has quite a bit in common with Java – in this case it is the virtual machine. The Scala code is compiled to byte code and is run on the same JVM that your Java programs run on. Yet the scala script may look a bit odd even if you are a Java programmer. There are quite a few elements that should be fairly similar once you are familiar with the syntax.

Include files

import io.gatling.core.Predef._

The format is slightly different but this is almost identical to a Java import.

import java.io.*

Scala uses a underscore for the wild character and does not require a semicolon to finish the line.

Variables

var username = “chris”;
val password = “password”;

Scala doesn’t actually force you to use actual data types but rather the variable types can be determined by the types of data that is assigned to them. The only two key words you need to remember are var for variables and val for constants. Constants are equivalent to Java variables that are of type “final”.

Methods or Functions

// our own sample function
def myimporttext2(inputval : String, requestedIQ : Integer ) : Int = {
println(inputval)
return 125
}

Although my recorded script doesn’t explicitly have any functions defined it is possible to create your own functions which can be used to perform common tasks.

This Scala example is pretty non-sensical but you can see that it is possible to create a function with multiple inputs. It is also possible to return a value from the function which could be perhaps used in a calculation. It may not be obvious but it is trivial to do such functions with all strings some of the problems may occur when you try and use other data types. This example is returning the primitive Int because it is not possible to return the data type Integer.

Not all functions look alike. It is also possible to define a small chunk of code as seen below.

More methods or functions

val accountNotFoundCheck = regex("<returnCode>1</returnCode>").exists
val returnCodeZeroCheck = regex("<returnCode>0</returnCode>").exists
val bodyFetch = bodyString.saveAs("BODY")
 
This type of function can be used when performing a check after making a rest call.  The last of these was not to do a test but to save the body of a HTTP GET but to do so in an easy way.  Below is an example of actually using these functions.
 
 exec (
 http("update account")
 .post(maintainacctservice)
 //.body(RawFileBody("xsys\\2_XSYS-UpdateAccount.xml"))
 .body(StringBody(updateaccountdataxml))
 .check(returnCodeZeroCheck)
 .check(status.is(200))
 .check(bodyFetch)
 ) 

It might not be obvious in the example code from the recorder but it is possible to do multiple checks after performing a call. Simply add as many checks as is necessary to extract all the information or for verifying correctness.

More variables

Just like java it is possible to have variables and to have constants. Yet, test scripts would either be really long or impossible to manage if you had to create every variable individually as described above. It is possible to abstract out which values need to be changed and which may need to be grouped together. One fairly obvious example might be a users login credentials. We could run all of our tests with a single user but if the test is actually retrieving information from the database our tests might not be accurate as the database server may be caching that particular users information as it is requested so often.

In Gatling will simply group these values into a comma separated file. The file and a bit of syntactic sugar and voila we have converted those repetitive values into variables that our Gatling script can use.

File sample

first,last,id
paul,johnson,98
samual,smith,102
jack,jones,125

Each comma separated value from the first line of the file will be used as a variable. Gatling can use these csv files in several different ways. There are four different methods but in practice there are only really three.

TypeDescription
QueueRead a value but generate an error if end of file is reached
RandomPick values from list at random
CircularRead items from list but go back to top if you reach end of file
ShuffleShuffle the entries and then treat list like a queue

Using one of these strategies is actually pretty easy.

val scn = scenario("RecordedSimulation")
 .feed(csv("users.csv").circular)
 .exec(http("search asrock")
 .get("/computers?f=asrock")
 .headers(headers_4)
 .check(status.is(200)) 
)

Simply add the csv file in at the top of the run and with each iteration it will take a new entry from the data file. In my example, I am not actually using these values but if we wanted we could change the strategy to random and then have lists of computers that will be found or that will not be found. This would give a certain amount of realism to the test and would prevent the database server from caching values to improve the response times in our test.

All of this is accurate but it is difficult to get a good overview of what the original script does. This is a bit sad considering that the original script is quite short. It is possible to convert this script which is essentially “flow of consciousness” into something that is a bit more organized. I have take recorded example and organized it by task. Once this is done, below, you can see this is much much easer to read and modify if necessary.

 import scala.concurrent.duration._
 
 
 import io.gatling.core.Predef._
 import io.gatling.http.Predef._
 import io.gatling.jdbc.Predef._
 
 
 class ModifyRecordedSimulation extends Simulation {
 
 
 var httpProtocol = http
 .baseUrl("http://computer-database.gatling.io")
 .inferHtmlResources(BlackList(""".*\.js""", """.*\.css""", """.*\.gif""", """.*\.jpeg""", """.*\.jpg""", """.*\.ico""", """.*\.woff""", """.*\.woff2""", """.*\.(t|o)tf""", """.*\.png""", """.*detectportal\.firefox\.com.*"""), WhiteList())
 .acceptHeader("text/html,application/xhtml+xml,application/xml;q=0.9,image/webp,image/apng,*/*;q=0.8,application/signed-exchange;v=b3")
 .acceptEncodingHeader("gzip, deflate")
 .acceptLanguageHeader("de-DE,de;q=0.9,en-US;q=0.8,en;q=0.7")
 .userAgentHeader("Mozilla/5.0 (Windows NT 10.0; Win64; x64) AppleWebKit/537.36 (KHTML, like Gecko) Chrome/73.0.3683.103 Safari/537.36")
  
 httpProtocol = httpProtocol.proxy(Proxy("localhost", 31288).httpsPort(31288))
 
 val headers_4 = Map(
 "Proxy-Connection" -> "keep-alive",
 "Upgrade-Insecure-Requests" -> "1")
  
 object TestHelper {
  
 var searchFailing =
 exec(http("search asrock")
 .get("/computers?f=asrock")
 .headers(headers_4)
 .check(status.is(200))
 )
  
 var searchExisting =
 exec(http("search mac")
 .get("/computers?f=mac")
 .headers(headers_4)
 .check(status.is(200))
 )
  
 var loadExisting =
 exec(http("load mac")
 .get("/computers/19")
 .headers(headers_4)
 .check(status.is(200))
 )
 
 var updateExisting =
 exec(http("update computer")
 .post("/computers/19")
 .headers(headers_4)
 .formParam("name", "COSMAC VIP")
 .formParam("introduced", "1977-01-02")
 .formParam("discontinued", "")
 .formParam("company", "3")
 .check(status.is(200))
 )
 }
 
 val simpletest = scenario("scenario 1")
 .repeat(1) {
 feed(csv("users.csv").circular)
 .exec(
 TestHelper.searchFailing
 ,TestHelper.searchExisting
 ,TestHelper.loadExisting
 ,TestHelper.updateExisting 
 )
 }
  
 setUp(simpletest.inject(atOnceUsers(1))).protocols(httpProtocol)
 } 

The main thing that is really new is that we have created our own Scala object. This object, TestHelper in my case, can be used to group either a single step or multiple steps. This example is using TestHelper as a holder for all the individual tests but you might want to have different blocks of code that you can use in different tests. In that case you might wish to have login credentials in one block and searching queries or helpers in a second block.

The scenario definition is now very short and it is obvious what this test is doing by the names that have been selected. It is even possible to define many different scenarios and have them all run at the same time, thus, not just testing system load but perhaps also covering different functionality. Perhaps these many different tests provide full or nearly full system coverage.

   setUp(scenario1.inject(rampUsers(10) over (ramp seconds))
       .protocols(HttpConfig.value(baseURL)),
     scenario2.inject(rampUsers(66) over (ramp seconds))
       .protocols(HttpConfig.value(baseURL))
   ) 

Posted in programming | Tagged | Comments Off on Gatling and Scala

Running a Gatling test script

If you create a test script using the recorder or even if you use your favorite editor the scala test code will need to be stored in the simulations directory (ie %gatling_home%\user-files\simulations). The gatling.bat script (ie %gatling_home%\bin) will look in this directory to compile all classes so you can run your test. If the gatling.bat script is run without any parameters then Gatling will display a list of tests that have been compiled and are available to be run.

 Example
 Choose a simulation number:
      [0] RecordedSimulation
      [1] gapiv5
      [2] bigfootv13
      [3] gpv10 

This is a list of the available “classes”, one for each test. Just like with Java each class name of each object must be unique. The class in the recorded example is called “RecordedSimulation”. This actually matches the name of the file that we saw in the recorder dialog. Simply press the number 0 (in this case) to run our recorded simulation.

Gatling test scripts are actually small command line programs that once compiled are run with all of the output going to the terminal screen. Below is the output from running our recorded simulation.

 Choose a simulation number:
      [0] RecordedSimulation
      [1] gapiv5
      [2] bigfootv13
      [3] gpv10
 0
 Select run description (optional)
 my first script
 Simulation RecordedSimulation started...
 
 
 =================================================================
 2019-11-07 14:30:27                            5s elapsed
 ---- Requests ---------------------------------------------------
 > Global                                    (OK=1      KO=0     )
 > search asrock                             (OK=1      KO=0     )
 
 
 ---- RecordedSimulation -----------------------------------------
 [---------------------------------------------------------------]  0%
           waiting: 0      / active: 1      / done: 0
 ==================================================================
 
==================================================================
 2019-11-07 14:30:33                           11s elapsed
 ---- Requests ---------------------------------------------------
 > Global                                    (OK=5      KO=0     )
 > search asrock                             (OK=1      KO=0     )
 > search mac                                (OK=1      KO=0     )
 > fetch computer                            (OK=1      KO=0     )
 > update computer                           (OK=1      KO=0     )
 > update computer Redirect 1                (OK=1      KO=0     )
 
 
 ---- RecordedSimulation -----------------------------------------
 [###########################################################]100%
           waiting: 0      / active: 0      / done: 1
 ==================================================================
 
 
 Simulation RecordedSimulation completed in 11 seconds
 Parsing log file(s)...
 Parsing log file(s) done
 Generating reports...
 
 
 ==================================================================
 ---- Global Information -----------------------------------------
 > request count                           5 (OK=5      KO=0     )
 > min response time                     176 (OK=176    KO=-     )
 > max response time                    3069 (OK=3069   KO=-     )
 > mean response time                    815 (OK=815    KO=-     )
 > std deviation                        1130 (OK=1130   KO=-     )
 > response time 50th percentile         240 (OK=240    KO=-     )
 > response time 75th percentile         400 (OK=400    KO=-     )
 > response time 95th percentile        2535 (OK=2535   KO=-     )
 > response time 99th percentile        2962 (OK=2962   KO=-     )
 > mean requests/sec                   0.417 (OK=0.417  KO=-     )
 ---- Response Time Distribution ---------------------------------
 > t < 800 ms                              4 ( 80%)
 > 800 ms < t < 1200 ms                    0 (  0%)
 > t > 1200 ms                             1 ( 20%)
 > failed                                  0 (  0%)
 ==================================================================

 Reports generated in 1s.
 Please open the following file: C:\Users\chris\gatling-charts-highcharts-bundle-3.3.0\results\recordedsimulation-20191107133020038\index.html 

This output actually does tell us some information about our test. Because some meaningful comments were inserted into our test script.

.exec(http(“search mac”)

We can see those meaningful names as the script progresses. At the end of the output we can see that there was four calls that were processed in less than 800 milliseconds while a fifth call took longer than 1200 milliseconds. We can also see that there were no failures.

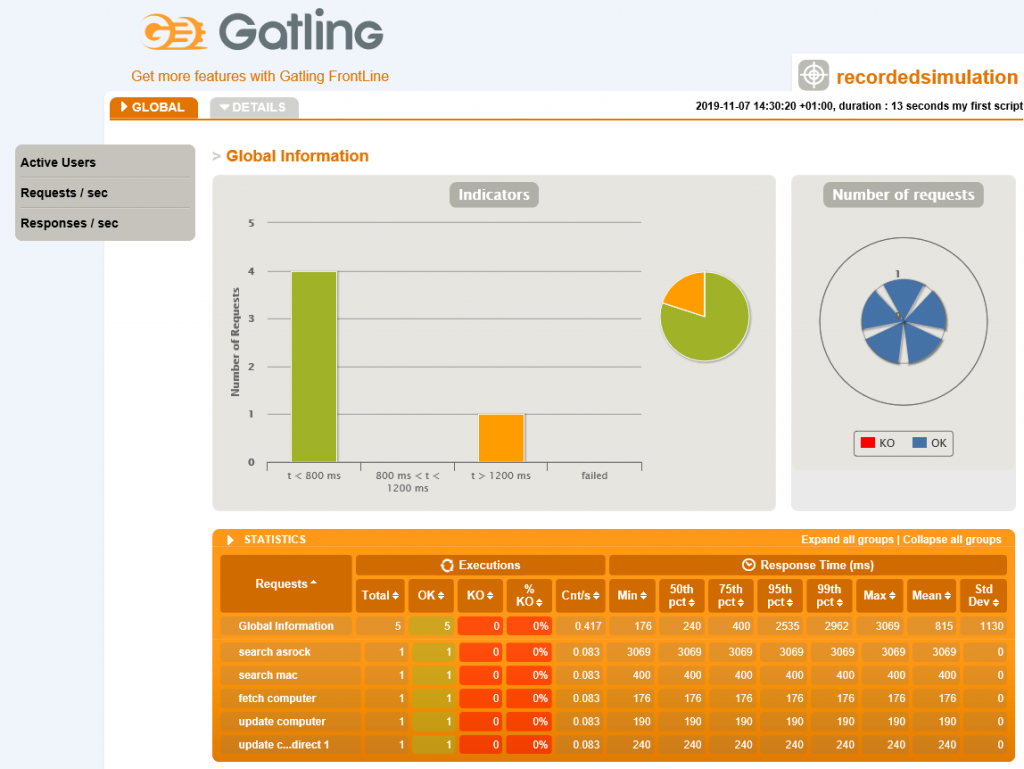
Despite the fact that this output does indeed tell us about how the run went it is actually much easier to look at the html page that we created to see a graphical representation of our script. The last line of the run output gives us the path to the index.html file which has been generated. If we view that html file with our web browser we will see something similar to the following.

Gatling generated report

This image is just part of the web page that is created but it does contain all of the statistics. We can see which of our calls succeeded and how long it took (min, max and average). In this case all of our numbers are the same but if we did run this script multiple times we would be able to see how many were in the 50, 75th and 95th percentiles.

Each one of our steps only perform one task so there is little reason to look much deeper but if each of these performed more than one call or loaded some important resources we could get a better look at the times by examining the details of each one of these steps.

If we look in the upper right hand corner of the picture we can see the name of the class, the runtime and the description that we gave when running it (ie my first run script)

Our script was generated by the recorder as pure Scala code. In my next blog I will clarify a bit of the Scala syntax.

Posted in programming | Tagged | Comments Off on Running a Gatling test script

Gatling

Of the three load and performance testing tools that I am going to describe Gatling is the new comer. While LoadRunner has been around since 1994 Gatling was first released in 2011 and since then has had 2 major releases with the most current version being 3.3.1. Gatling supports fewer protocols but can easily be used for testing HTTP, HTTPS, Web sockets and REST Api’s. In this sense it is more limited than LoadRunner yet as more and more applications are either browser based or implement a service that is available over the internet Gatling is certainly the right tool for the times. Gatling is an open source tool which uses Scala as the scripting language for writing tests. Why Scala?

  • Scala can interact with Java
  • It can use Java libraries
  • Cleaner code
  • Smaller code thus easier to have an overview

The only prerequisite for using Gatling is that you have a copy of the Java JDK installed on your machine. The Scala code is compiled into byte code which is then executed on the Java Virtual Machine of your Java installation. This has the pleasant side effect that you can use the native Java libraries to help in your testing scripts.

Installation

Gatling is distributed as a zip file that you can download from their homepage, https://gatling.io. Installing it is just a matter of finding a good location and unpacking the zip file.

Ie.

C:\users\myuser\testingapps\gatling-charts-highcharts-bundle-3.3.1

There is really nothing left to do if the JDK is installed. This directory where Gatling is installed should be stored in the environment variable GATLING_HOME. This is not necessary as this information can be determined by the start scripts but it is cleaner and this value can then be used in batch files or shell scripts. It is worth noting that a OpenJDK is also a JDK and worked just fine with Gatling for all of my tests.

Recorder

Gatling actually has a solution for people who are not familiar with Scala. Bundled with Gatling is a recorder which can be used for capturing an interaction between the user and a web site.. This recording tool is used as a proxy when surfing your web pages which allows it to capture all the URL’s and necessary headers. The actual output of this tool is a Scala script that will reproduce the same set of steps including all pauses made by the user. This recorder start script is started from the same directory as the gatling start script (%GATLING_HOME%\bin)

This may sound like very good news that web tests can be recorded except it is perhaps a bit simplistic. A long time ago it was pretty much determined from a web security standpoint that you cannot simply record a series of steps and then allow them to replay that exact set of steps without negative consequences. This type of action actually has its own name – a replay attack. A replay attack is somehow capturing a series of steps, which may also include the users credentials. Because of the inherent danger of allowing a strict copy and replay of a series of steps most if not all non-trivial web pages will have hidden variables that are set at each step but are unique each time you perform the same series of steps. The values form these variables must be used in subsequent steps and thus prevent you from creating a test script from a recording and using it without any changes.

These unique variables must be retrieved from the web pages and used for each test. So although Gatling recorder will capture all the hard coded unique values you will need to amend the test scripts. You will need go through the recorded script and make amendments to parse out these dynamic values and to use them at the correct locations while following the test steps.

If you are familiar with the website being tested you will find these recorded scripts to be fairly easy to read. Below is a small test along with the recorded test of these same steps. This example what you would see if you followed the Gatling quick start tutorial (https://gatling.io/docs/current/quickstart/)

This test will perform the following operations.

  • Goto computer database gatling.io web site
  • Search for computer ASRock
  • Search for computer Mac
  • click on computer (internal id #19)
  • save computer id #19 with these details

This script almost exactly what is produced by the recorder. I have trimmed out a few unimportant steps and have added a few important changes (use my local proxy) and changed the comment values to be representative of what action they are performing.

 import scala.concurrent.duration._
 import io.gatling.core.Predef._
 import io.gatling.http.Predef._
 import io.gatling.jdbc.Predef._
 
 class RecordedSimulation extends Simulation {
 
 var httpProtocol = http
 .baseUrl("http://computer-database.gatling.io")
 .inferHtmlResources(BlackList(""".*\.js""", """.*\.css""", """.*\.gif""", """.*\.jpeg""", """.*\.jpg""", """.*\.ico""", """.*\.woff""", """.*\.woff2""", """.*\.(t|o)tf""", """.*\.png""", """.*detectportal\.firefox\.com.*"""), WhiteList())
 .acceptHeader("text/html,application/xhtml+xml,application/xml;q=0.9,image/webp,image/apng,*/*;q=0.8,application/signed-exchange;v=b3")
 .acceptEncodingHeader("gzip, deflate")
 .acceptLanguageHeader("de-DE,de;q=0.9,en-US;q=0.8,en;q=0.7")
 .userAgentHeader("Mozilla/5.0 (Windows NT 10.0; Win64; x64) AppleWebKit/537.36 (KHTML, like Gecko) Chrome/73.0.3683.103 Safari/537.36")
 
 httpProtocol = httpProtocol.proxy(Proxy("localhost", 31288).httpsPort(31288))
 
 val headers_4 = Map(
 "Proxy-Connection" -> "keep-alive",
 "Upgrade-Insecure-Requests" -> "1")
 
 val headers_7 = Map(
 "Origin" -> "http://computer-database.gatling.io",
 "Proxy-Connection" -> "keep-alive",
 "Upgrade-Insecure-Requests" -> "1")
 
 val scn = scenario("RecordedSimulation")
 .exec(http("search asrock")
 .get("/computers?f=asrock")
 .headers(headers_4)
 .check(status.is(200))
 )
 .pause(3)
 .exec(http("search mac")
 .get("/computers?f=mac")
 .headers(headers_4)
 .check(status.is(200))
 )
 .pause(2)
 .exec(http("fetch computer")
 .get("/computers/19")
 .headers(headers_4)
 .check(status.is(200))
 )
 .pause(2)
 .exec(http("update computer")
 .post("/computers/19")
 .headers(headers_7)
 .formParam("name", "COSMAC VIP")
 .formParam("introduced", "1977-01-02")
 .formParam("discontinued", "")
 .formParam("company", "3")
 .check(status.is(200))
 )
 setUp(scn.inject(atOnceUsers(1))).protocols(httpProtocol)
 } 

What isn’t in the original recording is a status check that the HTTP call succeeded. I have also added a line that will amend the httpProtocol variable to also include my local proxy server. With just a small amount of imagination you can think about passing in a proxy port and host and if the port is not equal to zero then add the proxy to the httpProtocol as part of your test script.

One thing that might not be immediately obvious is that most of the script is not actually running anything but defining the variable scn. This scenario variable is what will be performed by Gatling. The last line of the scala code actually does the setup which will cause this variable to be used by Gatling to call our series of steps.

setUp(scn.inject(atOnceUsers(1))).protocols(httpProtocol)

In this test script we are going to use only one user and that user should be created all at one time. This sounds pretty silly for a single user, however, if you are speaking about creating 10 or 100 users you can see that immediately quite a load will be created. It is possible that a system which might be able to support 500 concurrent users doesn’t work very well if all 500 start at once within 2 milliseconds. I will cover increasing the number of users and different ways of generating that load later.

My next post will cover how we actually run this script.

Posted in programming | Tagged | Comments Off on Gatling

Performance Testing – LoadRunner

Loadrunner is perhaps the oldest of these three testing tools that I am going to cover. It was created by Mercury Interactive in 1994, sold to Hewlett Packard in 2006 and eventually resold to Micro Focus in 2016. This software tool supports quite a few different protocols.

  • .Net
  • Citrix ica
  • DNS
  • Flex
  • FTP
  • IMAP
  • Java over http
  • LDAP
  • MAPI
  • MQTT
  • ODBC
  • POP3
  • RDP
  • RTE
  • Sap web
  • SMTP
  • Truclient
  • Web http/html
  • Web services

Loadrunner is an integrated suite of programs which let you program your test. Three different programs in this suite mirror the process.

Virtual User Generator – develop a test
Controller – run the test and gather statistics
Analysis – reporting on test statistics

Virtual User Generator

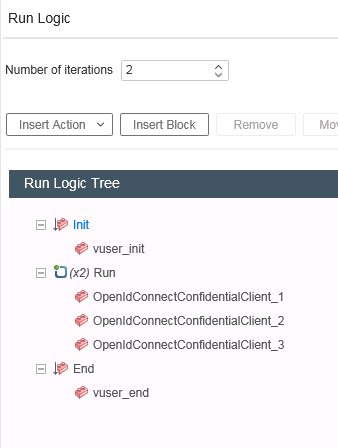
The “VuGen” program reminds me a bit of Arduino IDE. Because you are not creating your own stand alone program there is essentially a harness that you are fitting your tests into. Each new Test program which is referred to as a “Solution” in LoadRunner has an initialization and clean up routing. You are then able to add as many Actions (source files) as you see fit. Loadrunner has its own main routine for the program and so you create your method and it is run in the order listed under Run in the Run Logic Tree.

One strong point for LoadRunner is that you can define what code or tasks is a step. LoadRunner has its own API and so defining a “Transaction” is just a matter of calling the lr_start_transaction at the beginning of process and closing off the transaction when it is finished with the lr_end_tranaction. A Transaction can include a single REST API call, multiple REST calls or as much code as you wish to include for that step. Most of the steps that are included in a Transaction is either the REST or HTML calls or the necessary code for generating or saving values that are part of the responses.

One of the quirks of creating a script in LoadRunner is that if you wish to retrieve a variable from a returned page of HTML you need to ask for it before the call. This may have made the process easier for the original developers but it does take a while to get used to this odd ordering of instructions in the source code.

The source code is standard C. Depending on your language preferences you may find this encouraging or depressing but the good news is that there is an integrated debugger. Just like other modern IDE’s it is possible to set breakpoints and examine variables. The log output is a monologue what was done or called along with the responses. This information is displayed with the line and source file so it is possible to examine the output at your leisure.

Considering the nature of Load testing, it should not be too surprising that LoadRunner has a built in system for defining lists of values that should be available as parameters for your REST or Web calls. LoadRunner provides a dialog to create and maintain such lists of values but the values themselves are written out to a csv file. Once the mapping is performed in loadrunner it may be easier to simply edit these csv files in a standard editor.

LoadRunner also provides a recorder. This will allow you to visit a website (ie HTML Testing) and go through a series of steps. It is quite likely that this recorded script will need to be amended as many websites have logic in place against replay attacks, but recording is a nice way to get at least small jump on the task.

The general development of the script may involve running it and looking at the log output or it may be debugging it line by line. But eventually you will have a working script which can be used for the actual load testing. Once you are at this step you use the second tool from LoadRunner – Controller.

Controller

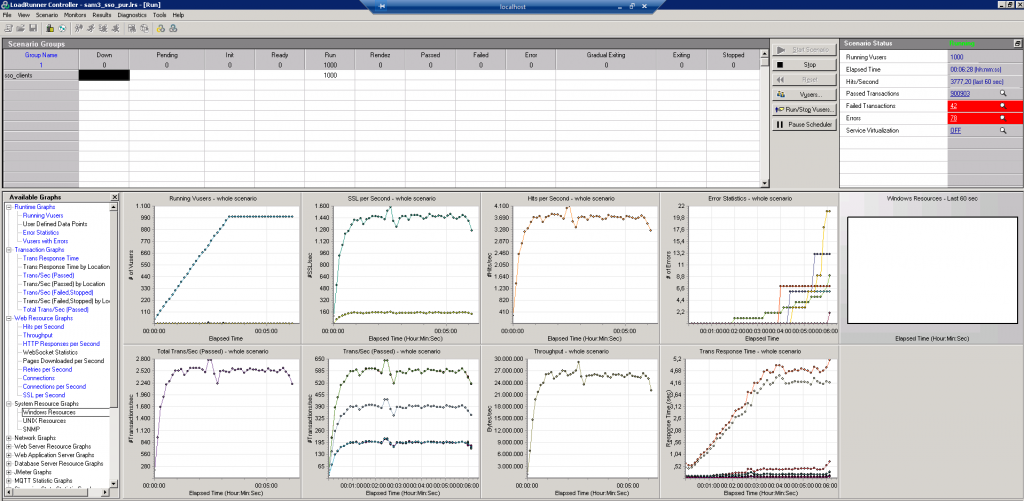
There is actually a surprising amount of possible configuration possible in the Controller but the main task of this program is to run any test or tests and to capture the results. The most used settings run time and number of virtual users. You decide how many users to use and how long it should take to start that many users. (ie 10 every 2 seconds) Once that number of users has been reached LoadRunner will maintain that number for the duration of the run.

Actually there is another interesting feature. It is possible to have other computers assist in the load generation process. These other computers are called LoadGenerators. When they are used it is to support the main machine in generating the necessary load but without exceeding the number of licensed users. It is usually necessary to have more than one load generator if you are trying to really push your system test. I am not clear if this is because of the raw cpu that is necessary to run thousands of virtual users or if this is due to a operating system limitation (ie number of theads).

As you can see there are quite a number of different graphs that can be used. These graphs are some of the values that can be gathered and displayed immediately but all values will be saved and used by the third LoadRunner program – Analysis.

Analysis

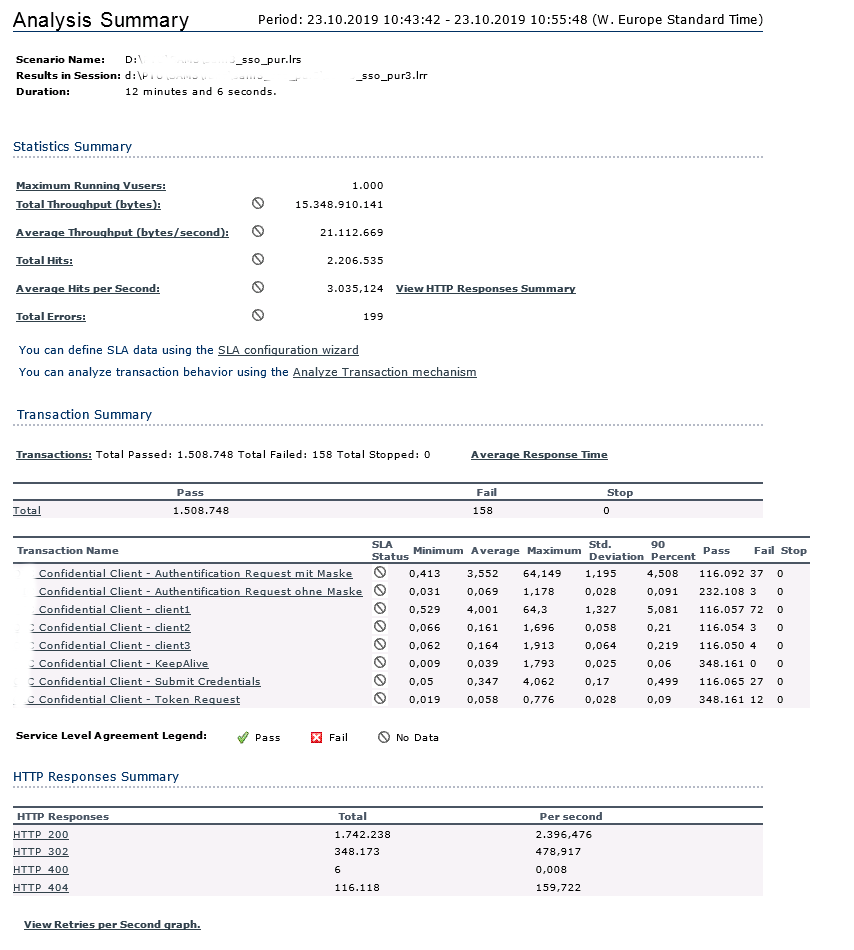
The analysis program tends to be a little anti-climactic. The testing script is create and debugged using the Virtual User Generator program, and it is tested in the Controller. The controller will even show some of the available graphs in real time.

The actual analysis phase is simply picking which graphs you wish to look at and displaying them. It is possible to create a report and save it as a PDF/RTF/Excel/JPG/… The graphs are so helpful but somewhat difficult to read in the PDF report yet there is another way. It is also possible to create a HTML report instead of saving a normal report data as HTML. This will create a sub-directory and store all the necessary data, html and pictures in it. This “report” can then be viewed in your favorite web browser. That entire directory can be zipped up and emailed to colleagues who can then look at the report. This is perhaps a bit clumsy but the graphs are then very legible. Not only that but for some of the graphs produced it is possible to deselect various information being graphed to allow you to focus on one aspect or another of the test.

Yet, there is one more little gem in the analysis tool. It is possible to create Service Level Agreement templates. These templates define what the expected behavior (i.e. response times) should be. This template is color coded and can be copied between test directories. In this way it is possible to open up this SLA agreement summary after a test and quickly and visually see (green or red) if any of the results are not as quick as expected or required.

Summary

The LoadRunner tool from MicroFocus is a comfortable tool to use. It is easy to create, debug, run and graph all output. I understand that MicroFocus’s goal is indeed to receive income from this tool but most certainly for a small shop this tool might be too expensive to consider.

I am not going to go into too much depth about this program because of the pricing structure. If you are an enterprise and have a budget for software, license costs, personnel and so forth than the pricing of LoadRunner may not as important. Unfortunately for the rest of us money may be an issue. LoadRunner has its pricing based on the number of users that you will be using to generate your load. The more users you use the higher the cost. Unfortunately there is no real fixed price sheet that I can use for analysis but there are a few web resources that do give some hints.

https://aws.amazon.com/marketplace/pp/Micro-Focus-Micro-Focus-LoadRunner-1000-Virtual-Us/B01K3PEB7O

https://www.microfocus.com/de-de/products/loadrunner-load-testing/pricing

If these examples are correct, then the cost for 1000 virtual users is 500 USD per hour from Amazon as a service or 3500 USD for 1000 virtual user days from Micro Focus. I seem to remember that there were other restrictions of the permanent license. If memory serves it was limited to a specific piece of hardware in a specific location. Furthermore it could only be used by users physically at the same location.

https://www.jds.net.au/loadrunner-licensing/

https://www.microfocus.com/media/white-paper

loadrunner_to_performance_center_migration_wp.pdf

Don’t lose hope if you really desire to write your tests in C and to use LoadRunner to do it. It is possible to download a free version of LoadRunner that will support 50 virtual users and can be used for all protocols except for a handful. Load testing with 50 users per second it not quite Google or Facebook territory but this might be a good test for an internal site or perhaps a website that supporting s a small business or sports club.

There are certainly other proprietary tools in the market place but the next tool – Gatling – is actually an open source tool.

Posted in programming | Comments Off on Performance Testing – LoadRunner

How much can you process – Performance Testing

Load and performance testing is just like many other types of testing (beta testing, functional, acceptance, regression, unit testing, integration testing) but like them it also has a specific goal. That goal is that a system or service can run when under a specific load. Unlike other types of testing this is not intended to uncover bugs but to ensure that the system continues to run when it encounters the expected number of users or amount of data.

Load testing is not the only type of testing of this type. There is also stress testing which verifies that the system continues to run when encountering unexpected workloads. Volume testing covers situations testing larger or expanding amounts of data. Performance testing is another related type of testing. Performance testing is perhaps less well defined but usually refers to expected amount of time that is expected for performing a specific act or acts. Stability testing would be that the given system or service can continue to function over a longer period of time. This type of testing might also be done in conjunction with load testing to verify that a system can perform over time with a specific amount of traffic. Unsurprisingly these terms are sometimes used interchangeably.

The number of tools available for load testing is not quite as many as the leaves on the trees but it is safe to say that there are quite a few different tools which can help automate this process. Even the goal of load testing can be split up into testing a the GUI, perhaps web applications, or testing the services and hardware behind the GUI. I am going to be focusing on the backend which is to say the servers and services.

  • JMeter
  • Gatling
  • LoadRunner

These tools do not cover the entire market for this type of testing but they are both fairly well represented and have been around for a long enough time that there is both a fair amount of other support information available on the internet and the concern that any of these tools will fade away seems unlikely.

Over the next few articles I will be covering to a greater or lessor amount the following testing tools.

Posted in programming | Tagged | Comments Off on How much can you process – Performance Testing

Hammers and Saws and IOT – oh my

After moving to a new apartment I needed to get some hardware in order to hang a few pictures in the livingroom. A quick trip to the hardware store should allow me to make my apartment a home. While walking through the store I was surprised to see smart sockets wedged in between fans and light bulbs. Not only smart sockets but also a small selection other smart components such as light bulbs and light switches.

When seeing that I had to decide on a smart socket, smart light bulbs, or smart light switches. I thought that perhaps the most flexible item that I could use would be smart socket, no electrician required.

Smart sockets are just a rather clever bit of hardware which includes a small relay for switching on the power on and off. The real brains for the smart solution is the phone app that controls the device.

I thought I would get a few more smart sockets and see how smart I could make my apartment.

Malmbergs

The first device tested was that first smart socket from the hardware store. The first real step for all these smart sockets is install the corresponding app from your app store – this app was in both the Google store and the Apple store.

The instructions that came with the device instructed to install the app with the name “REC Smart” by Ankuoo[1]. The app requires that you create an account and once the account is created you log into the app everything works pretty much as you might expect.

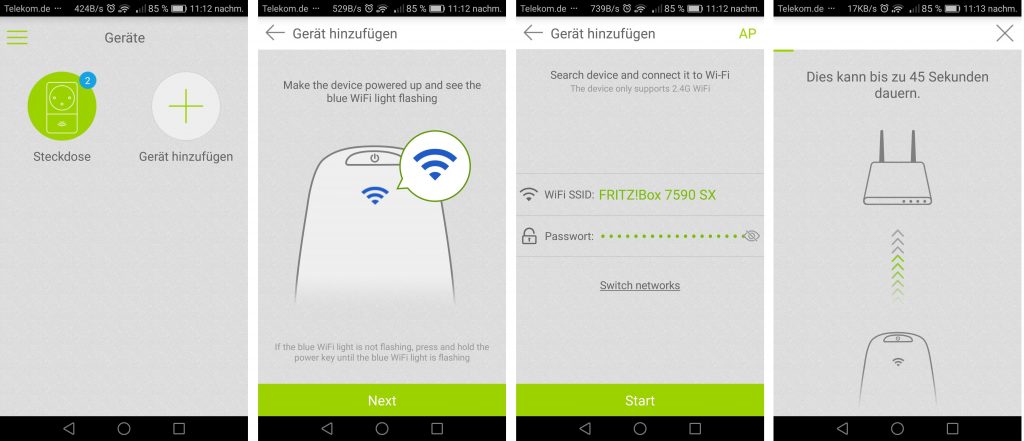
Pairing a new device is just a matter of holding down the power button on the smart switch for at least five seconds and then it is in discover mode. You can see that by the blue led flashing on the device and then just follow the prompts to add the device Illustration 1.

xxxxxxxx
Illustration 1: Malberg

This smart socket and its supporting app really does provide a lot of basic functionality. The app will keep a list of all the sockets that have been registered. Initially the app will give each device a generic name but it is also possible to assign a friendly names to each device.

The functionality that makes the smart sockets smart is the ability, with the addition of software, to create schedules when it should be switched on or off. One of the nice features is the countdown timer. The timer offers six predefined times (5, 10, 15, 30, 60 and 120 minutes). There is actually one little quirk for this particular feature. The timer functionality assumes that the socket is already turned on.

Traditional hardware timers make it is possible to schedule when the socket should turn on or off. With software it is easier to make this a bit more flexible. The rules can be setup for either individual days or to run at the same time on multiple days.

Scheduling tasks is fairly orthogonal, it is possible to add schedules, remove schedules but more important they can be disabled and re-enabled at a later time.

The final bit of functionality is called “anti-theft timer”. Much like the schedule functionality you select a time range for a day or for days. The app will turn the socket on and off at random intervals during this time period.

Note: When you enable the anti-theft timer a warning comes up that the other functionality will be disabled while the anti-theft timer is running.

I used wireshark to watch the traffic when adding a device to the app. The smart switch does make a number of connections over the internet. Once this connection has been defined it is possible to control the device using the data connection from a cell phone.

The communication between the device seems to be UDP messages[2]. However, despite the information available on how to control such a device on the internet I was unable to control the socket myself. The information that I did find implied that the packets were unencrypted and it was possible to resend packets to control the device. My experience did not match that of the other users from the internet. It is possible that over the last few years[3] that the manufacturer has modified their devices to put security first and remove this avenue of control. It is also a bit sad as I did not find any API that would allow me to control this device from Linux.

[1] https://www.hornbach.at/data/shop/D04/001/780/491/304/314/6216499_Doc_02_DE_20180117133221.pdf

[2] https://github.com/Diagonactic/Ankuoo

[3] https://news.ycombinator.com/item?id=11211037

S1 Series

The next device I tested was the “S1 Series WiFi socket”. This socket is marketed as also working with Alexa which is some additional functionality that the Malmberg socket does not support. I do not have an Alexa so my tests were focused on the basic intelligence on the socket and the app that controls it. Like the Malmberg device, it appears that most of the intelligence is not in the device itself but is actually in the smart app that controls the device.

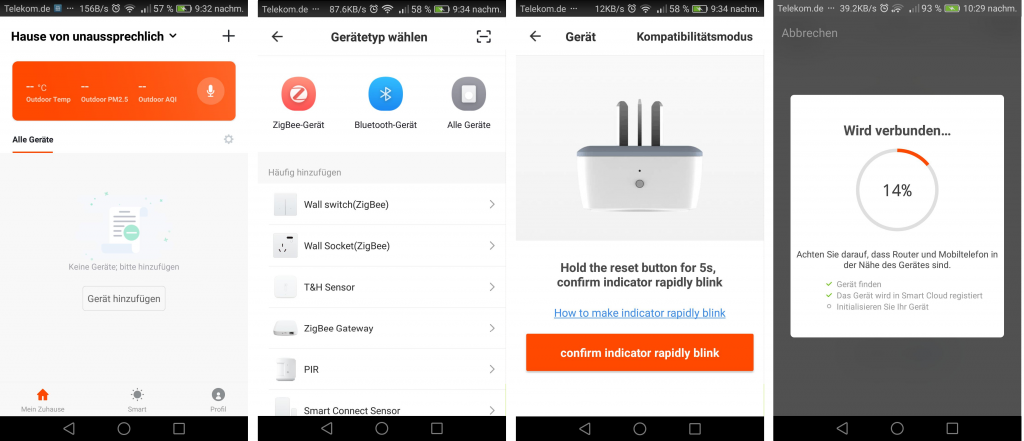
Just like the Malmberg socket, adding a device is actually quite easy. Press the power switch for 5 or more seconds until the led starts to flash. From that point follow the steps in the app to add a device. (Illustration 2)

Illustration 2: S1

The only complicated part about adding a new device is the wide breadth of types of devices that are supported by this app. This is a double edged sword for the technically less savy as you need to be aware of which type of device you are trying to join up.

ZigBee Low power digital radio

Bluetooth Short wavelength UHF radio waves

WiFi Standard wireless networking

Just like the Malmberg device, it is required that you create an account with the manufacturer, Tuya, in order to use the app.

Not unsurprisingly the app has a fairly simple set of features, quite similar to the previous app but Tuya seemed to give more attention to the development of the app, it just felt more polished.

The timer also has a much finer level of granularity. The timer can be defined for how many hours and minutes before the device is switched off but it can also be defined to switch on after a given amount of time.

It is also possible to setup a schedule to turn devices on and off at different times. I found it to be a bit odd that this device only allowed you to define a day and time for switching the device either on or off. This does obviously maximize flexibility but it also creates a larger list to be searched when matching up the pairs of on/off times as the number of entries increases.

The S1 Series device is different from the other two devices reviewed as it supports Alexa and that the Tuya corporation appears they have made some libraries and documentation available[4][5]. This should allow people the ability to control their own devices.

I did take a look at the documentation that was available but it is not for the faint of heart. I was unable to create anything myself using this but it is possible due to the number of projects on github. Just search for project with Tuya in the name.

From looking at the website of the Tuya corporation, it seems that they might be licensing the design of their smart switch solution. This is because their web site allows for the creation of your own app with using your own branding[6].

[4] https://docs.tuya.com/en/app/app-sdk/android-sdk.html

[5] https://github.com/TuyaInc/tuyasmart_android_sdk/tree/master/TuyaSmartAndroidSdkDemo/libs

[6] https://docs.tuya.com/en/app/app-autobuilding.html

Sonoff S20

The Sonoff S20 smart socket is only one of many different Sonoff smart devices. The company also sells smart sockets that also measure temperature, monitor humidity as well as remote controlled light switches[7].

The S20 is controlled by the eWeLink app to support setting up a timer for creating a schedule for turning the device on and off.

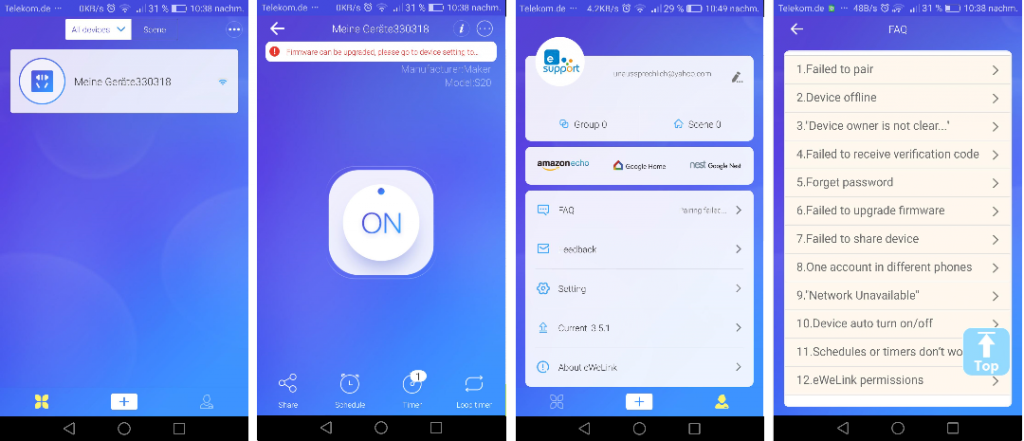
The pairing of devices is as simple as starting the synchronization on the switch itself while adding a connection from the smartphone app. One of the things that make the Sonoff app different from the other two is that it does assume that there can be difficulties in the pairing process, illustration 3. Based on the realization that difficulties can occur, the app included a frequently asked questions section with a list of the most common problems, illustration 14. The list is both long and very helpful.

Illustration 3: Sonoff S20

All three applications are generally friendly and are localized to the language that has been selected on my smart phone. One difference in the eWeLink app, used by the Sonoff, is that it explicitly supports 22 different languages. You can select the language on the app itself which does allow you to select a language on the application that is actually different than the underlying phone operating system.

Although changing the application language does work for all of the application menus and status’s there is one tiny little inconsistency for the eWeLink app. All of the text that is available under the frequently asked questions remain in English and does not change despite what language is selected for the application.

[7] http://sonoff.itead.cc/en/

All of these smart sockets are well built and the smart phone apps are easy enough to use. Unfortunately all of these smart sockets are produced by separate companies each with incompatible protocols which prevents a single app from controlling them all. The solution is to either purchase only from one manufacturer or modify these smart sockets with some open source software.

Posted in programming | Comments Off on Hammers and Saws and IOT – oh my

Repeating myself

It doesn’t seem like all that long ago that I purchased an EDIMAX repeater to fill in the gaps in my home wifi network. This solution did seem to work out for me, which actually means me and my laptop, over time it did not prove to be the best solution for the rest of the family. Everyone else, actually uses other types of equipment such as smart phones, tablets and ipad and they were uniformly less happy. During the intervening months I had to turn the repeater off and on again as well as to use the following rational to quell unrest.

It works for me. I am also using wifi so it must be fine.

I don’t want to imply that a ultimatum from my spouse is all that it takes to cause a revolution but the device stopped working for me as well so it needed to be replaced. The question is do I want or need to get a different solution.

Powerline extender

This solution connects your router to your power wires. It is then possible to plug another device in to a socket in another room and use the internet from there. There is a limit to the number of devices you can use but the technology doesn’t always have the throughput that is advertised. This might not be a fault of the technology but my experience in old old apartment buildings.

Wifi repeater

This solution picks up the existing wifi network and then transmits a boosted signal.

Bridge

A bridge is used to connect two separate network segments together.

I want the new device to work longer than the previous one and I want it to make all of the “hard to please” members of the family fully satisfied, so I have splashed out and purchased a new Fritz!Repeater3000.

I didn’t purchase this device because I knew with certainty the best one on the market but rather because it looked pretty good, had good reviews and I already owned a Fritzbox 7590 router. It was an odd coincidence but the day I was shopping for a solution I met someone who works for TP Link at the store and he was trying to convince me to purchase their solution. Despite being fairly well convinced I went with the more boring solution of all devices from a single vendor. Who wants a couple of devices and a problem and the difficulty of proving where the problem actually lies.

Setup

The biggest decision was how exactly should I configure my device. The Repeater3000 actually supported three different modes.

  • Repeater
  • Wlan bridge
  • Lan bridge

I just want to extend the network into the living-room so I set this up as a repeater. Before I could begin I did need to make sure that my firmware for the router was updated to 7.12. There were a couple of setup methods but I did take a rather less traditional approach (for me) and used the wps button on the router. The repeater and the router were joined without any fanfare.

Once the repeater was setup it worked just fine. The specifications are also pretty impressive.

  • Maximum WiFi performance thanks to the intelligent use of three radio units (2 x 5 GHz and 1 x 2.4 GHz)
  • Wireless AC with up to 1,733 Mbit/s in the first 5-GHz band
  • Wireless AC with up to 866 Mbit/s in the second 5-GHz band
  • Wireless N with up to 400 Mbit/s in the 2.4-GHz band
  • Connects to a router/FRITZ!Box via the dedicated 5-GHz band
  • Compatible with all wireless routers compliant with the 802.11 ac/n/g/b/a radio standards
  • Adopts the configured encryption of the wireless network (WPA2)
  • Wi-Fi Protected Setup (WPS) – easy and safe configuration of wireless network at the touch of a button

I cannot say if this solution will make everyone happy but over the last few weeks I have only happy family members who.

Posted in Review | Comments Off on Repeating myself