War in Ukraine, Gas from Russia and shoes from China

A few years ago it was pointed out that Germany was reliant on Russian natural gas for 60-70% of their energy imports.

This is not quite correct. Indeed Russia does supply a large amount of natural gas but natural gas only makes up a relatively small portion of Germany’s overall energy usage. Ever since the “Russian excursion” into Ukraine has caused Russia to move from Santa’s and pretty much everybody else’s “nice list” to “naughty list”. I guess that Vladimir Putin doesn’t like being on anybody’s naughty list. This is purely an assumption due to all of the problems that have recently popped up preventing the delivery of natural gas. To someone who is more cynical than I am might even think that this is Russia lashing out at other countries who are are taking a stand against his special military operation.

Nobody except for Vladimir Putin really knows if these gas delivery problems are due to the sanctions and technical problems or because Russia can reduce their natural gas in an attempt to get sanctions lifted.

The only thing that can be said with certainty is that as recently as a few years ago, it was in the international news that relying on Russian gas should be considered a strategic risk. Now, it is a few years later, and regardless of the reason for the disruption Germany (and Europe) is heading into a winter that could be punctuated with natural gas shortages. This will affect consumers but it will also affect industry. This one fact makes the early shutdown of Germany’s nuclear power facilities seem a bit premature.

But this blog post is not about Russia nor about the Ukraine. It is not even about natural gas but rather it is about shoes. Just recently I visited a shoe store to purchase a pair of shoes. I was a bit dismayed about the relative disorder inside of the store as it make the search process for shoes my size longer and more difficult. I guess the disorder could have been pandemic related due to uneven receipt of new merchandise as well as too few staff to put the shoes on the shelves. The actual result was unopened shipping boxes sitting in the corner of the store. From looking at the outside of the boxes you could see that these shoes did come a long way to be sold in Minnesota.

  • China
  • Thailand
  • Vietnam

The boxes were from the far east but the majority of them were from China. It is not a secret that China is perhaps the worlds largest manufacturer of things. These things might be medications, these things might be electronics or electrical items, or even simple medical masks.

Global trade does enrich both partners in the transaction, but it is possible to create counterparty risk if one party becomes too dependent on the other. The situation between Germany and Russia is over natural gas. If one partner cannot or will not deliver the other partner is in a pretty precarious situation. This might seem like an obvious statement especially in light of the difficulties currently going on in Europe but what about shoes or electronics?

If China cannot or will not deliver some or all of the merchandise that America requires at some point in the future what happens? This might mean a populace that has old shoes that are falling parts who are forced to use last years electronic gadgets. Furthermore it could mean that consumers who require generic medicines might have to pay more for medications sourced from another location or may not receive the medications at all.

This probably seems like a very unlikely situation until you remember that China feels very strongly about Taiwan and wants to “bring them back into the fold” despite the people of Taiwan not being that interested in being formally merged back into China. The United States has promised to defend Taiwan if this happens but if a skirmish were to break out this could cause disruptions between the US and China as well as any imports from China, Taiwan or even the far east to the rest of the world.

The United States is not very reliant on Russian energy which is why there has been very little disruptions due to the Ukraine situation but if there were any serious trading difficulties between the US and China there would be a very large impact both on businesses and the average consumer.

USA trade with Russia in 2019 was approx. 34 billion USD

USA trade with China in 2020 was approx. 615 billion USD

It is impossible to force companies to not invest in China as their manufacturing location but it seems reasonable that the USA might want to take a closer look at what strategic items are being produced abroad and encourage at least some of them be locally manufactured. In addition to this it might want to craft some legislation that to encourage companies to spread some of their manufacturing across multiple geographic areas to prevent this risky scenario, perhaps even produce their goods at home.

The global supply chain works great, well, until it doesn’t.

Posted in Germany, Soapbox | Comments Off on War in Ukraine, Gas from Russia and shoes from China

Do not reuse too much – a computer upgrade story

My computer has been hanging on but just barely. Recently it has taken multiple restarts and the occasional CMOS reset to get it to boot. When it was new, the hardware was pretty good.

Asrock 990FX Extreme4
AMD FX-8350 Black Edition
32GB Corsair 1333 Mhz
Nvidia GTX 650

My friend helped me to choose the parts and he was a AMD fanboy. The processor did have 8 cores but probably won’t go down in history as AMD’s best design – but it is easy to pick on this from the side lines a decade later.

Picking out the parts to last a long time but also not breaking the bank was tricky but only because I needed a single feature on my motherboard. The one feature i really had to have was a 7 segment display to help debug any setup difficulties I may encounter. There are probably hundreds of websites that can help but after my research I settled on the following.

Gigabyte Aorus Z690
32gb 4400mhz DDR5
Noctua NH-D15
Intel Core i7-12700F
750 Watt be quiet! power supply

The parts are not a complete computer but rather just enough to upgrade most of it. I didn’t want to upgrade my graphic card in the middle of cryptocoin induced tech winter. I thought my existing card should be enough for the time being – wow was I wrong.

The GTX 650 is indeed a graphic card and it can pass on the video signal to a monitor or a television but there is one thing this card cannot do.

Unable to boot into the bios

It was simply not possible to boot into the bios to make any changes or select a different boot device. There were a few other people on the internet that also had this problem. They solved this by connecting the HDMI output to a newer monitor.

My monitor was not super but is only 1 year old, but that did not help. I tried connecting the computer to my television which is a higher quality than my monitor but no luck. With the GTX 650 I was only able to boot directly into the operating system.

I had heard that other people were able to modify the bios settings to once they were connected to another monitor and then were able to use their original hardware. I was able to boot into the bios once using a borrowed GTX 1650 OC which was not stone age old. With this graphics card I was able to boot into the bios and modify the settings.

I did not have the same luck as others who were able to use their old hardware. In the end I was compelled to get a newer card – Nvidia 1660 super.

Posted in corona times, Review | Comments Off on Do not reuse too much – a computer upgrade story

Terraform tutorial part 3

Infrastructure is not only virtual machines or load balancers but also the virtual private cloud that allows everything to communicate with each other. What is also quite convenient is that it can be defined in Terraform and AWS with only a few lines.

main.tf
resource “aws_vpc” “cgd-default-vpc” {
cidr_block = var.vpc_cidr
enable_dns_hostnames = “true”
tags = { Name = "${var.environment}-webproject" }
}
Configuration for a VPC

I have created a variable vpc_cidr which will hold the CIDR for this VPC. It is defaulted 172.16.0.0/16 which is a tiny network but it can be set to a different value if a larger network is required. This default value is being overridden with 10.10.0.0/16 which is a huge network.

The VPC is defined using two different variables, vpc_cidr and environment. It is rather nifty that you can create more complex values with constants and variables like is being used in the tags definition.

One more important note for the tags is the tag Name is special and is display in all lists as a user friendly name for the AWS element. The output from the terraform apply, just like the plan command will show what changes need to be made but then will make the changes.

terraform apply -var-file=development.tfvars –auto-approve
Acquiring state lock. This may take a few moments…
Terraform used the selected providers to generate the following execution plan. Resource actions are indicated with the following symbols:
+ create

Terraform will perform the following actions:

# aws_vpc.cgd-default-vpc will be created
+ resource “aws_vpc” “cgd-default-vpc” { arn = (known after apply)
+ cidr_block = “10.10.0.0/16”
+ default_network_acl_id = (known after apply)
+ default_route_table_id = (known after apply)
+ default_security_group_id = (known after apply)
+ dhcp_options_id = (known after apply)
+ enable_classiclink = (known after apply)
+ enable_classiclink_dns_support = (known after apply)
+ enable_dns_hostnames = true
+ enable_dns_support = true
+ id = (known after apply)
+ instance_tenancy = “default”
+ ipv6_association_id = (known after apply)
+ ipv6_cidr_block = (known after apply)
+ ipv6_cidr_block_network_border_group = (known after apply)
+ main_route_table_id = (known after apply)
+ owner_id = (known after apply)
+ tags = {
+ “Name” = “development-webproject”
}
+ tags_all = {
+ “Name” = “development-webproject”
}
}

Plan: 1 to add, 0 to change, 0 to destroy.

Changes to Outputs:
+ _environment = “development”
+ awskey = “don’t display this”
+ awssecret = “don’t display this”
+ region = “us-east-1”
+ vpc_cidr = “10.10.0.0/16”
+ vpc_id = (known after apply)
+ vpc_tags = {
+ “Name” = “development-webproject”
}

aws_vpc.cgd-default-vpc: Creating…
aws_vpc.cgd-default-vpc: Still creating… [10s elapsed]
aws_vpc.cgd-default-vpc: Creation complete after 13s [id=vpc-091d490dc7a1d6407]
Releasing state lock. This may take a few moments…

Apply complete! Resources: 1 added, 0 changed, 0 destroyed.

Outputs:
_environment = “development”
region = “us-east-1”
vpc_cidr = “10.10.0.0/16”
vpc_id = “vpc-091d490dc7a1d6407”
vpc_tags = tomap({
“Name” = “development-webproject”
})

For this tutorial we are expecting one item to be created, the first time it is run, and we can see the 1 resource will be added. The last few lines under Outputs shows the values that were setup in the output.tf file.

development.tfvars
region = “us-east-1”
environment = “development”
vpc_cidr = “10.10.0.0/16”
Variables with new vpc_cidr variable

inputs.tf
variable “vpc_cidr” {
type = string
description = “virtual private network”
default = “172.16.0.0/16”
}
Variable to hold the VPC CIDR

output.tf
output “vpc_id” {
value = aws_vpc.cgd-default-vpc.id
}
output “vpc_tags” {
value = aws_vpc.cgd-default-vpc.tags
}
output “vpc_cidr” {
value = aws_vpc.cgd-default-vpc.cidr_block
}
Additions to output to display info about VPC

Creating a VPC really does not show off too much of what you can do with Terraform. However, it is the overarching network that will be filled in and where we can launch our own EC2’s.

This will be demonstrated in the next blog.

Posted in programming | Comments Off on Terraform tutorial part 3

Terraform tutorial part 2

When running the terraform init command it will store the current state locally in files. This is pretty convenient but if that file is stored on your workstation that makes it impossible to share the build process between multiple developers. This would also make it impossible to add this to a CI/CD pipeline if the actual state was dependent on a specific pc.

Clever scripts could be done to save this information on a networked drive but why bother when this same information could be saved within AWS itself. With a small bit of configuration it is possible to save the infrastructure state in a S3 bucket. To ensure that only one person can work on the infrastructure at a time the AWS dynamo database would be used to store the locking state.

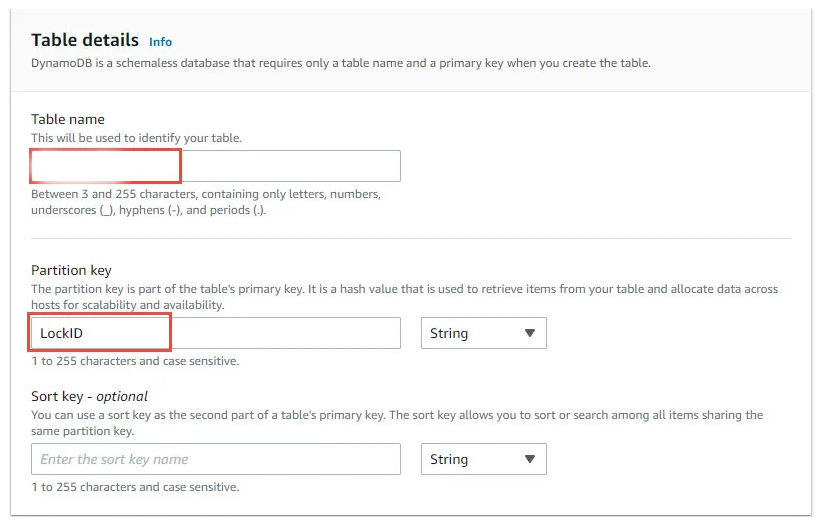
Setting up Dynamodb table

Once the dynamodb table created with the Partition key equal to “LockID” and with the S3 bucket created all the AWS backend setup is complete. Simply refer to this table and this bucket in your configuration.

main.tf
provider “aws” {
region = var.region
access_key = var.AWS_ACCESS_KEY_ID
secret_key = var.AWS_SECRET_ACCESS_KEY
}
terraform {
backend “s3” {
bucket = “cgd.development.terraform.state”
key = “terraform.tfstate”
region = “us-east-1”
dynamodb_table = “cgd-development-dynamodb-table”
}
}
Backend setup using AWS as the backend

However, it does not matter if the Terraform state is saved locally or saved in S3 the first step still needs to be the initialization with the “terraform init” command.

Initializing the backend…

Successfully configured the backend “s3”! Terraform will automatically
use this backend unless the backend configuration changes.


Initializing provider plugins…
– Finding latest version of hashicorp/aws…
– Installing hashicorp/aws v4.20.0…
– Installed hashicorp/aws v4.20.0 (signed by HashiCorp)

Terraform has created a lock file .terraform.lock.hcl to record the provider
selections it made above. Include this file in your version control repository
so that Terraform can guarantee to make the same selections by default when
you run “terraform init” in the future.

Terraform has been successfully initialized!

You may now begin working with Terraform. Try running “terraform plan” to see
any changes that are required for your infrastructure. All Terraform commands
should now work.

If you ever set or change modules or backend configuration for Terraform,
rerun this command to reinitialize your working directory. If you forget, other
commands will detect it and remind you to do so if necessary.

The output from the initialization in this scenario is quite similar to the local case but taking a careful look we can see that the S3 bucket is being used.

The configuration is identical the previous blog with the exception of the backend configuration and the changes to the output.

output.tf
output “region” {
value = var.region
}
output “_environment” {
value = var.environment
}
output “awskey” {
value = “don’t display this”
}
output “awssecret” {
value = “don’t display this”
}

This configuration for Terraform still doesn’t create any AWS infrastructure but it is the perfect starting point to be included into a CI/CD pipeline.

Posted in programming, Setup From Scratch | Comments Off on Terraform tutorial part 2

A simplifed Terraform and AWS tutorial

A lot of tutorials and youtube videos about Terraform go through the process of downloading and installing Terraform. This process is essentially to download a single executable and make sure that this executable is in your path. This process is rather well described and so I will not waste any time on this setup.

If you are not somewhat familiar with Terraform it may be a surprise to learn Terraform is a command line program. There is no GUI, just a few basic commands that can be used but the lack of a GUI is a strength not a weakness. This makes it possible to use Terraform in batch processes. One obvious and common process would be to add Terraform as part of a CI/CD pipeline.

Terraform as previously mentioned allows you to create scripts that will describe your desired infrastructure. Running Terraform will compare your desired state against what is actually setup. This middleware layer does slightly abstract you from the underlying platform. It might not be totally clear from reading other articles but this abstraction doesn’t allow you to transparently and automatically change between AWS and Azure backend. The scripts are rather specific to which underlying platform you are writing them for. Yet, if you write your applications in a rather independent way, they can run on any cloud platform you choose.

This script actually doesn’t really create anything. Terraform uses the AWS CLI tools and so it is important to have these credentials available. The could be hard coded in a script, defined as a Terraform variable or even defined as an environment variable.

provider “aws” {
region = “eu-central-1”
access_key = var.AWS_ACCESS_KEY_ID
secret_key = var.AWS_SECRET_ACCESS_KEY
}

This example shows the access_key and secret_key being assigned from a variable. These values are typically saved in the .aws directory of the users home directory. The AWS CLI setup is not described here as there is plenty of documentation available from Amazon itself.

The first time you run Terraform you may see the following message.

> terraform plan

│ Error: Inconsistent dependency lock file

│ The following dependency selections recorded in the lock file are inconsistent with the current configuration:
│ – provider registry.terraform.io/hashicorp/aws: required by this configuration but no version is selected

│ To make the initial dependency selections that will initialize the dependency lock file, run:
│ terraform init
Terraform error if not properly initialized

This error is because Terraform either did not have the proper underlying provider defined or because the initialization using that provider was not done. The important first step once the provider has been defined is to run the initialization command.

Terraform init

The initialization step will produce output similar to the following.

Initializing the backend…
Initializing provider plugins…
– Finding latest version of hashicorp/aws…
– Installing hashicorp/aws v4.20.0…
– Installed hashicorp/aws v4.20.0 (signed by HashiCorp)

Terraform has created a lock file .terraform.lock.hcl to record the provider selections it made above. Include this file in your version control repository so that Terraform can guarantee to make the same selections by default when you run “terraform init” in the future.

Terraform has been successfully initialized!

You may now begin working with Terraform. Try running “terraform plan” to see any changes that are required for your infrastructure. All Terraform commands should now work.
If you ever set or change modules or backend configuration for Terraform, rerun this command to reinitialize your working directory. If you forget, other commands will detect it and remind you to do so if necessary.
Output from Terraform initialize

First Terraform scripts

A lot of tutorials on Terraform start with a few scripts with all the values hard coded. I have even seen a few where the AWS CLI credentials are hard coded. These examples do explain quite a bit about Terraform but most do not go back and correct the credentials to a proper secure state. I would rather start with a slightly more complicated solution that is secure from the beginning.

In this tutorial there is a named development.tf where variables for a single environment can be defined. The file will contain all setup for creating a development environment. By separating the values for each environment into a separate file it is possible to have a single infrastructure setup defined which can be parameterized with differing infrastructure attributes. This makes it trivial to have a test environment that is identical to production or perhaps to create multiple but slightly smaller development environments – one for each developer.

When you separate out various infrastructure values as variables they can be passed to Terraform one by one but what is more common is to pass an entire file full of variables.

terraform plan -var-file=development.tfvars

The output of this command will show what, if any, changes will be performed. If the standard output does not alway provide enough information but it is possible to add additional types of output. This is an example with a few additional values being displayed in the output.

Changes to Outputs:
_environment = “development”
awskey = “AKI YOURKEYHERE PFZ9”
awssecret = “tnd your secret would be here 26362383 DS3Wk9C”
region = “us-east-1”
You can apply this plan to save these new output values to the Terraform state, without changing any real
infrastructure.
──────────────────────────────────────────────────────────────────────────
Note: You didn’t use the -out option to save this plan, so Terraform can’t guarantee to take exactly these actions if
you run “terraform apply” now.
Output from Terraform plan command

It is important to note, that setting up environment variables to hold the AWS key and AWS secret is super for security but displaying it like above is a totally bad idea in real life. It was done this way simply to show off an example of how to display Terraform variables.

Below is the example code. This example doesn’t actually create any infrastructure but does show everything necessary for using the AWS key and secret information from the environment. Yet, in order for this to work it is necessary to have two environment variables.

TF_VAR_AWS_ACCESS_KEY_ID
TF_VAR_AWS_SECRET_ACCESS_KEY

The TF_VAR is the key to allow Terraform to know which environment variables should be passed through to the scripts.

The next blog post will use this as the basis to build actual infrastructure.

main.tf
provider “aws” {
region = var.region
access_key = var.AWS_ACCESS_KEY_ID
secret_key = var.AWS_SECRET_ACCESS_KEY
}
inputs.tf
variable “environment” {
type = string
description = “what env we are using”
default = “Development”
}
variable “region” {
type = string
description = “in which region we will do all of our work”
default = “eu-central-1”
}
variable “AWS_ACCESS_KEY_ID” {
type = string
description = “user access_key”
}
variable “AWS_SECRET_ACCESS_KEY” {
type = string
description = “user secret access key”
}
output.tf
output “region” {
value = var.region
}
output “_environment” {
value = var.environment
}
output “awskey” {
value = var.AWS_ACCESS_KEY_ID
}
output “awssecret” {
value = var.AWS_SECRET_ACCESS_KEY
}
development.tfvars
region = “us-east-1”
environment = “development”
Posted in Setup From Scratch | Comments Off on A simplifed Terraform and AWS tutorial

Alternative facts to alternative reality

Over the last few years the world has become a bit topsy turvy but it feels like acquiesce to the truth is leading us more and more into a world where people’s fantasy replace everyone else’s facts.

Definition of Fact

A think that is known or proven to be true.

Definition of Alternative

Different from the usual or conventional

When I was growing up we didn’t have alternative facts and had I come up with anything like that, it would have been given another definition by my parents. That definition would have been probably called a lie.

It doesn’t really matter what my parents would have thought of any creative word play as a child but what does seem to be more concerning is moving further and further away from facts. This is true of a lot of issues that are currently taking place in the United States. It is embarrassing that the American politicians cannot keep their jobs without “coloring” the facts to kiss up to their constituents.

However, is it worse that simply repeating some falsehoods during a single presidency has convinced a relatively large number of people that they are true.

With enough repetition even questionable information becomes familiar. This is a pretty amazing feat to convert adults beliefs but just imagine what you could do if you were starting with a more malleable person with less overall knowledge – such as a child.

Nation State alternative facts

We will get a chance to see exactly how this plays out as China appears to have made the decision that Hong Kong was never a colony of Britain. This is actually a pretty bold change to erase approximately one hundred and fifty years of colonial rule from 1842 until 1997. This small bit of historical revisionism will be changed in the high school textbooks. Actually, it is pretty much the perfect age to introduce this type of information. Old enough to take the information seriously but not old enough with enough experience to critically question it. It is curious if all facts will be erased from history or just the main facts. Chinese President Jiang admitted in the handover speech that Hong Kong had been a colony.

It is possible that the Chinese government believes that white washing history might make the local population more controllable. Perhaps the idea that Hong Kong had more freedoms under British rule than they enjoy under their own government might not sit well with the population. I suspect that the old politicians in China are terrified that there could be another Tienanmen square style incident. The popular uprising that occurred from 2019 to 2020 were perhaps a canary in the coalmine of worse things to come if not dealt with.

1984 by George Orwell

“Every record has been destroyed or falsified, every book rewritten, every picture has been repainted, every statue and street building has been renamed, every date has been altered. And the process is continuing day by day and minute by minute. History has stopped. Nothing exists except an endless present in which the Party is always right.”

Posted in Soapbox | Comments Off on Alternative facts to alternative reality

Stone age to cloud age

Back in the day when you needed a computer or a technical infrastructure you needed some money and you had to go and purchase actual computer equipment. With the wonders of the cloud technology it is possible to connect to one of the cloud vendors and allocate not only a virtual machine but all of the other networking pieces. From load balancers and fire wall rules to network address translation and actual internet access.

None of this is actually news, Amazon has been providing services since 2006. What is new, or relatively new, is the ability to declare how your IT environment should look and have it implemented on command. It is super cool for software development, you can create a test or development environment in the morning and shut it all down before going home.

Of course Amazon has their own tool for this – cloud formation. If you are planning on choosing AWS this might be the best choice. However, if the goal is to not be locked into one cloud vendor perhaps picking your own external tool is a good idea.

There are essentially two different ways to implement the infrastructure.

Declarative

The declarative approach only requires you define what infrastructure you wish to exist at the end. You can run a declarative solution multiple times. The first time the infastructure will be implemented, while the additional runs will verify what you need already exists. If there are no changes, then nothing new will be implemented.

Imperative

The other approach is a set of steps that when run will create their pieces of the infrastructure. These may need to be run in a specific order. Running these steps multiple times may create multiple sets of infrastructure.

My next blog will be about using Terraform

Posted in programming | Comments Off on Stone age to cloud age

Electronic system ESTA

National security is important, you don’t want to let sketchy people into your country. This is somewhat easy to determine for people applying for permanent visas. They have to provide a lot of information and the number of applicants are fairly small, well in comparison to the number of holiday visitors.

I imagine there is a process is a lot harder when the numbers skyrocket. I would think the process would be easier if all the information submitted was accurate. I guess the department of homeland security in the USA doesn’t feel the same way.

Most of the information you need to provide is fairly tame. Essentially the following.

  • who are you
  • where do you live
  • some personal details (passport #)
  • what do you do
  • where do you work

This information is entered and sometimes the character sets are the same as for the US, but in order to automate the process you would want computers to do all the work. There are at least 31 countries that have diacritics or special characters that are not representable by the Latin character set used by the US.

I know this because if you try and enter a German or French special character the US ESTA site points out that these are illegal names. You are then required to either misspell the name(s) so they are not rejected or the US needs to know all of the substitutions (ie ü = ue)

Either they like making things harder for themselves or perhaps they are not effectively checking out their tourist visitors.

Posted in programming | Comments Off on Electronic system ESTA

REST services – High tech easier than ever before

A few years ago I was doing some fooling around with creating my own RESTful services server.

Restful services in Java

Simple server example

Simple client example

Client and Server

360 Degree of restful server

360 Degree of Restful client

Granted these examples were written in Java and Java is a general-purpose, class-based, object-oriented programming language. Java programs can be a bit wordy. These examples were written 2017 and there were easier ways even back then but even since then more and more frameworks have been created to make life easier.

One such solution is using NodeJS and some of the supporting modules. NodeJS is a platform built on top of Chrome’s javascript runtime. NodeJS is both the runtime environment as well as the JavaScript libraries.

It is possible to create a service that you can connect to and transfer data to with only a few lines.

var http = require('http');
http.createServer(function (req, res) {
  res.writeHead(200, {'Content-Type': 'text/plain'});
  res.end('Hello World\n');
}).listen(3000, "127.0.0.1");
console.log('Server running at http://127.0.0.1:3000/');

This server is super simple. Ok, ok, it is not terribly functional. Perhaps I am getting ahead of myself. First lets install software on your machine.

Installing NodeJS on Linux Mint

Installing NodeJS on a Linux machine, just like most software Linux installations, tends to be just a few lines.

  • sudo apt-get install curl software-properties-common
  • curl -sL https://deb.nodesource.com/setup_14.x | sudo bash –
  • sudo apt-get install nodejs

I chose the long term version 14 instead of the latest release. What you choose would depend on what features you need if you are a bit more flexible (or perhaps less dependent on new features).

Your version can be verified with the following command.

node -v 
> v14.18.2

Beyond the javascript that your programs are developed in it is possible to download additional modules which can be used to encapsulate functionality into little package. This can be done in a few different ways but one of the most common is to use the npm, formerly called Node Package Manager, to download new packages. Installing a single package is done simply by doing an “npm install” followed by the package name.

$ npm install express
npm WARN saveError ENOENT: no such file or directory, open '/home/chris/working/nodejs/simple-server/package.json'
npm notice created a lockfile as package-lock.json. You should commit this file.
npm WARN enoent ENOENT: no such file or directory, open '/home/chris/working/nodejs/simple-server/package.json'
npm WARN simple-server No description
npm WARN simple-server No repository field.
npm WARN simple-server No README data
npm WARN simple-server No license field.

+ express@4.17.1
added 50 packages from 37 contributors and audited 50 packages in 1.892s
found 0 vulnerabilities

Simple Server

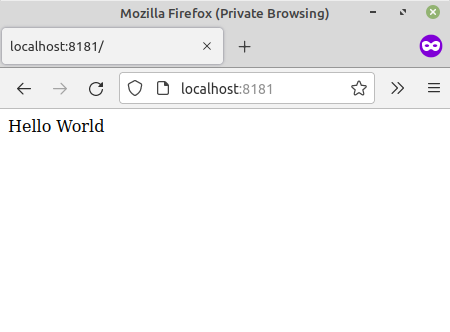
The smallest functional server written in NodeJS would one that listens to a specific endpoint for any of the common HTTP messages (GET,PUT,POST,DELETE). This example program will listen to port 8181 on the server.

var express = require('express');
var app = express();

app.get('/', function (req, res) {
   res.send('Hello World');
})

var server = app.listen(8081, function () {
   let port = server.address().port
   
   console.log(`Example app listening on port ${port} `)
})

This can be tested by running the server on your local machine attaching to it from your web browser.

Running the server is super easy as well, simply run the NodeJS (node) with the name of the script to run.

> node server.js 
Server running at http://127.0.0.1:3000/

Looking at the code you would expect to see your classic Hello World to show up when your visit this endpoint.

It is important to install any modules that you will use. There is quite a bit of existing functionality but the express module needs to be installed before it can be used.

Posted in programming | Comments Off on REST services – High tech easier than ever before

REST services – the Node JS simple server

NodeJS has actually encapsulated all of the hard work. A simple server that will wait for HTTP GET statements.

This simple server program has a lot of functionality. It is an example of three different endpoints that can be called. The /hello and /goodbye are pretty obvious and simply return a json message to the caller.

const express = require('express')
let app = express()
app.use(express.json());


app.get('/hello', (request, response) => {
  response.json({ "message": "hello world" });
});

app.get('/goodbye', (request, response) => {
  response.status(200).send("goodbye world");
});

app.get('/x/:id', (request, response) => {
  response.status(200).send(request.params.id );
});

const port = process.env.PORT || 3000;
app.listen(port, () => console.log(`listing on port ${port}` ));

The third endpoint is a bit more interesting as it allows you to pass in a parameter and easily as part of the URL. This particular example might be good for retrieving a value (ie book) by the code that is passed in. Because this is a service and not a web server it is only returning a value and not a webpage. But this is pretty useful as a backend server for your website.

Just as important as the ability to get information it is important to be able to pass in a complex structure.

app.post('/newitem', (request, response) => {

  let body = request.body;
  console.log("body of post")
  console.log(body);


  var keys = Object.keys(body);
  for (i in keys)
    console.log(i,keys[i],body[keys[i]]);

  response.status(200).send(request.params.id );
});

This example post endpoint allows us to pass in any structure and print it out to the console.

In my next post I will expand on this for other features that might be useful.

Posted in programming | Comments Off on REST services – the Node JS simple server