#include <bcm2835.h>
cat picube.c
#include <bcm2835.h>
#include <stdlib.h>
#include <stdio.h>
#include <string.h>
#include <unistd.h>
#include <signal.h>
#include "picube.h"
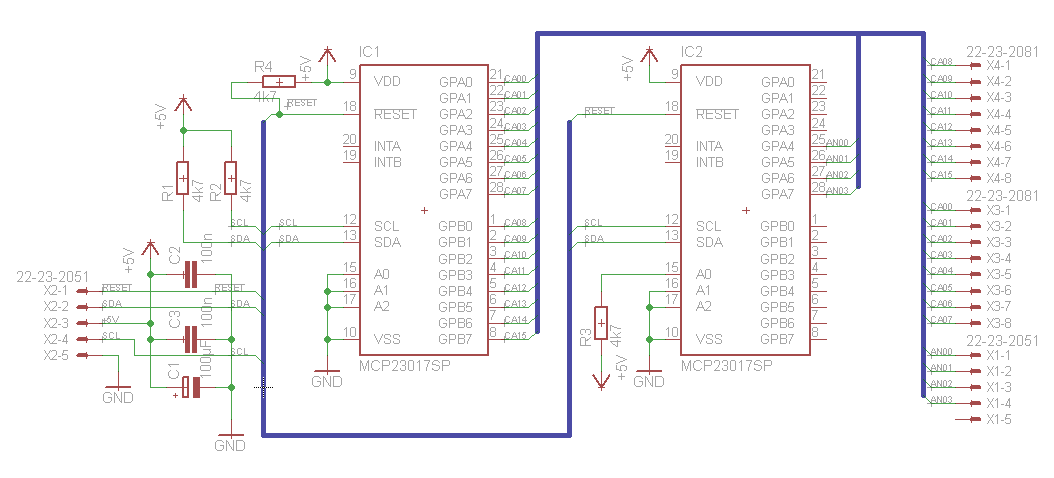
uint cathode = 0x20;
uint anode = 0x21;
uint IOCON = 0x0A;
uint IODIRA = 0x00;
uint IODIRB = 0x01;
uint OLATA = 0x14;
int mapping[4][4];
int zmapping[4];
int debug = 0;
int verbose = 0;
void sigint_handler()
{
printf("unexpected request, shutting down program\n");
final_bcm2835();
}
void init_mapping()
{
mapping[0][1] = 3;
mapping[0][0] = 7;
mapping[0][3] = 11;
mapping[0][2] = 15;
mapping[1][1] = 2;
mapping[1][0] = 6;
mapping[1][3] = 10;
mapping[1][2] = 14;
mapping[2][1] = 1;
mapping[2][0] = 5;
mapping[2][3] = 9;
mapping[2][2] = 13;
mapping[3][1] = 0;
mapping[3][0] = 4;
mapping[3][3] = 8;
mapping[3][2] = 12;
if (debug != 0)
{
int x,y;
for (x = 0; x < 4; x++)
{
for (y = 0; y < 4; y++)
printf("%02d ",mapping[x][y]);
printf("\n");
}
}
zmapping[0] = ZDIM0;
zmapping[1] = ZDIM1;
zmapping[2] = ZDIM2;
zmapping[3] = ZDIM3;
}
/*
** a bit of checking of return codes
*/
void check_retcode(int status)
{
switch (status)
{
case BCM2835_I2C_REASON_OK:
//printf("Code: Ok\n");
break;
case BCM2835_I2C_REASON_ERROR_NACK:
printf("Code: Received a NACK\n");
break;
case BCM2835_I2C_REASON_ERROR_CLKT:
printf("Code: Received Clock Stretch Timeout\n");
break;
case BCM2835_I2C_REASON_ERROR_DATA:
printf("Code: Not all data is sent / received\n");
break;
default:
printf("Code: unknown\n");
break;
}
}
// more for debugging than anything else.
void turn_on_entire_cube()
{
if (verbose != 0)
printf("turning on whole cube\n");
// turn on all cathodes
bcm2835_i2c_setSlaveAddress(cathode);
char cmd7[] = { OLATA, 0x00, 0x00};
check_retcode(bcm2835_i2c_write(cmd7,sizeof(cmd7)));
// turn on all layers (anodes)
char cmd9[] = { OLATA, 0xF0 };
bcm2835_i2c_setSlaveAddress(anode);
check_retcode(bcm2835_i2c_write(cmd9,sizeof(cmd9)));
sleep(1);
}
void turn_off_entire_cube()
{
if (debug != 0)
printf("turning off whole cube\n");
// turn off all layers
char cmd10[] = { OLATA, 0x00 };
bcm2835_i2c_setSlaveAddress(anode);
check_retcode(bcm2835_i2c_write(cmd10,sizeof(cmd10)));
}
void init_bcm2835()
{
if (!bcm2835_init())
{
printf("failed on init\n");
exit(1);
}
bcm2835_i2c_begin();
bcm2835_i2c_set_baudrate(400000);
}
void init_cathode()
{
// point library to cathode
bcm2835_i2c_setSlaveAddress(cathode);
// set bit 7 = 0 use consecutive mapping
// set bit 5 = 1 (address increment) to on
// all others dont care.
char cmd[] = { IOCON, 0x20 };
check_retcode(bcm2835_i2c_write(cmd,sizeof(cmd)));
// all pins output
char cmd2[] = { IODIRA, 0x00, 0x00 };
check_retcode(bcm2835_i2c_write(cmd2,sizeof(cmd2)));
#if 0
// all pins output
char cmd3[] = { IODIRB, 0x00 };
check_retcode(bcm2835_i2c_write(cmd3,sizeof(cmd3)));
#endif
}
void init_anode()
{
// point library to anode
bcm2835_i2c_setSlaveAddress(anode);
char cmd6[] = { IOCON, 0x20 };
check_retcode(bcm2835_i2c_write(cmd6,sizeof(cmd6)));
// all pins output
char cmd4[] = { IODIRA, 0x00, 0x00 };
check_retcode(bcm2835_i2c_write(cmd4,sizeof(cmd4)));
#if 0
// all pins output
char cmd5[] = { IODIRB, 0x00 };
check_retcode(bcm2835_i2c_write(cmd5,sizeof(cmd5)));
#endif
}
void init_microprocessor()
{
init_cathode();
init_anode();
}
void light_mask_z(int mask, int zmask)
{
int bitmask, invertmask, lowerx, upperx;
/*
** first deal with setting up the cathodes
*/
if (debug != 0 )
printf("mask %04x z%2d\n",mask,zmask);
// which bits should be on
bitmask = mask;
// then we invert bits
invertmask = ~bitmask & 0xffff;
// break it up for microprocessor
lowerx = invertmask & 0x00ff;
upperx = (invertmask & 0xff00) >> 8;
bcm2835_i2c_setSlaveAddress(cathode);
char cmd7[] = { OLATA, upperx, lowerx};
check_retcode(bcm2835_i2c_write(cmd7,sizeof(cmd7)));
/*
** now deal with setting up the anodes
*/
bcm2835_i2c_setSlaveAddress(anode);
// setup our layer
// set which layers should be on
bitmask = zmask;
char cmd8[] = { OLATA, bitmask & 0xff };
check_retcode(bcm2835_i2c_write(cmd8,sizeof(cmd8)));
}
// x is 0 - 3
// y is 0 - 3
// z is 0 - 3
void light_x_y_z(int X, int Y, int Z)
{
int bitmask, invertmask, lowerx, upperx;
int mappedpin;
/*
** first deal with setting up the cathodes
*/
mappedpin = mapping[X][Y];
if (debug != 0)
printf("x%2d(%d) y%2d z%2d\n",X,mappedpin,Y,Z);
// first set the bit
bitmask = ( 1 << mappedpin );
// then we invert bits
invertmask = ~bitmask & 0xffff;
// break it up for microprocessor
lowerx = invertmask & 0x00ff;
upperx = (invertmask & 0xff00) >> 8;
// printf("%2d %04x %04x %02x %02x\n",mappedpin,bitmask,invertmask,upperx,lowerx);
bcm2835_i2c_setSlaveAddress(cathode);
char cmd7[] = { OLATA, upperx, lowerx};
check_retcode(bcm2835_i2c_write(cmd7,sizeof(cmd7)));
/*
** now deal with setting up the anodes
*/
bcm2835_i2c_setSlaveAddress(anode);
// setup our layer
// set which layers should be on
bitmask = ( 0x10 << Z );
char cmd8[] = { OLATA, bitmask & 0xff };
check_retcode(bcm2835_i2c_write(cmd8,sizeof(cmd8)));
}
void rotate_layers()
{
if (verbose != 0)
printf("rotate layers\n");
// enable
int idx;
bcm2835_i2c_setSlaveAddress(anode);
for (idx = 0; idx < 4; idx++)
{
// actually write something out, will turn on
// one layer for any leds that are setup
char cmd8[] = { OLATA, 0x10 << idx };
if (debug != 0)
printf("cmd8 %x %x\n",idx, 0x10 << idx);
check_retcode(bcm2835_i2c_write(cmd8,sizeof(cmd8)));
sleep(2);
}
}
void circle_chase_base(int speed, double divisor)
{
int x,y;
int z = 1;
int iterations;
for (iterations = 0; iterations < 10; iterations++)
{
//printf("speed %d\n",speed);
for (z = 0; z < 4; z++)
{
for (x = 0; x < 4; x++)
{
light_x_y_z(x,0,z);
delay(speed);
}
for (y = 1; y < 4; y++)
{
light_x_y_z(3,y,z);
delay(speed);
}
for (x = 2; x > 0;x--)
{
light_x_y_z(x,3,z);
delay(speed);
}
for (y = 3; y > 0; y--)
{
light_x_y_z(0,y,z);
delay(speed);
}
}
speed = (int)(divisor * (double)speed);
}
}
void fast_circle_chase()
{
if (verbose != 0)
printf("fast circle chase\n");
circle_chase_base(15,1);
}
void circle_chase()
{
if (verbose != 0)
printf("normal circle chase\n");
circle_chase_base(200,0.65);
}
void one_after_another()
{
int count,x,y,z;
if (verbose != 0)
printf("one led after another\n");
for (count = 0; count < 1; count++)
{
for (z = 0; z < 4; z++)
for (y = 0; y < 4; y++)
for (x = 0; x < 4; x++)
{
light_x_y_z(x,y,z);
delay(30);
}
}
}
void top_bottom_rotate_side()
{
int counter;
if (verbose != 0)
printf("top bottom rotate\n");
for (counter = 0; counter < 5; counter++)
{
light_mask_z(YCOL0,ZDIM_TOPBOT); delay(250);
light_mask_z(XROW3,ZDIM_TOPBOT); delay(250);
light_mask_z(YCOL3,ZDIM_TOPBOT); delay(250);
light_mask_z(XROW0,ZDIM_TOPBOT); delay(250);
}
}
void side_corkscrew()
{
int counter;
if (verbose != 0)
printf("side corkscrew\n");
for (counter = 0; counter < 5; counter++)
{
// sides
light_mask_z(YCOL0,ZDIM0); delay(250);
light_mask_z(XROW3,ZDIM1); delay(250);
light_mask_z(YCOL3,ZDIM2); delay(250);
light_mask_z(XROW0,ZDIM3); delay(250);
// column CA7
light_mask_z(CA07,ZDIM_ALL); delay(250);
}
}
void rotate_takeoff()
{
if (verbose != 0)
printf("rotate take off\n");
light_x_y_z(3, 0, 0); // A
light_x_y_z(2, 1, 0);
light_x_y_z(1, 2, 0);
light_x_y_z(0, 3, 0);
sleep (200);
light_x_y_z(2, 0, 0); // B
light_x_y_z(2, 1, 0);
light_x_y_z(2, 2, 0);
light_x_y_z(2, 3, 0);
sleep (200);
light_x_y_z(1, 0, 0); // C
light_x_y_z(1, 1, 0);
light_x_y_z(1, 2, 0);
light_x_y_z(1, 3, 0);
sleep (200);
light_x_y_z(0, 1, 0); // D
light_x_y_z(1, 1, 0);
light_x_y_z(2, 1, 0);
light_x_y_z(3, 1, 0);
sleep (200);
light_x_y_z(0, 2, 0); // E
light_x_y_z(1, 2, 0);
light_x_y_z(2, 2, 0);
light_x_y_z(3, 2, 0);
sleep (200);
light_x_y_z(0, 0, 0); // F
light_x_y_z(1, 1, 0);
light_x_y_z(2, 2, 0);
light_x_y_z(3, 3, 0);
sleep (200);
light_x_y_z(1, 1, 0); // G
light_x_y_z(2, 1, 0);
light_x_y_z(1, 2, 0);
light_x_y_z(2, 2, 0);
sleep (200);
light_x_y_z(1, 1, 0); // G
light_x_y_z(2, 1, 0);
light_x_y_z(1, 2, 0);
light_x_y_z(2, 2, 0);
sleep (200);
// H
light_mask_z(OUTERRING,0); delay(250);
// I
light_mask_z(CORNERS,0); delay(250);
}
void fireworks()
{
int x, y;
if (verbose != 0)
printf("fireworks\n");
for (x = 1; x <= 2; x++)
for (y = 1; y <= 2; y++)
{
light_x_y_z(x, y, 0);
delay(100);
light_x_y_z(x, y, 0);
light_x_y_z(x, y, 1);
delay(100);
light_x_y_z(x, y, 0);
light_x_y_z(x, y, 1);
light_x_y_z(x, y, 2);
delay(100);
light_x_y_z(x, y, 0);
light_x_y_z(x, y, 1);
light_x_y_z(x, y, 2);
light_x_y_z(x, y, 3);
delay(100);
light_x_y_z(x, y, 3);
delay(25);
light_mask_z(INNERRING,ZDIM3);
delay(150);
light_mask_z(OUTERRING,ZDIM3);
delay(150);
// falling pieces
int zdim ;
for (zdim = 3; zdim >= 0; zdim--)
{
if (zdim % 2 == 1)
light_mask_z( CA05 | CA12 | CA09 ,zmapping[zdim]);
else
light_mask_z(CA07 | CA04 | CA08 | CA11 ,zmapping[zdim]);
delay(75 + zdim * 25);
}
turn_off_entire_cube();
}
}
void helicopter()
{
int smallwait[] = {110, 90, 65, 40 };
int zdim,idx;
if (verbose != 0)
printf("helicopter\n");
for (zdim = 0; zdim < 4; zdim++)
{
for (idx = 0; idx <= zdim+4; idx++)
{
light_mask_z(PATTERN_A,zmapping[zdim]); delay(smallwait[zdim]);
light_mask_z(PATTERN_B,zmapping[zdim]); delay(smallwait[zdim]);
light_mask_z(PATTERN_C,zmapping[zdim]); delay(smallwait[zdim]);
light_mask_z(PATTERN_F,zmapping[zdim]); delay(smallwait[zdim]);
light_mask_z(PATTERN_D,zmapping[zdim]); delay(smallwait[zdim]);
light_mask_z(PATTERN_E,zmapping[zdim]); delay(smallwait[zdim]);
}
}
for (zdim = 0; zdim < 4; zdim++)
{
light_mask_z(PATTERN_G,zmapping[zdim]); delay(1000/(zdim+1));
light_mask_z(PATTERN_H,zmapping[zdim]); delay(750/(zdim+1));
}
for (zdim = 3; zdim >= 0; zdim--)
{
light_mask_z(PATTERN_I,zmapping[zdim]); delay(300);
}
}
void x_rotating_plate()
{
int idx,rep,smallwait = 10;
if (verbose != 0)
printf("x rotating plate\n");
for (idx = 0; idx < 10; idx++)
{
for (rep = 0; rep < 5; rep++)
{
light_mask_z(XROW3,ZDIM3); delay(smallwait);
light_mask_z(XROW2,ZDIM2); delay(smallwait);
light_mask_z(XROW1,ZDIM1); delay(smallwait);
light_mask_z(XROW0,ZDIM0); delay(smallwait);
}
for (rep = 0; rep < 5; rep++)
{
light_mask_z(XROW3,ZDIM1); delay(smallwait);
light_mask_z(XROW2,ZDIM1); delay(smallwait);
light_mask_z(XROW1,ZDIM1); delay(smallwait);
light_mask_z(XROW0,ZDIM1); delay(smallwait);
}
for (rep = 0; rep < 5; rep++)
{
light_mask_z(XROW3,ZDIM2); delay(smallwait);
light_mask_z(XROW2,ZDIM2); delay(smallwait);
light_mask_z(XROW1,ZDIM2); delay(smallwait);
light_mask_z(XROW0,ZDIM2); delay(smallwait);
}
for (rep = 0; rep < 5; rep++)
{
light_mask_z(XROW0,ZDIM3); delay(smallwait);
light_mask_z(XROW1,ZDIM2); delay(smallwait);
light_mask_z(XROW2,ZDIM1); delay(smallwait);
light_mask_z(XROW3,ZDIM0); delay(smallwait);
}
for (rep = 0; rep < 5; rep++)
{
light_mask_z(XROW1,ZDIM3); delay(smallwait);
light_mask_z(XROW1,ZDIM2); delay(smallwait);
light_mask_z(XROW1,ZDIM1); delay(smallwait);
light_mask_z(XROW1,ZDIM0); delay(smallwait);
}
for (rep = 0; rep < 5; rep++)
{
light_mask_z(XROW2,ZDIM3); delay(smallwait);
light_mask_z(XROW2,ZDIM2); delay(smallwait);
light_mask_z(XROW2,ZDIM1); delay(smallwait);
light_mask_z(XROW2,ZDIM0); delay(smallwait);
}
turn_off_entire_cube();
}
}
void y_rotating_plate()
{
int idx,rep,smallwait = 10;
if (verbose != 0)
printf("y rotating plate\n");
for (idx = 0; idx < 10; idx++)
{
for (rep = 0; rep < 5; rep++)
{
light_mask_z(YCOL3,ZDIM3); delay(smallwait);
light_mask_z(YCOL2,ZDIM2); delay(smallwait);
light_mask_z(YCOL1,ZDIM1); delay(smallwait);
light_mask_z(YCOL0,ZDIM0); delay(smallwait);
}
for (rep = 0; rep < 5; rep++)
{
light_mask_z(YCOL3,ZDIM1); delay(smallwait);
light_mask_z(YCOL2,ZDIM1); delay(smallwait);
light_mask_z(YCOL1,ZDIM1); delay(smallwait);
light_mask_z(YCOL0,ZDIM1); delay(smallwait);
}
for (rep = 0; rep < 5; rep++)
{
light_mask_z(YCOL3,ZDIM2); delay(smallwait);
light_mask_z(YCOL2,ZDIM2); delay(smallwait);
light_mask_z(YCOL1,ZDIM2); delay(smallwait);
light_mask_z(YCOL0,ZDIM2); delay(smallwait);
}
for (rep = 0; rep < 5; rep++)
{
light_mask_z(YCOL0,ZDIM3); delay(smallwait);
light_mask_z(YCOL1,ZDIM2); delay(smallwait);
light_mask_z(YCOL2,ZDIM1); delay(smallwait);
light_mask_z(YCOL3,ZDIM0); delay(smallwait);
}
for (rep = 0; rep < 5; rep++)
{
light_mask_z(YCOL1,ZDIM3); delay(smallwait);
light_mask_z(YCOL1,ZDIM2); delay(smallwait);
light_mask_z(YCOL1,ZDIM1); delay(smallwait);
light_mask_z(YCOL1,ZDIM0); delay(smallwait);
}
for (rep = 0; rep < 5; rep++)
{
light_mask_z(YCOL2,ZDIM3); delay(smallwait);
light_mask_z(YCOL2,ZDIM2); delay(smallwait);
light_mask_z(YCOL2,ZDIM1); delay(smallwait);
light_mask_z(YCOL2,ZDIM0); delay(smallwait);
}
turn_off_entire_cube();
}
}
// rotates around the z axis
void z_rotating_plate()
{
int smallwait[] = {250, 200, 150, 100 };
int zdim,idx;
if (verbose != 0)
printf("z rotating plate\n");
for (idx = 0; idx < 4; idx++)
for (zdim = 0; zdim < 4; zdim++)
{
for (idx = 0; idx <= zdim; idx++)
{
light_mask_z(PATTERN_A,ZDIM_ALL); delay(smallwait[zdim]);
light_mask_z(PATTERN_B,ZDIM_ALL); delay(smallwait[zdim]);
light_mask_z(PATTERN_C,ZDIM_ALL); delay(smallwait[zdim]);
light_mask_z(PATTERN_F,ZDIM_ALL); delay(smallwait[zdim]);
light_mask_z(PATTERN_D,ZDIM_ALL); delay(smallwait[zdim]);
light_mask_z(PATTERN_E,ZDIM_ALL); delay(smallwait[zdim]);
}
}
}
void wire_frame()
{
int iter;
if (verbose != 0)
printf("wire frame\n");
for (iter = 0; iter < 200; iter++)
{
light_mask_z(OUTERRING,ZDIM0); delay(10);
light_mask_z(CORNERS,ZDIM1); delay(10);
light_mask_z(CORNERS,ZDIM2); delay(10);
light_mask_z(OUTERRING,ZDIM3); delay(10);
}
}
void shrinking_cube()
{
int iter,idx;
int redraw = 20;
if (verbose != 0)
printf("shrinking cube\n");
for (idx = 0; idx < 5; idx++)
{
// bigest cube
for (iter = 0; iter < redraw; iter++)
{
light_mask_z(XROW0 | XROW3 | YCOL0 | YCOL3, ZDIM0); delay(10);
light_mask_z(CA07 | CA11 | CA08 | CA04,ZDIM1); delay(10);
light_mask_z(CA07 | CA11 | CA08 | CA04,ZDIM2); delay(10);
light_mask_z(XROW0 | XROW3 | YCOL0 | YCOL3, ZDIM3); delay(10);
}
// next bigest cube
for (iter = 0; iter < redraw; iter++)
{
light_mask_z(CA05 | CA06 | CA07 | CA03 | CA01 | CA15 | CA14 | CA13, ZDIM0);
delay(10);
light_mask_z(CA03 | CA06 | CA01 | CA14, ZDIM1);
delay(10);
light_mask_z(CA05 | CA06 | CA07 | CA03 | CA01 | CA15 | CA14 | CA13, ZDIM2);
delay(10);
}
// next biggest
for (iter = 0; iter < redraw; iter++)
{
light_mask_z(CA07 | CA06 | CA03 | CA02, ZDIM0); delay(10);
light_mask_z(CA07 | CA06 | CA03 | CA02, ZDIM1); delay(10);
}
// smallest cube, actually just a point
for (iter = 0; iter < redraw; iter++)
{
light_mask_z(CA07, ZDIM0); delay(10);
}
delay(100);
// next biggest
for (iter = 0; iter < redraw; iter++)
{
light_mask_z(CA07 | CA06 | CA03 | CA02, ZDIM0); delay(10);
light_mask_z(CA07 | CA06 | CA03 | CA02, ZDIM1); delay(10);
}
// next bigest cube
for (iter = 0; iter < redraw; iter++)
{
light_mask_z(CA05 | CA06 | CA07 | CA03 | CA01 | CA15 | CA14 | CA13, ZDIM0);
delay(10);
light_mask_z(CA03 | CA06 | CA01 | CA14, ZDIM1);
delay(10);
light_mask_z(CA05 | CA06 | CA07 | CA03 | CA01 | CA15 | CA14 | CA13, ZDIM2);
delay(10);
}
// bigest cube
for (iter = 0; iter < redraw; iter++)
{
light_mask_z(XROW0 | XROW3 | YCOL0 | YCOL3, ZDIM0); delay(10);
light_mask_z(CA07 | CA11 | CA08 | CA04,ZDIM1); delay(10);
light_mask_z(CA07 | CA11 | CA08 | CA04,ZDIM2); delay(10);
light_mask_z(XROW0 | XROW3 | YCOL0 | YCOL3, ZDIM3); delay(10);
}
}
}
void floating_cube(int pause)
{
int iter;
int count = 2;
int cubes[] = { CA04 | CA00 | CA05 | CA01, // 0
CA05 | CA01 | CA06 | CA02, // 1
CA06 | CA02 | CA07 | CA03, // 2
CA02 | CA14 | CA03 | CA15, // 3
CA14 | CA10 | CA15 | CA11, // 4
CA13 | CA09 | CA14 | CA10, // 5
CA12 | CA08 | CA13 | CA09, // 6
CA00 | CA12 | CA01 | CA13, // 7
CA01 | CA13 | CA02 | CA14, // 8
};
int lvls[] = { ZDIM0 | ZDIM1, ZDIM1 | ZDIM2, ZDIM2 | ZDIM3 };
// next biggest
for (iter = 0; iter < count; iter++)
{
light_mask_z(cubes[0],lvls[0]); delay(pause);
light_mask_z(cubes[1],lvls[0]); delay(pause);
light_mask_z(cubes[1],lvls[1]); delay(pause);
light_mask_z(cubes[2],lvls[1]); delay(pause);
light_mask_z(cubes[8],lvls[1]); delay(pause);
light_mask_z(cubes[8],lvls[2]); delay(pause);
light_mask_z(cubes[3],lvls[2]); delay(pause);
light_mask_z(cubes[4],lvls[2]); delay(pause);
light_mask_z(cubes[5],lvls[1]); delay(pause);
light_mask_z(cubes[8],lvls[1]); delay(pause);
light_mask_z(cubes[6],lvls[0]); delay(pause);
light_mask_z(cubes[7],lvls[1]); delay(pause);
light_mask_z(cubes[8],lvls[0]); delay(pause);
light_mask_z(cubes[0],lvls[0]); delay(pause);
light_mask_z(cubes[8],lvls[1]); delay(pause);
light_mask_z(cubes[4],lvls[2]); delay(pause);
light_mask_z(cubes[3],lvls[2]); delay(pause);
light_mask_z(cubes[2],lvls[1]); delay(pause);
light_mask_z(cubes[1],lvls[1]); delay(pause);
light_mask_z(cubes[0],lvls[0]); delay(pause);
}
}
void final_bcm2835()
{
// make sure we turn off the leds
turn_off_entire_cube();
// shutdown in an orderly manner
bcm2835_i2c_end();
bcm2835_close();
}
int main(int argc, char **argv)
{
signal(SIGINT,sigint_handler);
init_mapping();
init_bcm2835();
init_microprocessor();
int loopcounter ;
for (loopcounter = 0; loopcounter < 10; loopcounter++)
{
//#if 0
loopcounter = 1;
turn_on_entire_cube();
sleep(2);
one_after_another();
sleep(1);
floating_cube(700);
sleep(1);
circle_chase();
sleep(1);
side_corkscrew();
sleep(1);
wire_frame();
top_bottom_rotate_side();
sleep(1);
fast_circle_chase();
sleep(1);
helicopter();
sleep(1);
fireworks();
sleep(1);
x_rotating_plate();
floating_cube(250);
y_rotating_plate();
shrinking_cube();
z_rotating_plate();
//printf("%d\n",loopcounter);
//#endif
shrinking_cube();
}
final_bcm2835();
return 0;
}
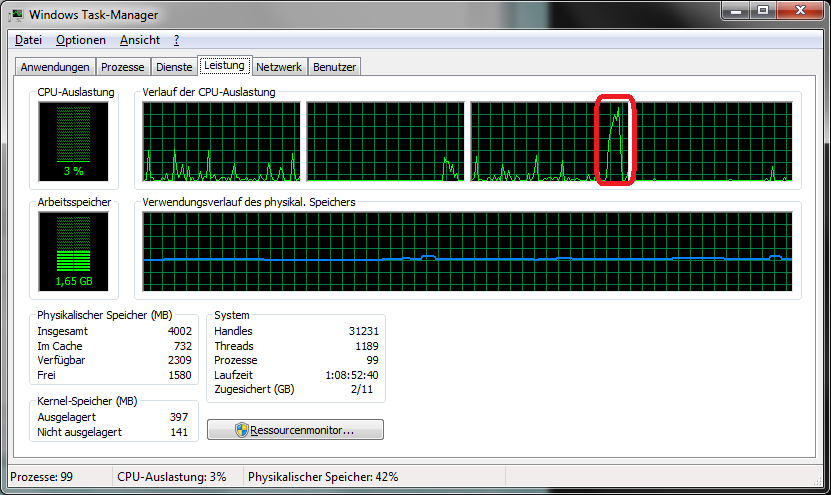
This script actually shouldn’t be necessary at all. Occasionally the program stops. I had not been able to trace it down to either my libraries or my code, but in the end decided to simply write a small watchdog to ensure that if the program stops, it is restarted.