Wireless Access point – EDIMAX

I don’t really feel the need to pimp out various hardware manufacturers but we just recently moved and our wireless network no longer reached all of the rooms.

The goal was to have seamless internet across the apartment without having two different wireless networks.  I did not have a large budget nor any preconceived notions which brand would be best. I tried going to a local electronics store and it would have been easy to walk away with at least 10 different brands of repeaters but from what I was seeing on the internet repeaters don’t discriminate which signals they repeat.  The internet also mentioned that most devices will be both a repeater and an access point, but as none of the pretty colored boxes mentioned this I abandoned my local store … for the internet.

I did some searching on Amazon to try and find a model or two and the trick was not finding a model that was an access point but to find one that did not have a lot of negative reviews.  I will be honest, I simply settled with the EDIMAX N300 access-point (EW-7438APn)

The actual device was quite tiny and the box also included a flat network cable.  It was perhaps 10 or 12 cm long but was too short for me.  The box also came with a tiny quick setup booklet that did describe what you needed to do if you are planning on using it just out of the box.  I felt changing the admin password away from the default would be a good idea.

The only reason that I am writing this up is because of just how painless this was.  I didn’t quite follow the instructions but to be honest they could have provided a link for something a bit beefier.

The setup

Once I plugged in the device, I connected it to the network and turned it on.

I was able to reach the device from my desktop computer.  Simply login using the provided admin and password and proceed to change a few of the values.

Of the values I only changed the SSID from the factory default to be the same value as my existing wireless network.  I changed the admin password and the wireless passphrase.  The only other change that I did was to setup the NTP server, select my timezone and  to enable the watchdog service check every 10 minutes.

I also did find a lot of very useful information about the topic in general on superuser.com

https://superuser.com/questions/122441/how-can-i-get-the-same-ssid-for-multiple-access-points

It was pointed out that setting the SSID to the same value for multiple access points will work but it depends on the client that connects to it.  If that client is not very clever, it will remain stuck to its original connection even when a better one exists.

There was one other small problem.  Despite setting up a connection to a time service the date and time of the device doesn’t get properly set.  This wasn’t a problem for me but would be a problem if you wanted to schedule the wireless turn off period.

I actually do have one more small possible issue.  I personally haven’t had any problems connecting to the network using our new edimax using either android (Samsung, Huawei or Kindle) but my wife has complained that she has problems connecting from her Apple tablet.

Posted in Review | Tagged | Comments Off on Wireless Access point – EDIMAX

AWS – Autoscaling

The cloud isn’t really the cloud without some additional functionality beyond the ability of creating a virtual machine to run your software.

The cloud isn’t just somebody else’s data center either.  A short definition might be.

A Cloud solution is one where the software solution or service available over the internet and the user has the ability to allocate or deallocate this on own their own without the involvement of IT.  Usually the cloud solution can expand or contract as required.

The National Institute of Standards and Technology has a slightly bigger, and much more elegant definition of what Cloud computing is – Cloud computing.

The part of this definition that I will be focusing on today is the ability of a cloud solution to expand or contact as necessary.  Amazon refers to this as elasticity and make it possible by allowing you to setup Autoscaling.

Autoscaling

The ability to launch or shutdown an EC2 instance by uising system statistics such as CPU load to determine if more or fewer instances are required.

If it were only that easy in practice.  In order to take advantage of autoscaling the programs need to be written in so that it is possible to have multiple programs or processes running independent of each other.  This doesn’t have to be a difficult task however, this may be an undertaking for monolithic legacy systems that have certain expectations.

Autoscaling

Setting up Autoscaling is a two part process.  The first part is to define a launch configuration (ie a template) describing how each machine should be configured.  This would probably to use one of your previously created AMI’s which would probably have your most if not all of your software configuration.

For brevity sake, I will skip a few of the screens for creating the launch creation.  The reason is that these steps should be familiar as they are the same as setting up a EC2 instance.

First we give our launch configuration a name.

Once everything has been selected, we do a quick verify that all tags, storage and such are correctly defined.

Auto Scaling Group

I cannot say if it is good “style” that AWS automatically launches in the creation of a scaling group once your launch configuration has been setup, however, it certainly is convenient.

First you give your auto scaling group a name, decide how many instances should be in the group, pick a network and decide which availability zones will be used when autoscaling.  The Amazon literature is pretty specific that for a high availability solution you would want your solutions to span availability zones when possible to counter the unlikely chance that a AZ goes down or becomes unreachable.

The scaling policies is the location where you get to decide on how big your solution should scale.  You do have the opportunity to keep your group size the same as previously defined.

Doing so would be the equivalent of a high availability solution.  This guarantees that AWS will launch a new instance if for any reason your existing instance(s) go down.

You also decide what metrics will be used when deciding to increase or decrease the number of instances you have.

You can see that I have decided that 45% cpu utilization should be the signal to create another EC2 instance.

You can also see that if the overall CPU utilization goes below 25% then AWS will decrease the number of EC2 instances that are running.

Once you have setup everything for your group (notification and tags not displayed here), then you get a chance to verify that you are satisfied with the setup.

The non-obvious step here is that once you actually create this group then AWS will proceed to create everything for you.  This is in one sense exactly what you want, however, it does make it impossible to create the group setup and then trigger once you are ready.


Posted in Setup From Scratch | Tagged , , | Comments Off on AWS – Autoscaling

AWS – Your own machine image

Until you start to actually use Amazon storage (elastic block store) you end up repeating yourself a lot getting your machine images into a working state.  This  might be something really simple such as adding your world class html code to your web site, or it might be adding other tools to your environment, it could even be the setup of your web server.

In anycase, the act of repeating the same actions time and time again does begin to it lose it charm after about 3 or 4 times.  It is possible to actually save the state of your machine images by creating your own custom image.  I don’t have an entire data  center full of machines so I will start with a single image – the web server.

In my opinion, this turns out that this is actually easier than a lot of other steps that i have had to perform.  The steps are pretty easy.

  • Pick an existing AMI as base
  • Start your image
  • Connect to your virtual machine and modify
  • Save image with new name

Pick an existing Amazon machine image

A lot of the steps for creating an Amazon machine image, AMI, is actually the same as when you first pick out an image when creating an EC2 instance.

Select an Amazon Machine Image


Choose which instance type of that image you wish

It depends on either which linux flavor you desire (or which windows version you require).


Start your image

This is exactly the same steps that you had to perform to start an EC2 image. This has been described in my article “AWS – Setting up EC2”.


Connect to your virtual machine and modify

Connecting to your machine is actually made quite painless by Amazon.  Simply select your machine and press the “connect” button on your dashboard.  This will bring up a big friendly dialog on how to connect to your machine.

Not only that, it is possible to copy and paste the command from the dialog to your shell.

If you are a windows user or are using some other operating system how to do your connection may vary.  Amazon does have instructions for windows users.

Once you are connected to the instance you can do any of the normal command line operations.  One such example is the stress command.  The stress command comes in handy when testing autoscaling.

I have been using the Amazon Linux image which uses yum for installing software.

sudo yum install stress

Once the stress utility is installed or even Apache web server then you are ready for creating your own image.  I didn’t install the entire LAMP for this test but Amazon does describe how to install the entire stack.


Save image with new name

Once you have an instance up and running that contains all of your personal changes the rest is trivial.  From the dashboard simply select Image from the “Actions” button and select create image (Actions -> Image -> Create image).

This will bring up a dialog box asking for both the image name and a description of the image.

Once you have filled this out press the create image button and after a few minutes the image will be saved under your list of Amazon images.


Posted in Setup From Scratch | Tagged , , | Comments Off on AWS – Your own machine image

AWS – Setting up EC2

Elastic compute cloud

A EC2 – an elastic compute cloud – is just a simple virtual machine.  Amazon does have a lot of really interesting ways of using virtual machines to solve problems.  The first step is to create an EC2 instance.  The steps to do this are as follows.

  • Choose an AMI
  • Choose an instance type
  • Configure instance
  • Add storage
  • Add tags
  • Configure Security group
  • Review
  • Generate key pair

Choose an AMI

Amazon give the acronym AMI to represent all of the machine images that you can choose.  Of course Amazon has their own Linux distribution but they also have a lot of other popular distributions available as well.

  • Redhat
  • SUSE
  • Ubuntu
  • Windows 2016 server

You can select whichever distribution you feel the most comfortable with.


Choose an instance type

The next step is to select the resources that should be made available to the machine.  The resources is all the same as for a physical computer.  This is the number of cpu’s, or virtual cpu’s, the memory and disk space.  I have chosen a small machine for testing.


Configure instance

The next step is to select your vpc and which subnet (assuming more than one exists).  Assuming you correctly did all of your steps correctly in creating it your virtual machine will get a public IP.


Add storage

Your EC2 will already have a drive assigned to it.  This is also were you could add additional volumes.  I haven’t actually needed any permanent storage for my tests so I left the default for this, however, in the future I will write up an example adding additional storage.


Add tags

This is a totally optional step.  You can create a number of tags that will be displayed with your machine.  I believe that these tags will also be on your billing statement.


Configure Security group

At this point it is either possible to create a new security group or select the one that was created while creating your VPC.


Review

With these few steps done Amazon gives you a chance to review all of your settings before actually committing to this EC2 instance.

Generate key pair

Oddly enough I would have thought that this step would have been before the review.  The only way to connect to your machine is with a public / private key pair.

This will be the only opportunity to download the key pair so you should save it in a good location.  While creating other EC2 instances it is possible to either create another new pair or use an existing key pair.

At this point when you press the “Launch Instances” button the EC2 instance is created.

Pressing the instances button will bring up the dashboard.


Dashboard

The dashboard will show all of the running, stopped or terminated instances.  The terminated instances will be displayed for a short period of time and then eventually will be removed.

Summary

Once your instance shows up on the dashboard as running you can then connect to it.  Simply ssh to your virtual machine using your private key.  In this example the machine name is rather a mouthful.

ec2-13-59-244-104-us-east-2.compute.amazonaws.com

However, Amazon does make it easy to connect to your machine, well, if you happen to be using linux or unix.  Simply select your machine and choose “connect” from the actions button at the top of the screen.  This will bring up a dialog showing the actual command that you need to use to connect to the machine.

ssh -i  "apacheAMI.pem" root@ec2-13-59-244-104-us-east-2.compute.amazonaws.com

If you are not actually using some flavor of unix you will need to do a few other small changes in order to connect to your machine, but Amazon is good enough to have a web page that documents this process.

Posted in Setup From Scratch | Tagged , , | Comments Off on AWS – Setting up EC2

AWS – Setting up a VPC

I would rather talk about the actual compute engine (EC2) but that oddly enough you need a network before you can really create one.  Rather than talking about the default VPC I will discuss about the networking a bit right now.

Amazon Web Services VPC

A virtual private cloud (VPC) is essentially all of the networking infrastructure you would need in a virtual environment.  When creating a network at home you really don’t need very much.

  • Internet gateway
  • CIDR block

In a home network this usually boils down to a router that is connected to the internet.  The CIDR block is usually one of the non-routable networks.  My home network is 192.168.178.0/24.

The process when creating a VPC on Amazon is pretty much the same.

  • Create a VPC for a given CIDR block for entire network
  • Create one or more subnets for the network
  • Create a an internet gateway
  • Attach gateway to my VPC
  • Add route to from VPC to rest of internet
  • Setup any special firewall rules
  • Create a security group

Before I cover all of the steps that are necessary for completely setting up a VPC it is important to note that Amazon makes it really easy to set all of this up with much less effort.  It is possible to create a default VPC which will create everything that is necessary.

Create a VPC for a given CIDR block for entire network

All of the setup will be associated with samplevpc and the CIDR block 192.168.  It is also possible to create a IPv6 network as well, but as IPv6 addresses are pretty horrible to look at I will leave that off.  It is enough to know that Amazon does also provide support for that new(ish) standard.

I question why Amazon didn’t add one more check box on the VPC creation dialog box that asked if the VPC should support DNS hostnames.  You need this if you want to connect to your EC2 machine (setup later) either with ssh, http or really any protocol. Once you create your VPC you need to edit it to set this option.

Create one or more subnets for the network

This step, can actually be performed as many times as necessary depending on how many different subnets you want.  This might be useful if you split up your setup into different logical networks.  This might be because you put different applications into different subnets or perhaps to create firewalls to create different layers of permissions.

My same criticism of the VPC creation dialog extends to the creation of subnets.  It should have been possible to add a checkbox to the subnet dialog for the assignment of IPv4 addresses.

Create a an internet gateway

Creating the internet gateway is really not much of a process.  The only real control you have is the user friendly name for the gateway.

However, once the gateway is created it is not automatically associated with anything.

Attach gateway to my VPC

Just select the VPC from the list that should be associated with this gateway.  The process isn’t difficult and as it turns out, you can only associate one internet gateway with a network.

Add route to from VPC to rest of internet

When first looking at the routing everything looks just fine.

The thing that might not be apparent from looking at this figure is that any virtual machine can talk to other virtual machines on its network segment.  However, if the destination is to a machine outside of the local network then there is no route to pass that information out.

This small change allows us to both communicate with any virtual machines but also that they can communicate with us as well.

Setup any special firewall rules / ACL

It is possible to set up the access control list which is essentially creating your own firewall.  You determine which protocols can come in on which ports from which locations.

Input ACL


Output ACL


Create a security group

Actually the AWS security group is really not that much different from the access control list setup.

It is possible to user either the ACL or the security group for dealing with internal traffic and the other as the firewall to the actual internet.

Summary

All of this setup is required to create your own little network and attach it to the internet.  It does seem like a lot of setup but it only takes a few minutes and it does give you the same control as setting up a router at home.

I will be using this network setup with a virtual computer (EC2 ) in my next article.

Posted in Setup From Scratch | Tagged , , | Comments Off on AWS – Setting up a VPC

AWS – Cloud computing with Amazon

I recently started looking at cloud computing by looking at OpenStack.  OpenStack allows you to take a lot of common hardware and create your own cloud server on your own hardware.  Once the software is setup it is easy for the user to setup his or her own little server or network.

The only problem is that I don’t have a bunch of intel I7 multi core servers full with ram sitting around for creating such a cloud.  I did have a five year old AMD 8 core server but unfortunately creating your own cloud server is very resource intensive.  Much more intensive than my poor old computer could handle.

I actually didn’t finish the tutorials because working with OpenStack was too slow with the equipment that I had available to me – yet it wasn’t their fault.  I wanted to do more with cloud computing so I decided to give Amazon Web Services a chance.  My thought was that Amazon has some amazing infrastructure around the world and so I should be able to use theirs without waiting an excessive amount of time.

Wikapedia says this about Cloud computing

Cloud computing is an information technology (IT) paradigm, a model for enabling ubiquitous access to shared pools of configurable resources (such as computer networks, servers, storage, applications and services), which can be rapidly provisioned with minimal management effort, often over the Internet.

Cloud computing

Cloud computing is a pretty big topic.  Cloud computing is almost like virtual computing except that clould computing takes a disparate resources and makes them available.  However, in addition to making them available it is done so by letting the user allocate what he or she wants rather than wait for IT to create the VM.

Yet that isn’t really cloud computing.  When a user can allocate their own “servers” from a pool of resources that is really only bordering on the edge of cloud computing as that is simply virtual computing – ie. take a server and run it on virtual hardware.

Clould computing is one step further.  It allows you to configure the setup so that multiple servers can be automatically brought on line up as the demand requires it but they can also be automatically shutdown when they are no longer needed. Additionally cloud computing can be configured to be smart enough to replace servers that are no longer responding and or even virtualize away the networking away from the physical hardware.

To create your own cloud based VM you need a network (VPC) and the computer (EC2).  In the next series articles I will create the network and then a virtual machines to run on it.  I will also discuss about setting up auto scaling and adding a load balancer as well as touching on some of the interesting services that Amazon web services offers.

Posted in Setup From Scratch | Tagged , , | Comments Off on AWS – Cloud computing with Amazon

Customer advocacy or just smarting off without consequences

Don’t ever dare Murphy’s law.

I guess I did put the hit out on our washing machine by bragging how old it was.  Within weeks, it broke. We have children and cannot be without a wash machine for more than a few days.  The internet came to the rescue.

The internet is a great place, you can research and find the best deals all without changing out of your pajamas.  We went to the web site of a large home merchandise and it really didn’t take too long to find a replacement.  It was ordered and we were informed it could be delivered by the end of the week – awesome.

The company called and made an appointment for when we they could install it but it was when they showed up that things started to fall apart.  They delivered the washing machine but we needed a safety plate for the top of the machine as it was to be built under the counter in the kitchen.

No plate, no install.  This was a problem as we paid for the installation but also because we generate a lot of dirty laundry.  The delivery guys were professionals and they knew what could be safely done and what not.

It was looking like we would have a wash machine sitting in the middle of the room for days until we could sort this out.  I guess that created an extra load of stress as I could feel it over the phone line as I was explaining everything to her.  A short time later, my wife called back and reminded me that the old machine was the same brand and perhaps we could reuse that plate.

We were lucky.  I spoke with the installation guys who were game enough but while we were fooling around trying to install this my spouse called the support line. You really wouldn’t believe what happened – I didn’t.

The squeeky wheel gets the grease … kinda

Due to an amazing set of events I thought I would try and enlighten the suits in the C-suite with just how much glory they were covered in.  Who would be the best person to contact?  Store manager – nah, doesn’t really get the word out.  The CEO of the store chain – close, but I was upset and my wife couldn’t hardly string together words.  I finally found the correct person – I wrote to the CEO of the holding company for both that chain and another similarly large one.  I am not certain but I think those two chains is the majority of home items and electronics in all of Germany.

It was nice to receive a response from their public relations group but I don’t really believe that they are all that worried by a single dissatisfied customer.  The 30 Euros gift certificate that they sent was a nice gesture, small but nice.  It represented less than 4% of the total purchase, I am not sure that they were all that concerned.

The only silver lining was that I can work from home so in this particular case I didn’t have to worry about taking off more time from work to wait for a delivery of a wash machine.

My Letter

April 2017

Dear <big boss man>

I have just purchased a washing machine from Big Box Store and I am having a hard time trying to contain my dissatisfaction.

I have gone to your webpage which seemed to be well written and offered quite a bit of assistance when trying to compare the various models against each other. This machine was replacing one that was already built into our kitchen and so we selected that we wanted the old machine to be taken away and the new machine was to be installed by your firm or your designated workers.

Your web site did not bother to mention that additional hardware would be necessary to safely install this machine. We found this out when the machine was delivered to our house by which time it was too late to correct. The Hermes people who did the delivery were totally knowledgable, polite and helpful in this problem that was not of their making.

In my opinion this situation would have been bad luck if it were not for two factors. The lesser is that Big Box Store is a large multinational corporation earning hundreds of millions in yearly profits selling these types of devices for years – you should have known better. I was almost willing to consider this an oversight until my wife called up to discuss this with your support personnel.

How she was handled by your staff, Rude Customer Service Dude, is probably textbook reading. First discuss the problem and then when it starts to get hard to explain why you cannot fulfill your end of the purchase decide you won’t speak with the client. It turns out that my name was on the purchase order so your man decided he could stop speaking with my wife in the middle of the conversation. It is a rather curious type of customer service that your firm practices. Perhaps also some additional guidance would be helpful for your support staff who are currently only tarnishing your companies image.

You cannot imagine her surprise to find out your employee Rude Customer Service Dude not even willing to discuss this problem with her. The reason she was given is that she did not purchase the machine.

I guess this is part of new policy of Big Box Store is pursuing to convince people not to purchase things from their web site. This does make a small amount of sense if you are trying to limit your sales opportunities strictly to stores that must both display the merchandise and pay sales people to attempt to sell this merchandise.

It would be better to simply get your software developers to add an additional optional item that needs to be purchased when the user decides on “unterbaufähig” devices like washers as well as dealing with any similar situations.

I will most likely be telling this story for years. I would like to know if this was a simple oversight that is being corrected and how? Failing any feedback would force me to consider that either this is proof that your company cannot even write a simple web site or perhaps that Big Box Store is a good example of an old bricks and mortar company that will be replaced with by some cyber company in the coming years.

Sincerely,

Max Mustermann

Their response

Dear Mr. Mustermann, 

We are very sorry to hear about your unsatisfactory purchasing experience.

First of all we want to ensure you that this does not correspond to our corporate philosophy.

We can understand your anger regarding the missing information about the necessary installation accessory. Of course we informed our specific department to find any solution for a better understanding regarding this products. Furthermore we want to apologize for the unfriendly and inappropriate behavior of the Hotline employee. We also will clarify this situation to prevent such customer experiences for the future.

As compensation for this inconveniences we will send you a gift card worth 30 €, which you can use in our Onlineshop as well as in our stores.

We’re looking forward to welcome you again and hope we can convince you of the contrary to your bad experience.

Yours sincerely

<big boss man>

The real response

I have had more than six months to cool down from this experience but I am feeling my blood pressure again going up.  It is not simply because I went back to the infamous website and this particular oversight does not seem to be fixed – but that is part of it.

No the real reason is that while speaking with my wife she reminded me of a very similar story.  The problem was not a washing machine but a dishwasher but it was the exact same issue.  This time it was the other large home and electronics store that made the mistake.

If that weren’t amazing enough, they made the mistake with my wife (girlfriend at the time) and I was at work about 10 years back.

I kinda wonder just how often this has happened in the last decade …

Posted in Soapbox | Tagged | Comments Off on Customer advocacy or just smarting off without consequences

using docker

Although docker does have quite a few command options a small subset is all you need for general usage.  The number of individual tasks you need is limited the following.

  • download an image
  • run the image
  • remove the image
  • build a new image
  • monitoring images

Docker has a store that contains both their official containers as well as community supplied containers.  The official containers contain a lot of very large well known software programs.

  • Microsoft SQL server
  • Oracle database
  • Oracle Java 8
  • WordPress
  • Tomcat
  • Owncloud
  • gcc

The store is important as it contains a list of the containers that are available and what their name is, however, there is one more really important thing in the store.  Each of the containers that are listed have the name of the container to be downloaded but more importantly they contain helpful notes.

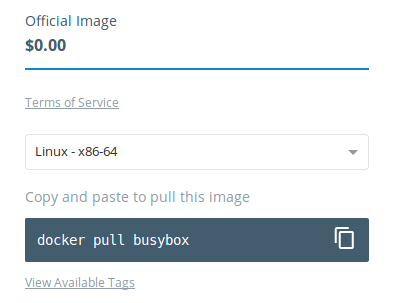
Each container shows the command necessary for pulling down the image to your machine.  This is important but other details are listed that might be helpful when actually running the container.

This might be how to run the image, how to extend the existing container to make a new container, descriptions or perhaps the license for this software.

The good news is that all of the entries in the store show the command for retrieving that specific image.

The only inconvenience is that you need elevated privileges to run the docker commands.  This is actually as easy as using sudo.  Easy but still somewhat inconvenient.  Yet this too can be overcome with the tiniest of changes. Quite some time back Docker was changed to have the group docker for the docker daemon.  The daemon has ownership of the read/writable for that socket.

Thus the solution is to simply add your user to the docker group.  This is either done when creating your user or if your user already exists simply use the usermod command to add the user to the group.  This is explained in a really good post at the howtogeek website.

General usage

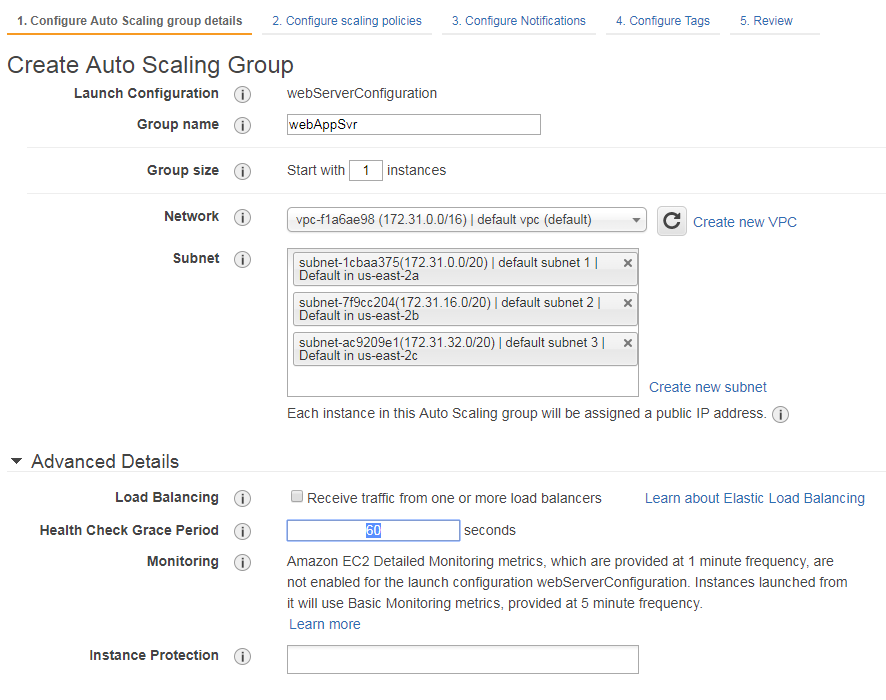
One of the challenges for production environments as well development environments is to ensure that the exact identical setup exists.  The neat thing about docker is that you can pull down all the specific tools by version. You simply provide a host and pull down your containers. If for any reason you need a different version or multiple versions you can run them on the same machine as a container regardless of if this would be possible as a simple install.

Docker has a lot of different command options which can be used to monitor the containers but the most important one is actually running containers. Simply use the run parameter and then the container is run as a normal process.  This actually isn’t very different from some installed program running but the containerization makes this a bit different.

Containers are kept segregated from the host and from each other which means that they cannot actually do very much unless you allow the container to interact with system.  Docker was not only done really well but also very granular.  It is possible to allow the container to access a file, directory or even a port.

The most simple container does not need any input to the outside world, but those types of jobs would be pretty rare.  An example of this is the hello-world container provided by docker.

This example doesn’t save anything to the file system nor read any input from a port.

A more common use case would be to either access a directory or to map a configuration file from the host into a container.  This is done by passing in the mapping or mappings by using the -v argument.

-v <host source directory>:<container dest directory>

This can be done with either a directory or just a simple file – in either case the syntax is the same.  The same format is used for mapping a port from the host machine to the container.

-p <host port>:<container port>

It is possible to also pass through environment variables to the container as well.

-e <host variable>:<container variable>

Interactive container

In my opinion one of the neatest uses of containers is to run a graphical program like Eclipse. However as the container itself is not persistent Eclipse in a container is not very useful unless it is exposed to the host.

In this case a directory from the host is mapped to the container workspace directory. Simply by mapping the local directory to the container makes Eclipse behave exactly as if it was a normal install on the host machine.

Below is a small script to run the container and map a few directories and an environment variable into the container.  This script below is fairly similar to the one in the docker store for this container.

cd ~cdock
mkdir `pwd`/.eclipse-docker >/dev/null 2>&1

myip=`hostname -I | awk -e '{ print ($1)}'`
xhost + $myip

export DISPLAY=$ip:0

CMD="docker run -d --rm -e DISPLAY=$DISPLAY \
-v /tmp/.X11-unix:/tmp/.X11-unix \
-v `pwd`/.eclipse-docker:/home/developer \
-v /home/cdock/workspace:/home/developer/workspace \
fgrehm/eclipse:v4.4.1 "

$CMD 

It is not alwtays obvious what host resources need to be mapped into a container.  This particular container is just another example why it is useful to look at the notes that are in the store.

The eclipse container is a great example of an user interactive task but not all containers have a gui.  It is possible to run a program interactively but that program could also be bash.

docker run -i -t fgrehm/eclipse:v4.4.1 /bin/bash

Monitoring Docker

There are two different tasks to monitor.  The first is what containers are downloaded to your computer.

This will however only show the images not which containers are actually running.  The “ps” argument, much like the Linux ps command, is used to see which containers are actually running.

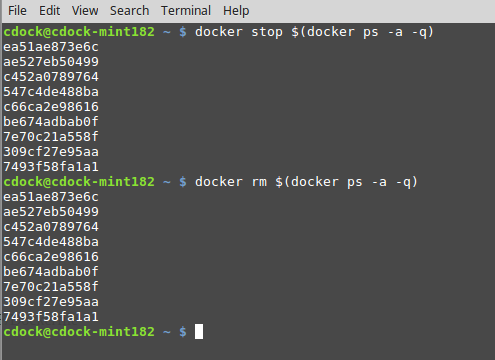
The tasks that are running are probably a daemon or other process that runs in the background.  Stopping the process is actually as simple as starting it.  Simply ask docker to stop the process for the container id.

docker stop ae527eb50499

After stopping a container it will no longer show up in the list of running tasks.  However, if you ask right, you can see a list of the containers that have already been stopped.

It is possible to clean up this list by removing the stopped processes.

If you were limited to pre-created docker containers from the docker store this would still be a very powerful tool, but it is actually possible to either create your own containers or even extend existing containers.

I will talk about that in my next article on docker.

Posted in programming | Tagged | Comments Off on using docker

lightweight virtualization – docker

Virtual machines can allow you better utilize the resources or make it possible to run multiple incompatible versions of the same software or even different operating systems. Virtual machines sound like the perfect solution, instead of a server that runs only database server or web server you can have a single server that runs both of them and more.

There is actually one little downside to all of these virtual machines.  Each one is actually running an entire operating system.  This takes up more ram and more disk space than is strictly necessary.  A single windows 7 installation could take 10gb disk space but four could take 40gb or more.

It doesn’t take a mathematics genius to see this downside to just using virtual machines fairly clearly – the solution was to bring down virtualization to the application level.

Containers

This “application virtualization” was created as containers.  These containers contain not only the application but it also bundles other required resources.  These containers then are separated from each other in the operating system through the implementation of both namespaces and cgroup‘s inside the Linux kernel.

The difference between container technology and virtual machines is that the containers use the host operating system for the application while the virtual machine has its own operating system.  Thus the resources used by a container should always be less than any virtual machine.

Docker

Linux did create its own container technology (LXC/LXD) but for most people a more recognizable container solution is Docker. Docker is a friendly command line container program which is more performent than using a VM but more importantly it also has a repository of containers that have been already been built. It is quite possible that the program that you want or need is already in a docker container.  There are two different sets of precreated containers, official docker containers and community containers.

Docker may have been originally developed on Linux but this awesome container technology can be run on either Linux or Windows – well, Windows 10 and Windows server 2016.

Docker is basically just a command line program and because of that you can use all of the same commands on Windows as you do on Linux.  Actually, if you really are a Windows aficionado you will be happy to learn that you can also use powershell command line as well with Docker.

The installation process is really strait forward, rather than duplicate the instructions here are a few links for installing docker on Linux.

How to install Docker and run Docker containers on Linux Mint 18/18.1

How to install Docker Machine on Linux Mint 18 and 18.1

I plan on doing a few more blog posts on actually using Docker, but for right now I will put up a link for a history of Linux containers.  The solution of a program utilizing the host operating system but yet being (somewhat) segregated from all the other processes is not new.  The solution for segregating a an application used to be a chroot.

History

https://dzone.com/articles/evolution-of-linux-containers-future

Posted in programming | Tagged , | Comments Off on lightweight virtualization – docker

Support your favorite …

The open source community is an amazing place.  No matter what software you want there is an extremely good chance that it exists. You can use Gimp for manipulating graphic images, LibreOffice or Apache Office for word processing, piviti for editing videos or possibly Blender for creating videos.

Today I was a bit saddened when I read that Linux Journal will be shuttering its doors.  This is a magazine that has been around for 20 years and has sharing a lot of technical know how.  Yet size is no refuge.

There is so much software that you don’t need to spend a dime on anything but your hardware.  This is pretty cool but most of the world needs money for things.  The big popular projects do seem to manage to get funding but it is important to support those projects with time and assistance but also with money.

Most of the open source projects are not making their developers rich – they are doing so most likely out of a labor of love.

In my opinion, to keep the Linux ecosystem alive and thriving we need to open up our wallets and donate to the cause or project that you care about.  This might be a donation to our favorite distribution or it might be more general – giving some money to the Electronic Frontier Foundation.

There are other Linux magazines still left but I can imagine that there is a lot of pressure.  It was not very long ago Linux Voice merged with Linux Magazine

Showing support with any Linux group, event or organization helps keep the ecosystem alive.

Posted in Soapbox | Tagged , | Comments Off on Support your favorite …